WISEflow
Deadlines for submission of the assignment:
-
Home assignment: Let Johanna know when the assignment is due. Exam office will create a Flow for you about two weeks before the deadline. You can then upload your assignment directly to the Flow.
-
You can start creating the assignment in WISEflow before the Flow is created. Once the Flow is created, you can then add your assignment to the Flow.
-
Assignment period: 2 weeks, starting at 09:00 and ending at 14:00 on the due date.
E.g, due date on 2026-10-14, then the assignment period is from 2026-09-30 09:00 to 2026-10-14 14:00.
-
-
Skoleeksamen: final exam
WISEflow Introduction
Useful resources:
-
For students
- Preparations for examinations in WISEflow
-
FLOWmulti: Try out different interactive question types and if the lockdown browser is correctly installed (requires that the lockdown browser is installed before starting the demo flow). Starting the demo will close all running programs on the computer.
Announcement
WISEflow for school exam (Digital Skriftlig Skoleeksamen)
Hi, I’d like to share some useful resources about WISEflow to help you prepare for the school exam.- Overall guidance: Read Digital skoleeksamen section to be familiar with WISEflow.
- You can do demo tests to get used to the system before the exam. We will use FLOWmulti on the exam.
- The final exam consists of Multiple Choice and Math Essay question types. Math Essay questions has a built-in equation editor and do not support spellcheck. See HERE for a preview of how the questions look like.
Please let me know if you have any questions.
-
Nord Guidelines: For sensorer og ansatte (for examiners and staff)
-
Denne siden vil holdes oppdatert med info om eksamen, sensurering og WISEflow.
-
-
Tutorials in English in form of a web course. Interactive.
Log in portal: https://europe.wiseflow.net/author/
Begrunnelse skal være i WISEflow (IKKE Fagpersonweb lengre)
Workflow overview:
-
Flows are generated by the exam office.
Eksamenskontoret oppretter en Flow. Når den er opprettet, legger Johanna meg til som forfatter, slik at jeg kan laste opp oppgaven direkte i Flowen.
Flowen blir vanligvis opprettet cirka to uker før innleveringsfristen.
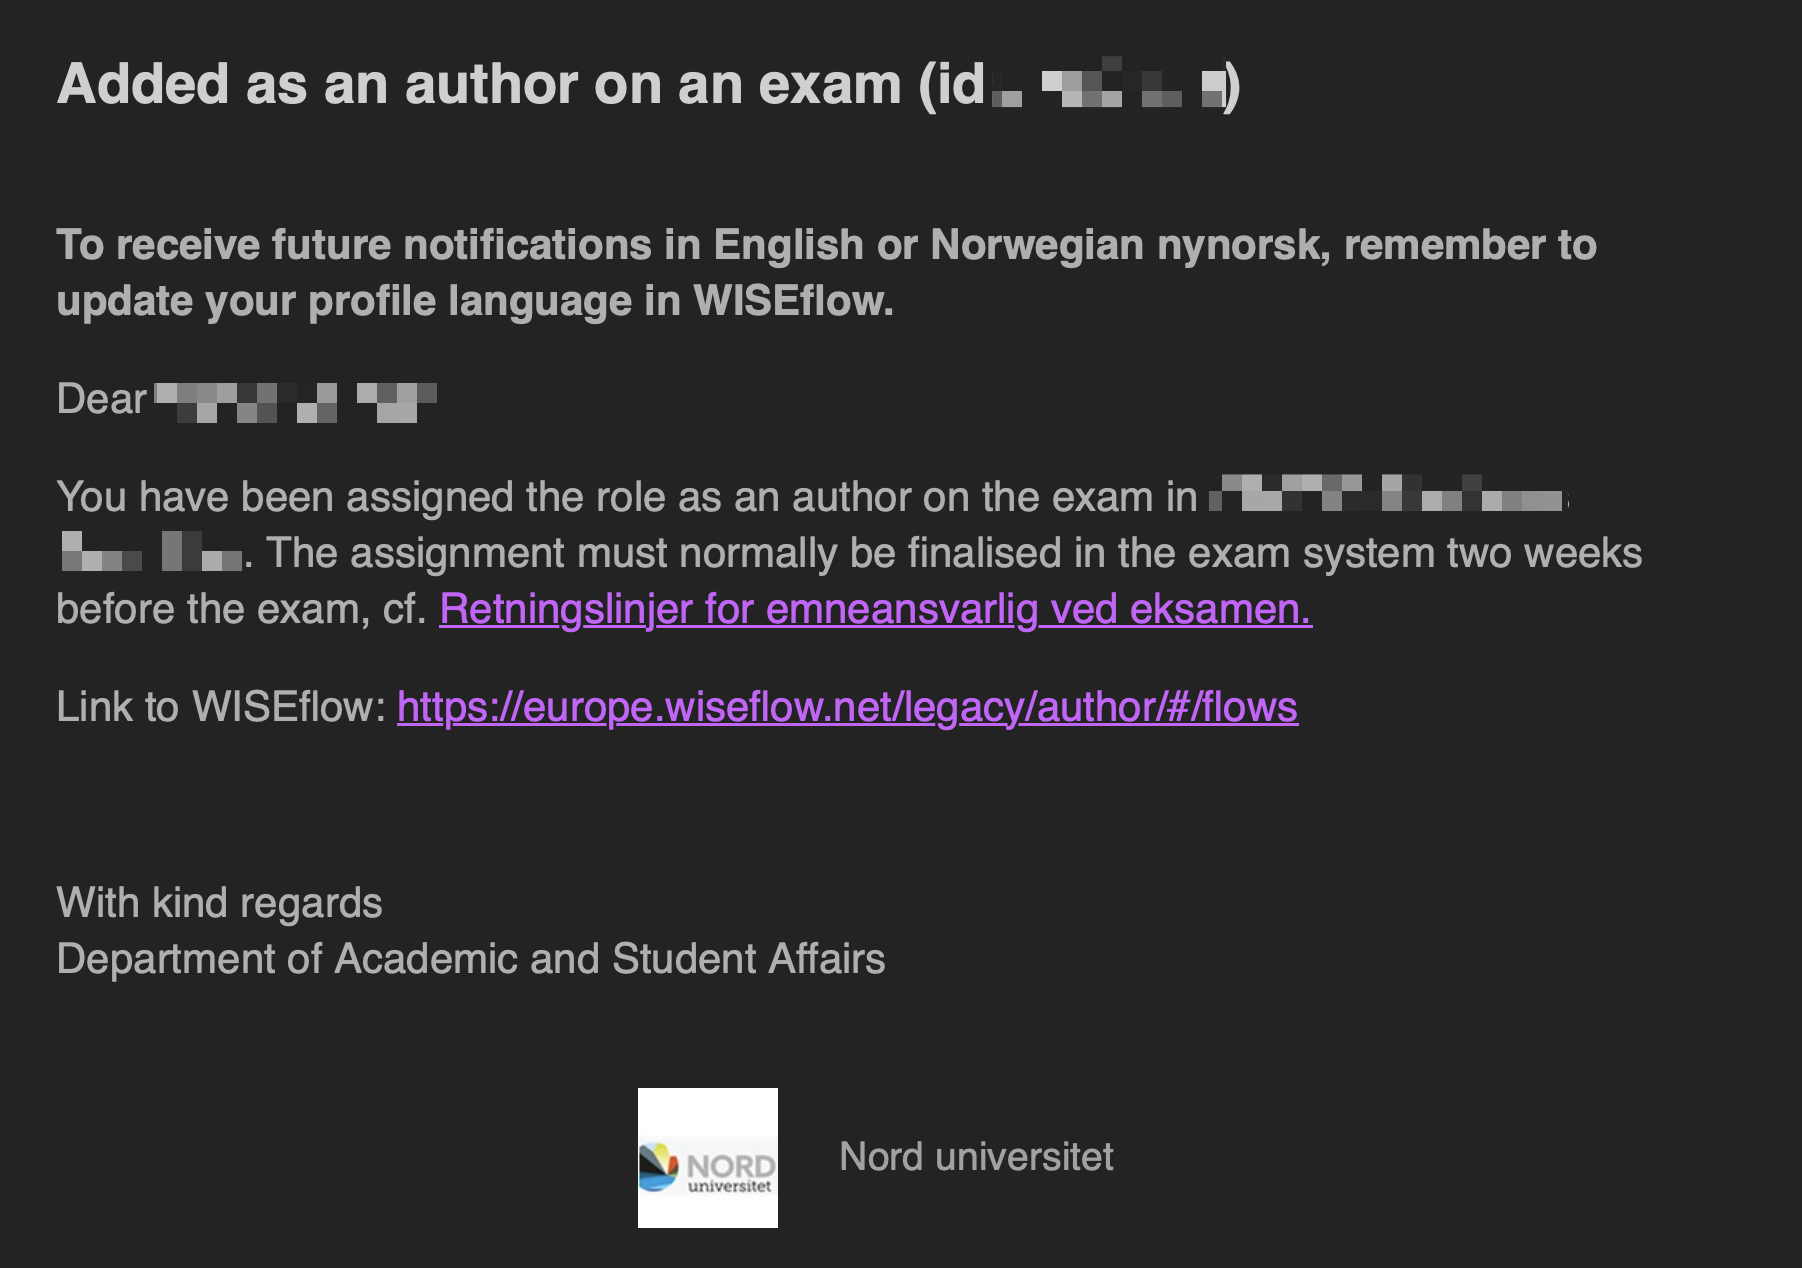
When the flow is created, you will receive an email notification from WISEflow.
-
The course responsible (me) adds Assignments to the flow.
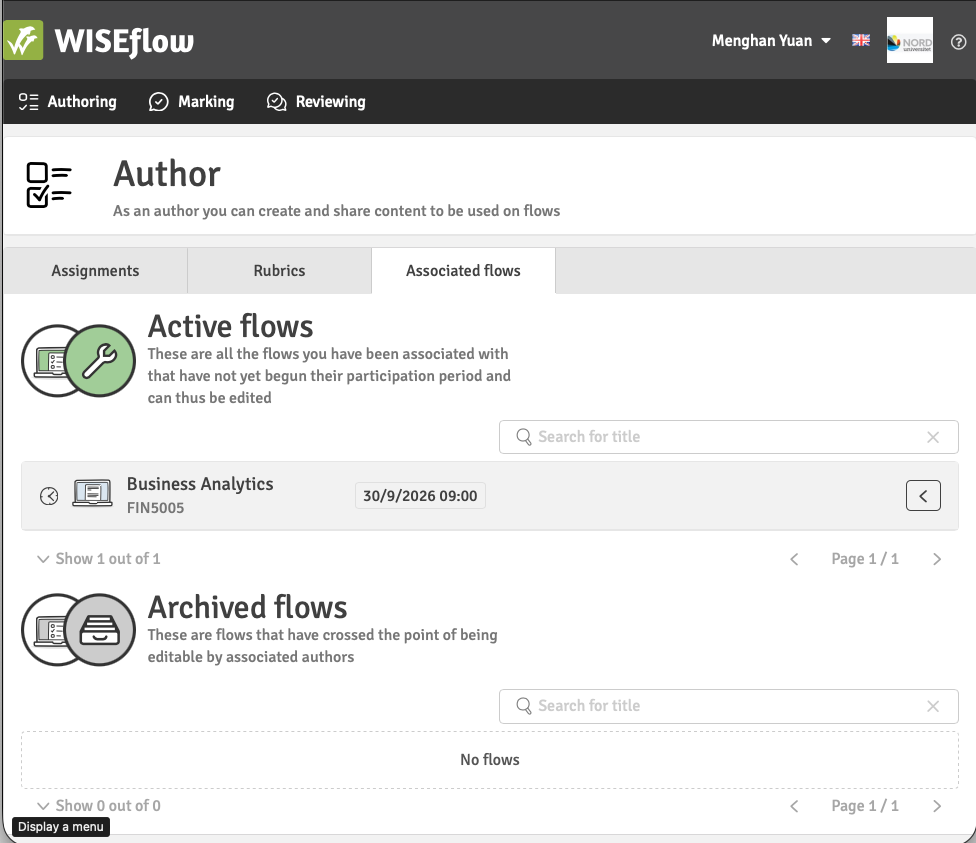
Click the corresponding flow to add your published Assignment.
Q: Do I need to create a FLow myself?
A: No. The exam office will create a Flow for you and add you as an author. You can then upload your assignment directly to the Flow. Besides, the Flow creation function is NOT available for course responsible’s WISEflow page.
WISEflow Document: Creating a Flow
Q: What are flow types?
A: Flow Types are different forms of assessments.
-
FLOWassign: Commonly used for home assignments. Participants view/download the set assignment from WISEflow and then work outside of the system to create their submission. Participants then upload their paper as a PDF (main paper must be in pdf format).
If enabled, their submission can be supplemented with Appendix Material where NO specific file type is required. Assessors can then provide feedback and provide grades within the system. Participants can view their provided feedback/grades within WISEflow.
I don't need to set up group submission. It is done by the exam office. I just need to add the assignment to the flow.-
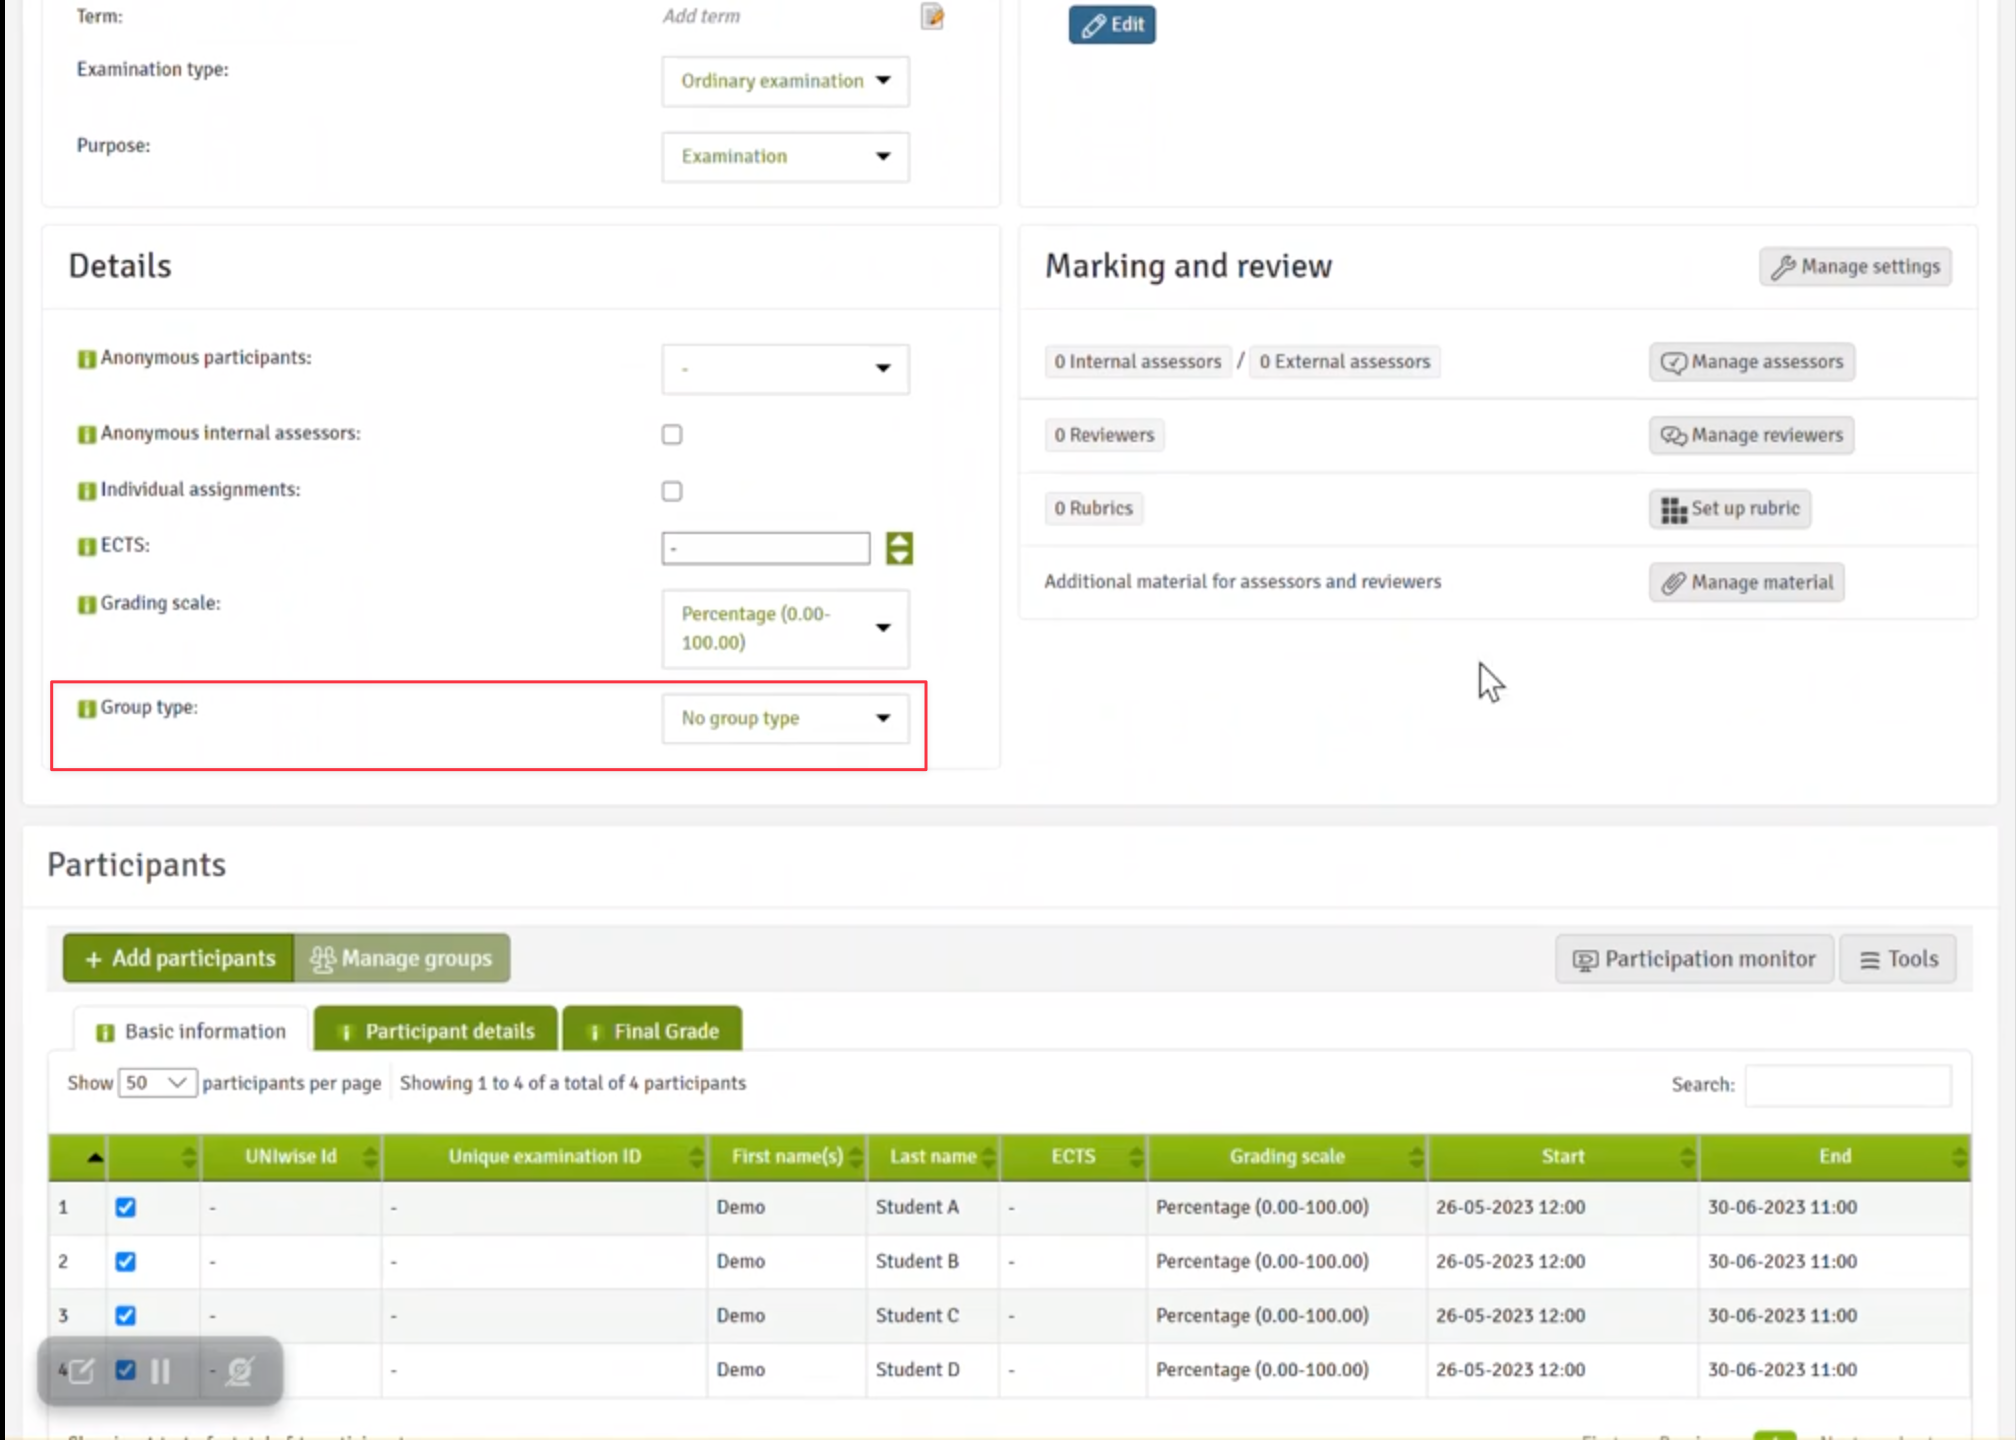
<Support working in groups ← Need to set this up manually; NOT enabled by default.
Basic settings tab > Details > Set “Group type” to “Group submission”.
-
Students are able to form groups themselves within WISEflow.
-
Each group must make a group submission.
Only one member of the group needs to make the submission. Once submitted, the submission is attributed to each participant in that group. Assessors will mark just the one submission; the scores and feedback will be attributed to each participant in the group.
-
Navigation and Basic Settings of a Flow
-
-
FLOWmulti: Final exams.
Group Type
-
No Group Type: Participants are not supposed to submit in groups. All participants will submit separately. This is set as a default on the licence.
-
Groups Submission: The participants on the flow need to form groups. Each group makes a joint submission. Each group member can submit and withdraw on behalf of the entire group, and only one paper can be submitted. Participants will receive feedback via the marking tool and there will be only one similarity report.
-
Individual Submissions: The participants on the flow need to form groups. Each participant submits individually.
-
Group with shared submission and individual grading: The participants on the flow need to form groups. Each group makes a joint submission. Annotations and feedback comments are common to the group but each participant receives an individual grade.
Manage Groups
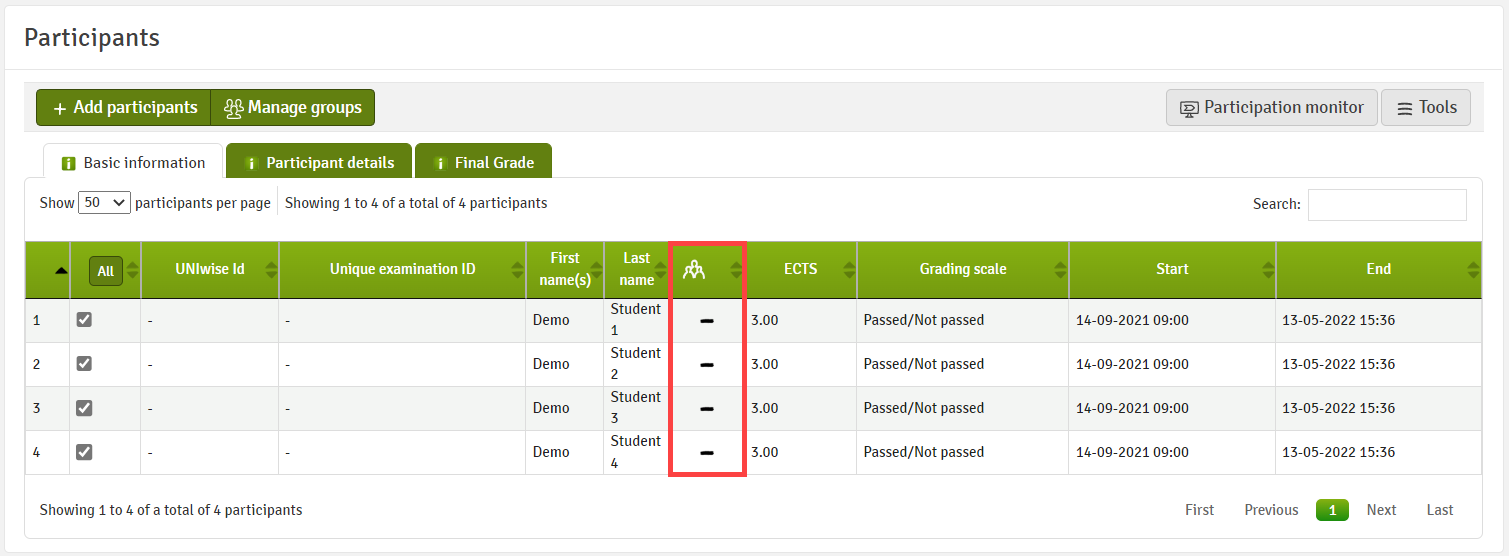
Click on Manage Groups to get to the group setup.
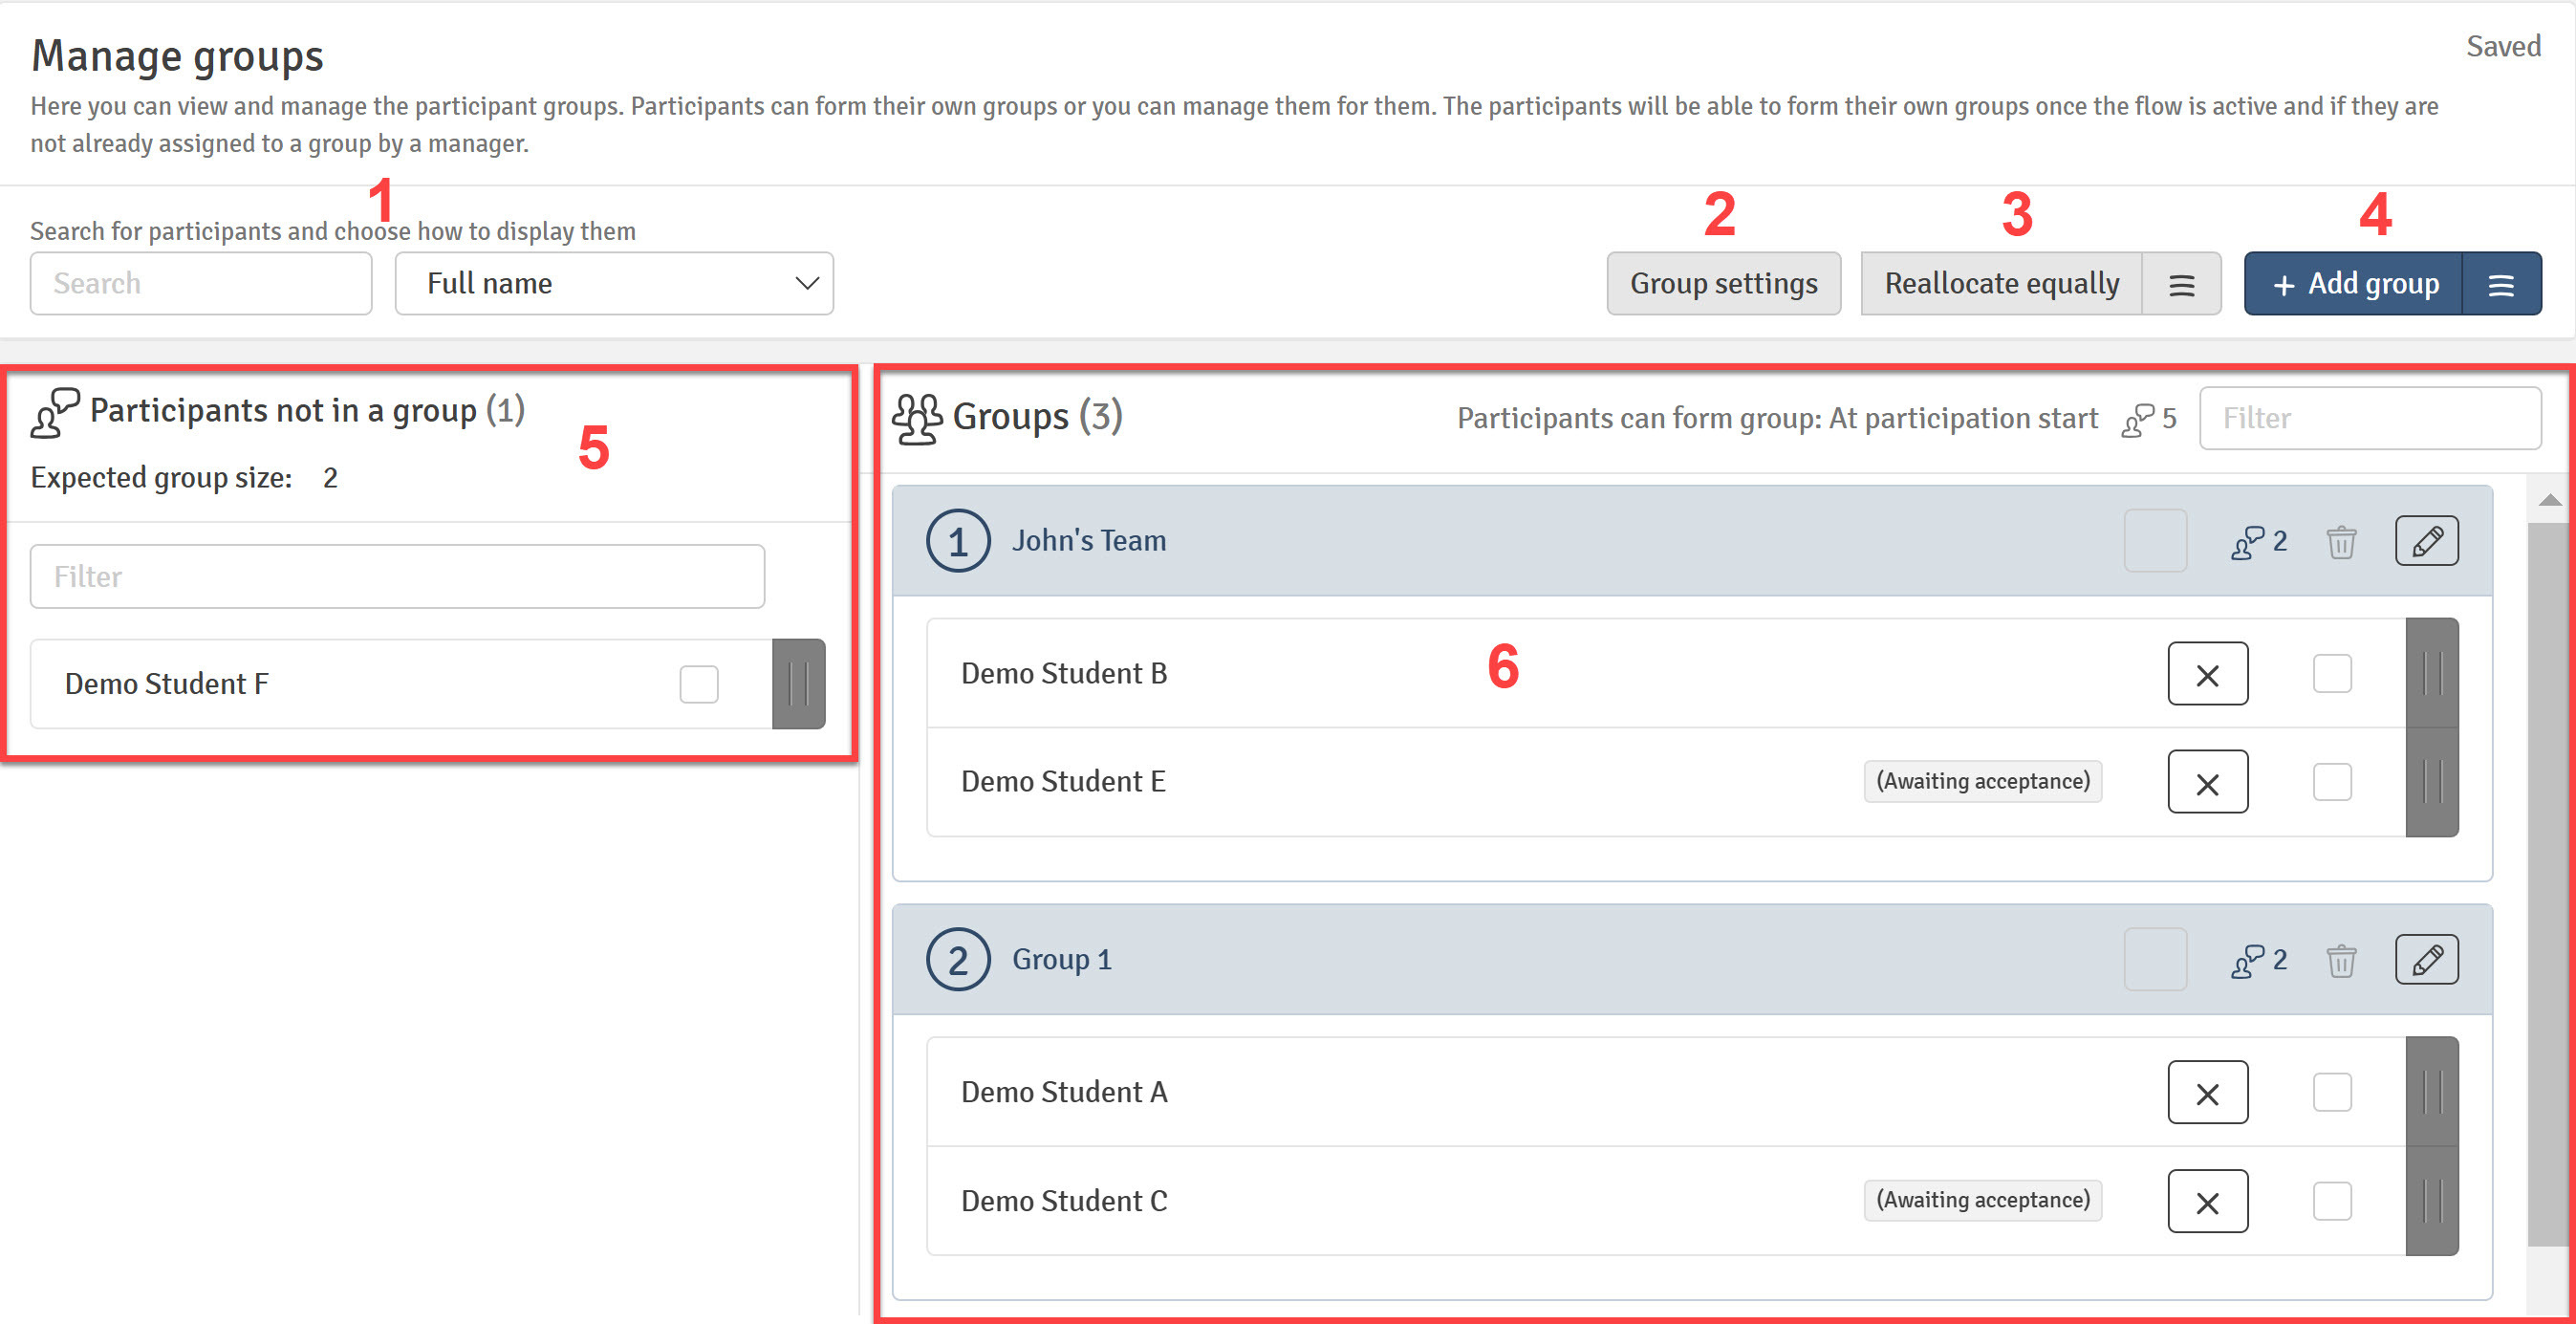
❷: Group Settings. Set minimum and maximum numbers of group members that should be in a group to be defined.
See Managing Groups for more details.
Create assignments / exams
FLOWassign
-
File-based assignment → For home assignment
-
Authoring tab > Click “Assignments (legacy)”
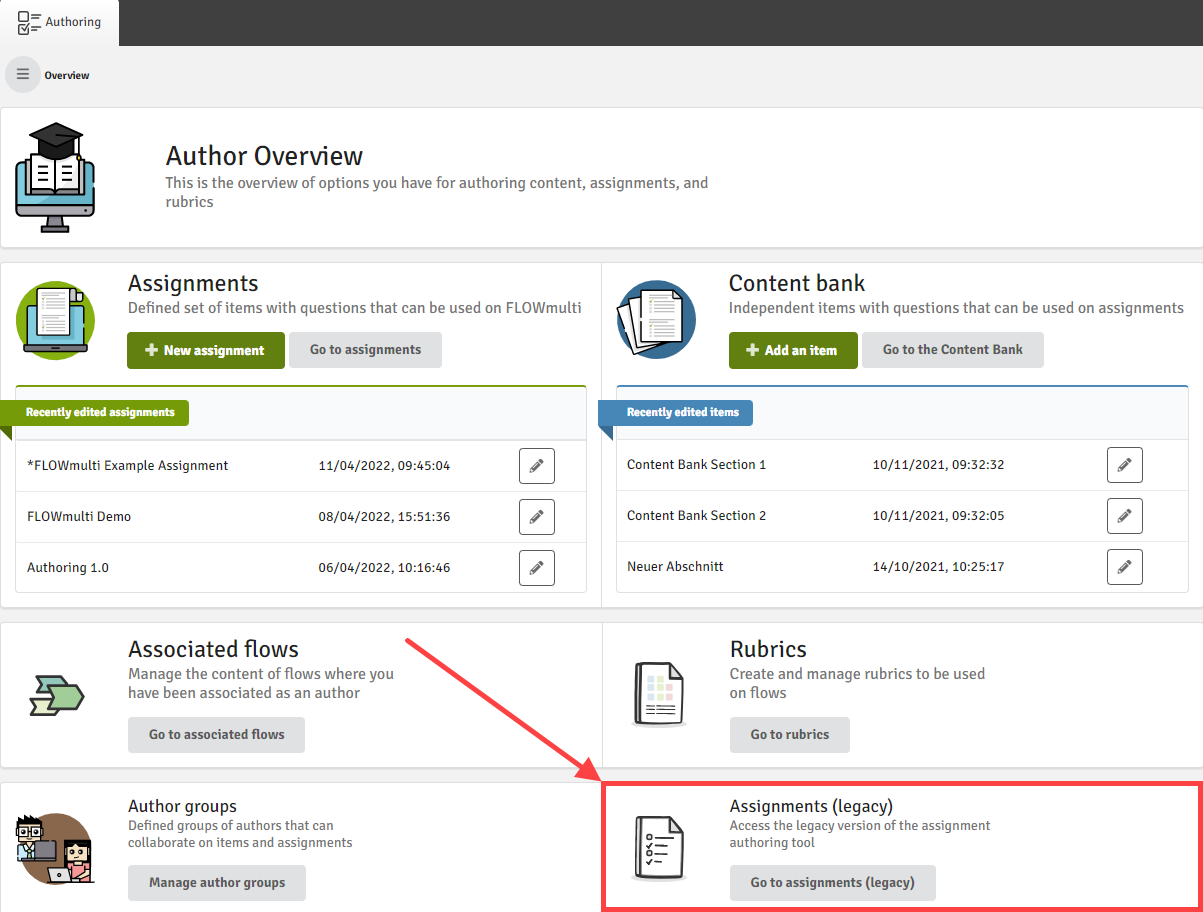
-
Click “New Assignment”.
Enter the title of the the assignment and any optional description and tagging information, then click Next.
Click “File based assignment” and click “Create”.
-
Edit the assignment.
You have now successfully created a shell to which you can either upload your file and any appendix material, or import existing files from the content bank. There are several different options available from this screen.
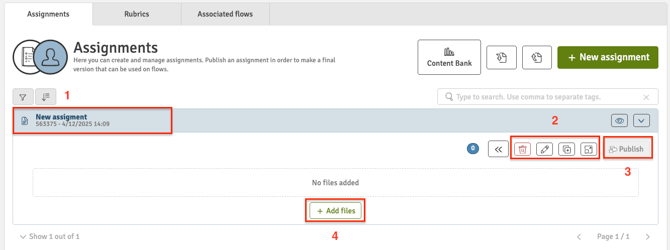
- Header bar displays the title, and any tags. These can be edited by selecting the pen icon.
- Tools: Delete, edit, copy and focused screen modes available.
- Publish assignment (unavailable until file has been added).
- Add assignment either by local upload or by importing from the content bank.
-
Publish the assignment.
Once you publish the assignment, it will appear in the list of “Published assignments” and a reference ID will be generated.
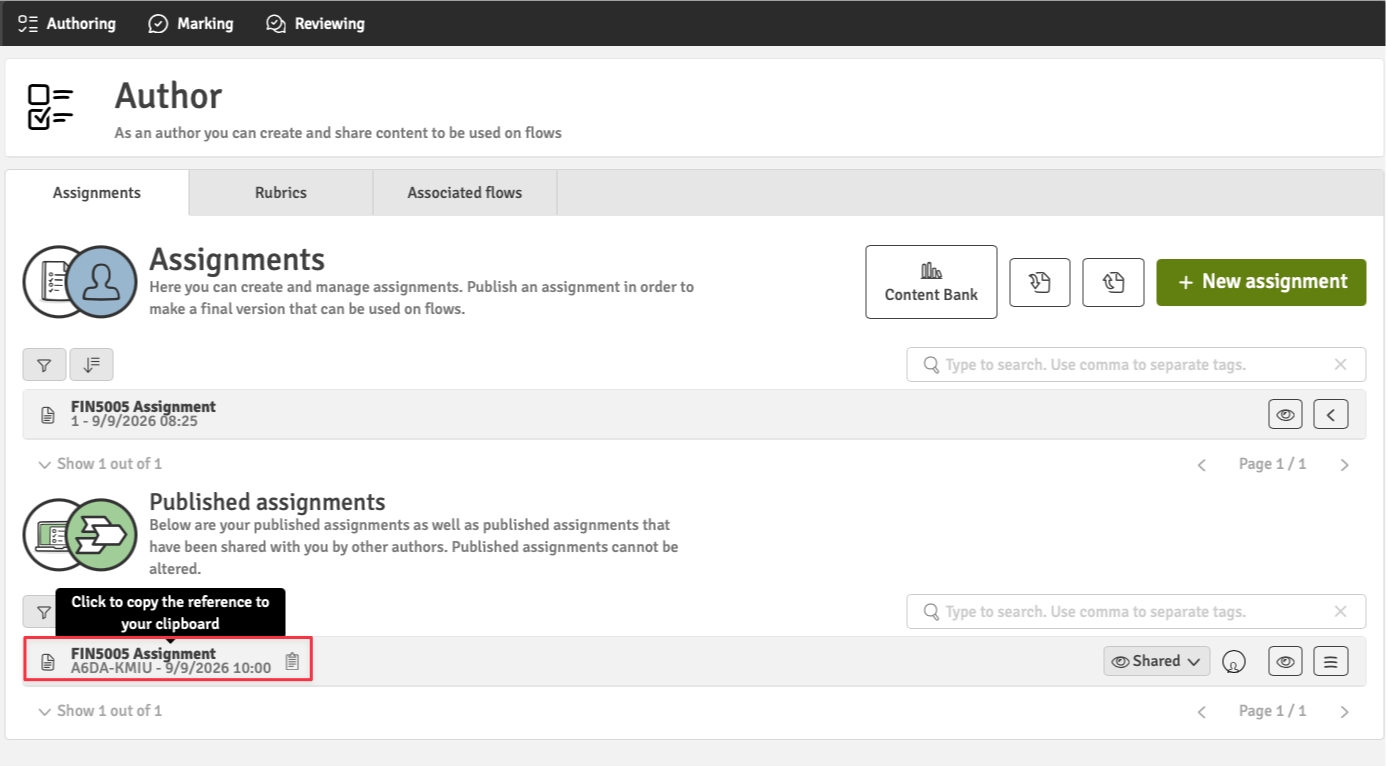
-
Add the assignment to the flow.
When you have received the “Associated flows” email notification, you can add the assignment to the flow.
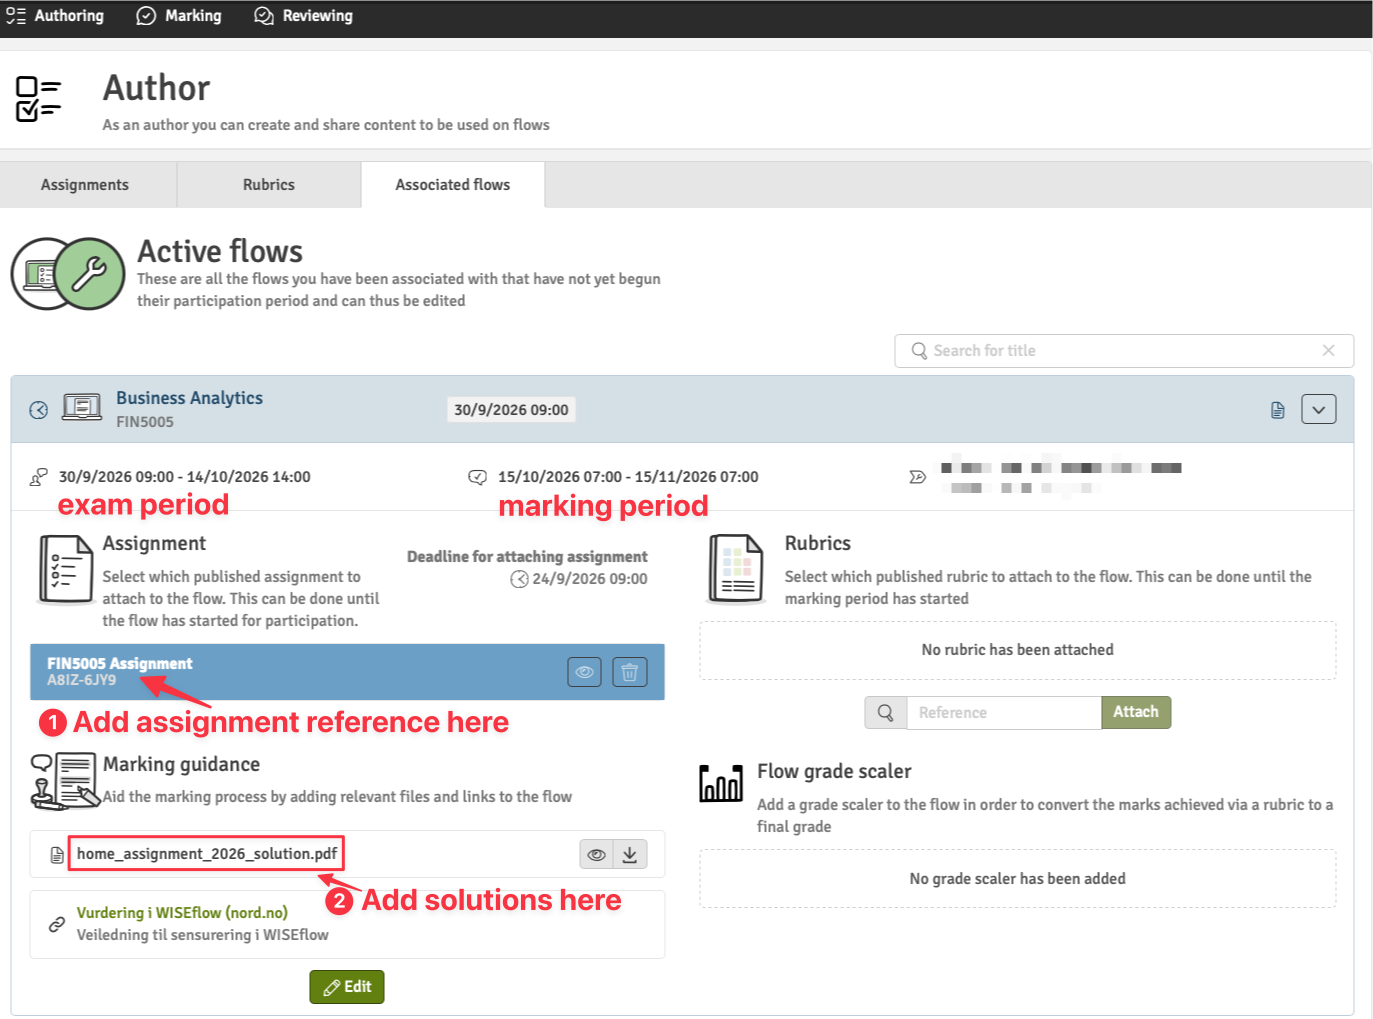
- add the Assignment itself.
- add the Marking guidance (sensorveiledning) for the assignment.
No additional settings are required. No group settings etc.
-
FLOWmulti
FLOWmulti Assignment → For school exam
For FLOWmulti, you need to create a Flow Version to generate a reference ID. See HERE for details.
Assignment List
Click “Go to assignment” to see the list of assignments that you have created.
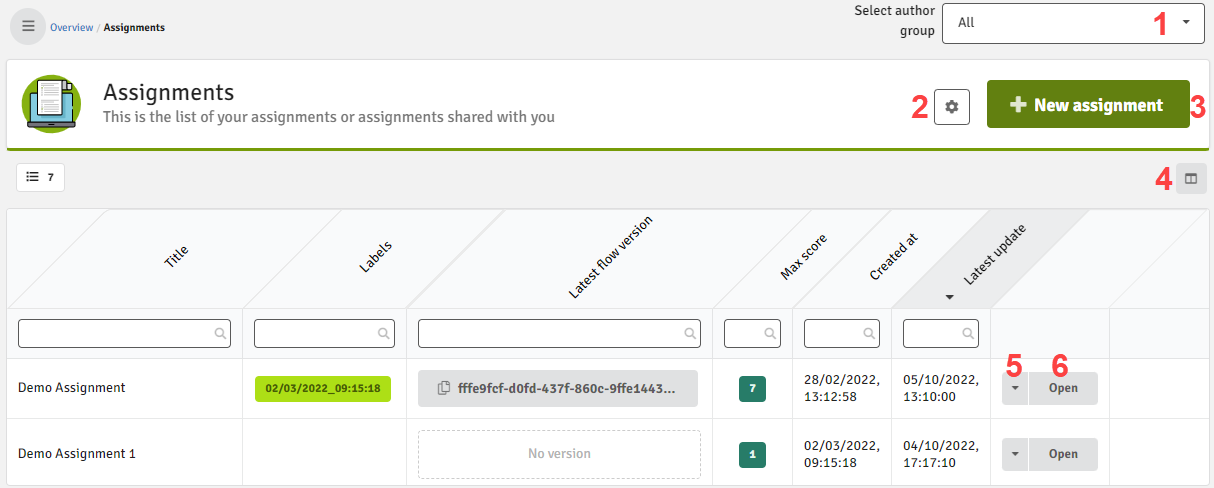
Only the ones you have published have “Latest flow version”.
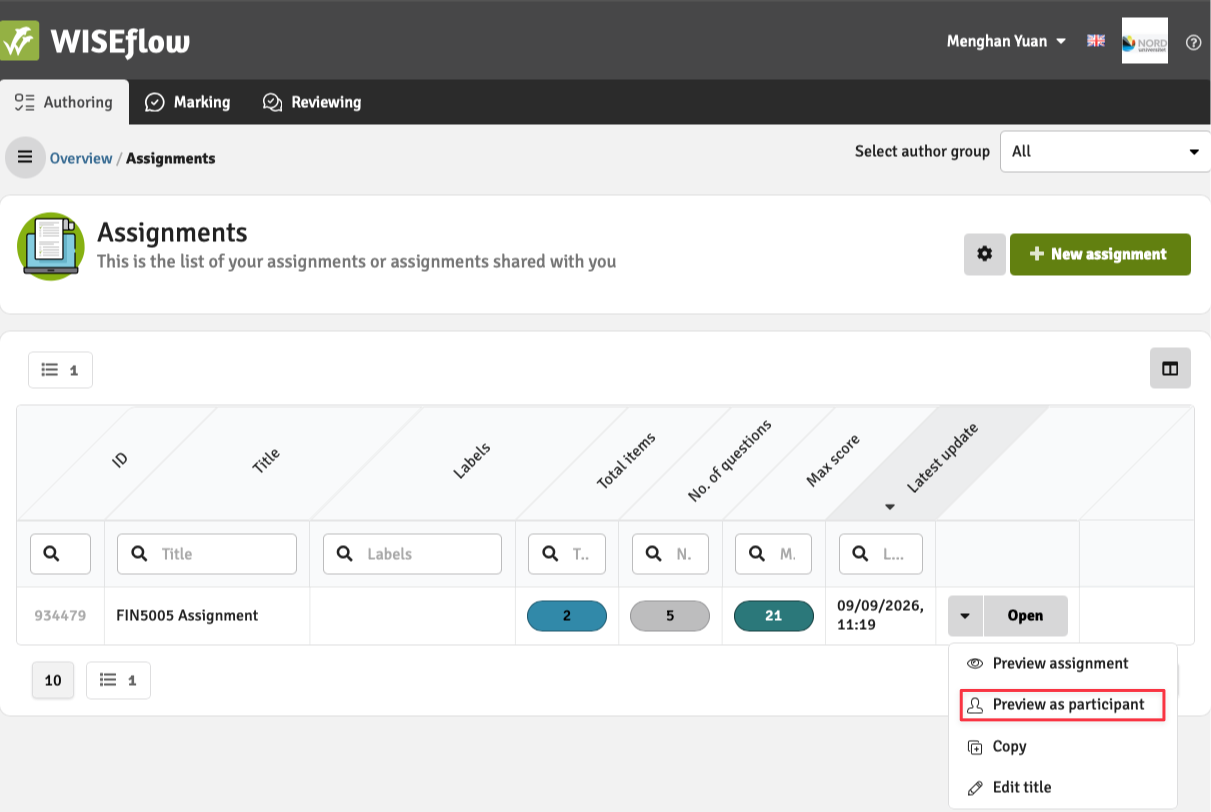
You can preview the assignment by clicking the triangle dropdown button. You can choose “Preview as participant”.
FLOWmulti Overview
-
You can find the flows that you have been associated with from the overview page.
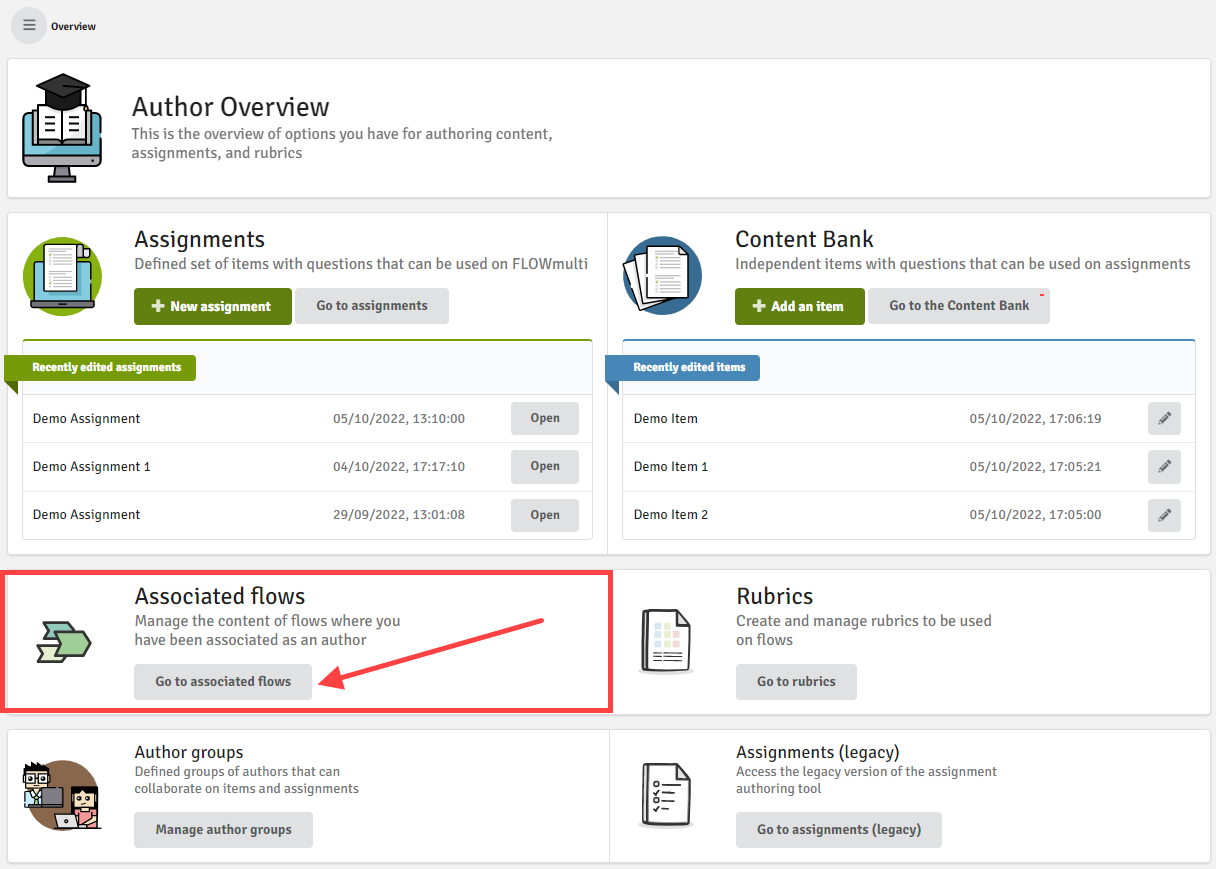
-
Choose your flow.
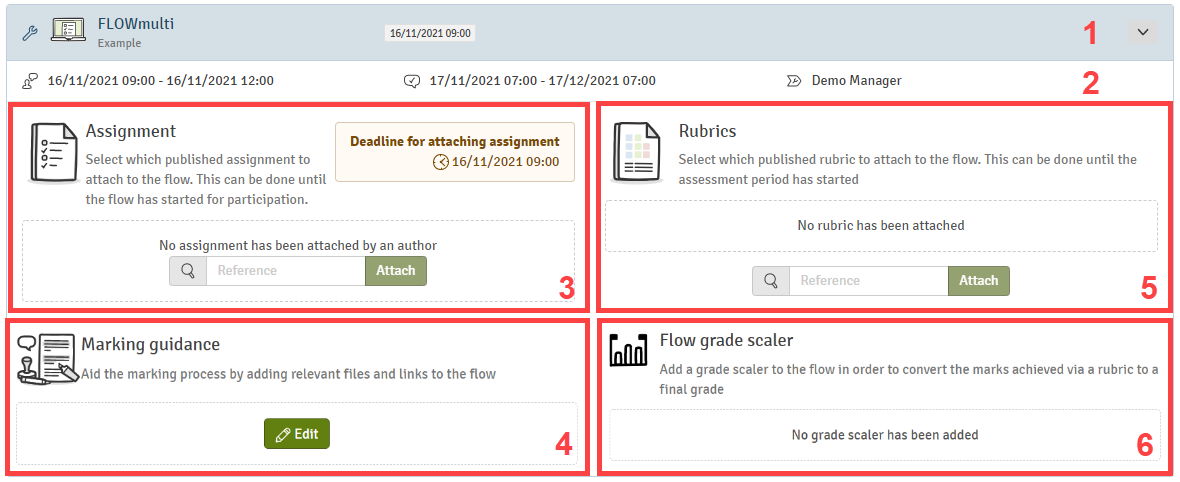
❸: Add an assignment by entering the reference ID.
Assignment Overview
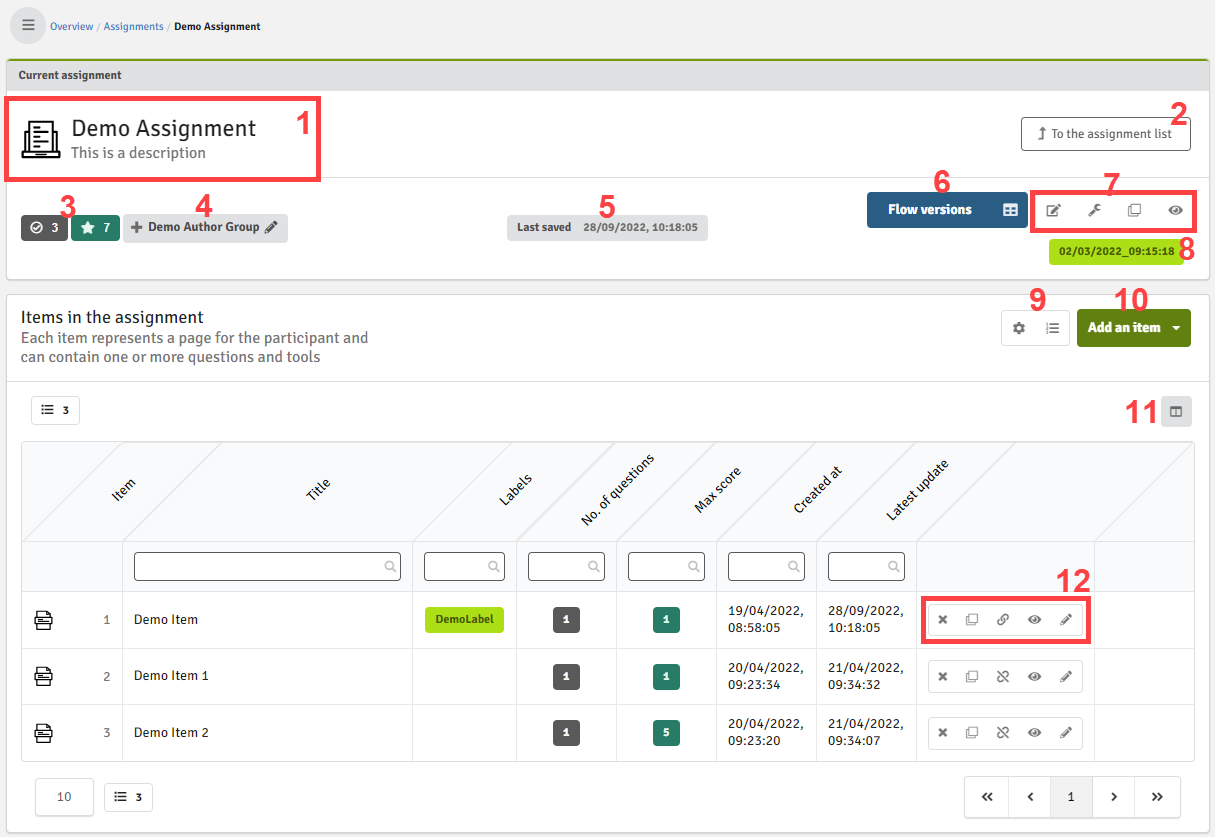
⓵ Title and description of the assignment
⓸ Add or edit author group(s).
⓺ Create a current flow version of your assignment or view list of all flow versions
See HERE for description of the other buttons.
Item Overview
“Item”: one section, usually for one topic.
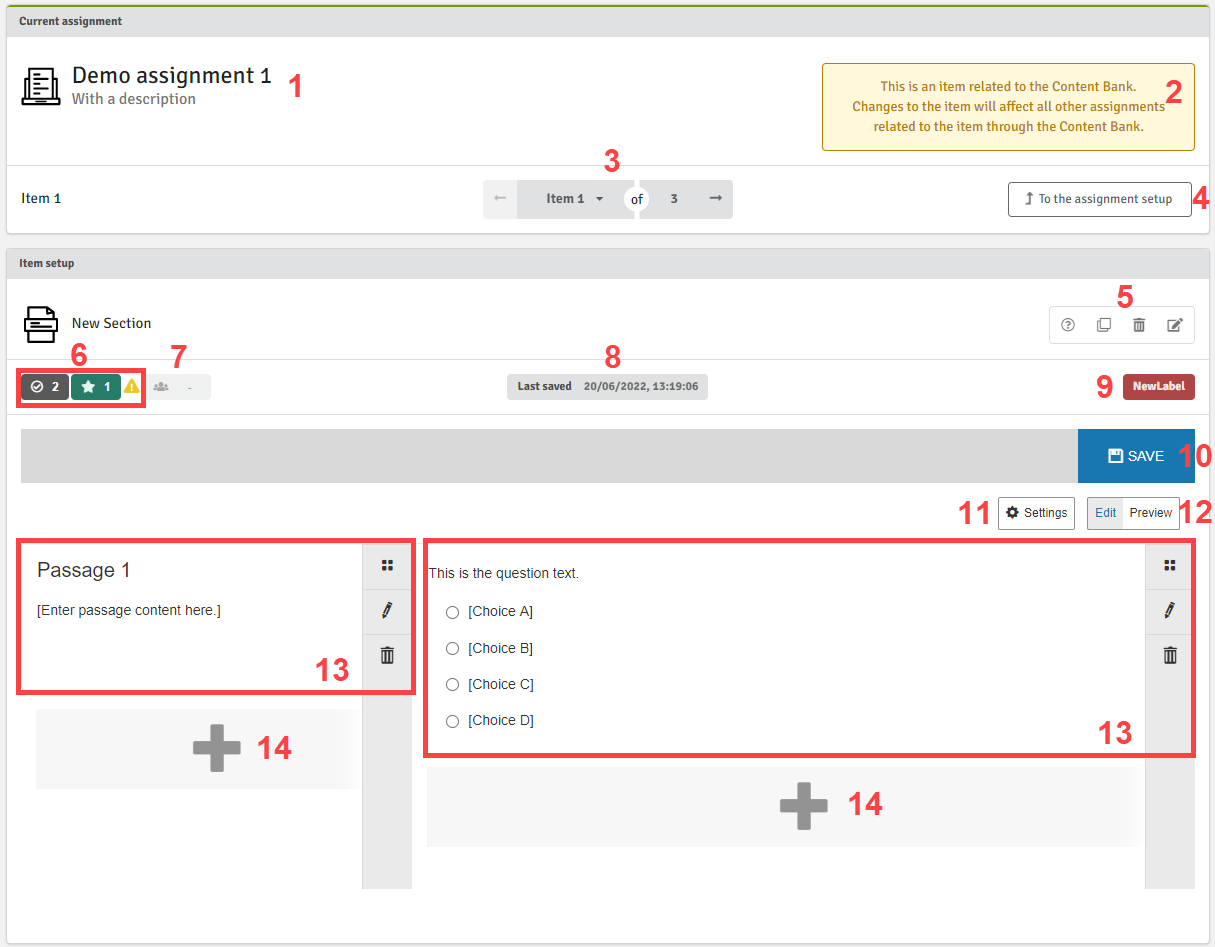
Add Coauthors to an assignment
-
Create an author group
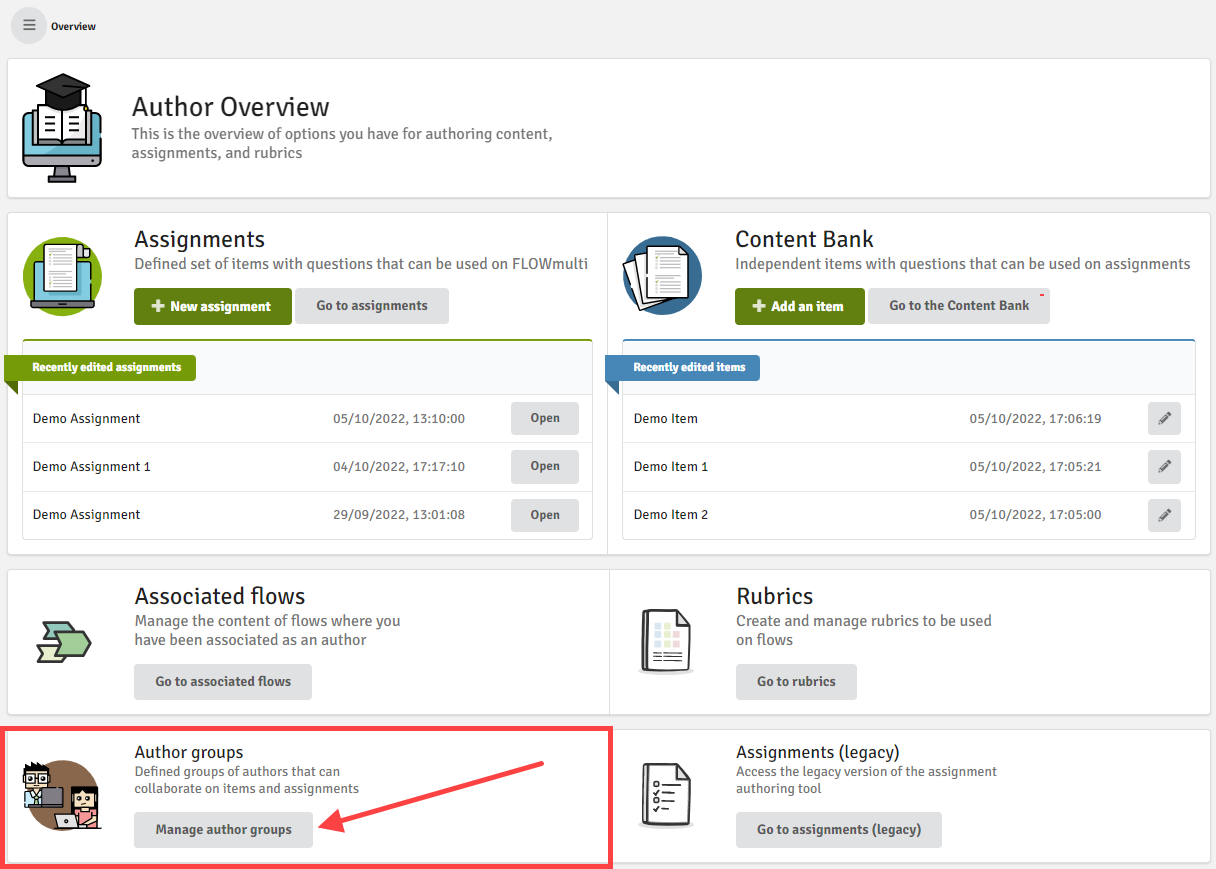
Click “Author groups” in the Assignment Overview page > Click “New author group”
-
Add Co-Authors to the group
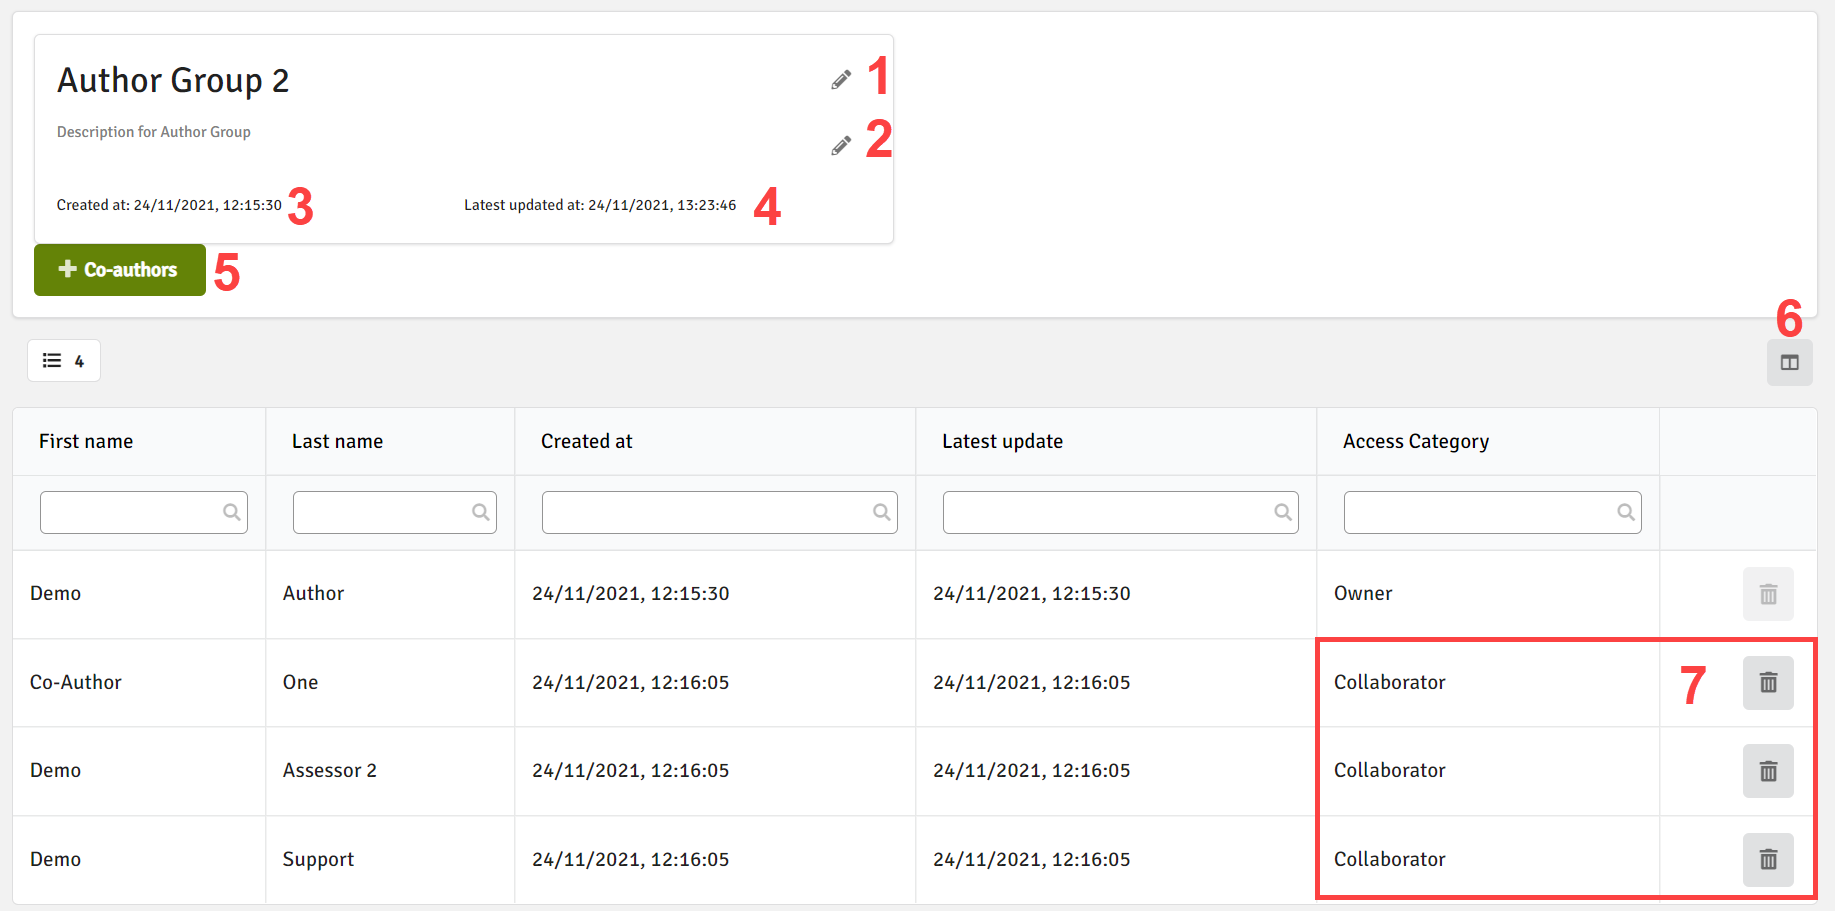
⓻ Existing coauthors will show here.
Click “+ Co-author” to add co-authors.
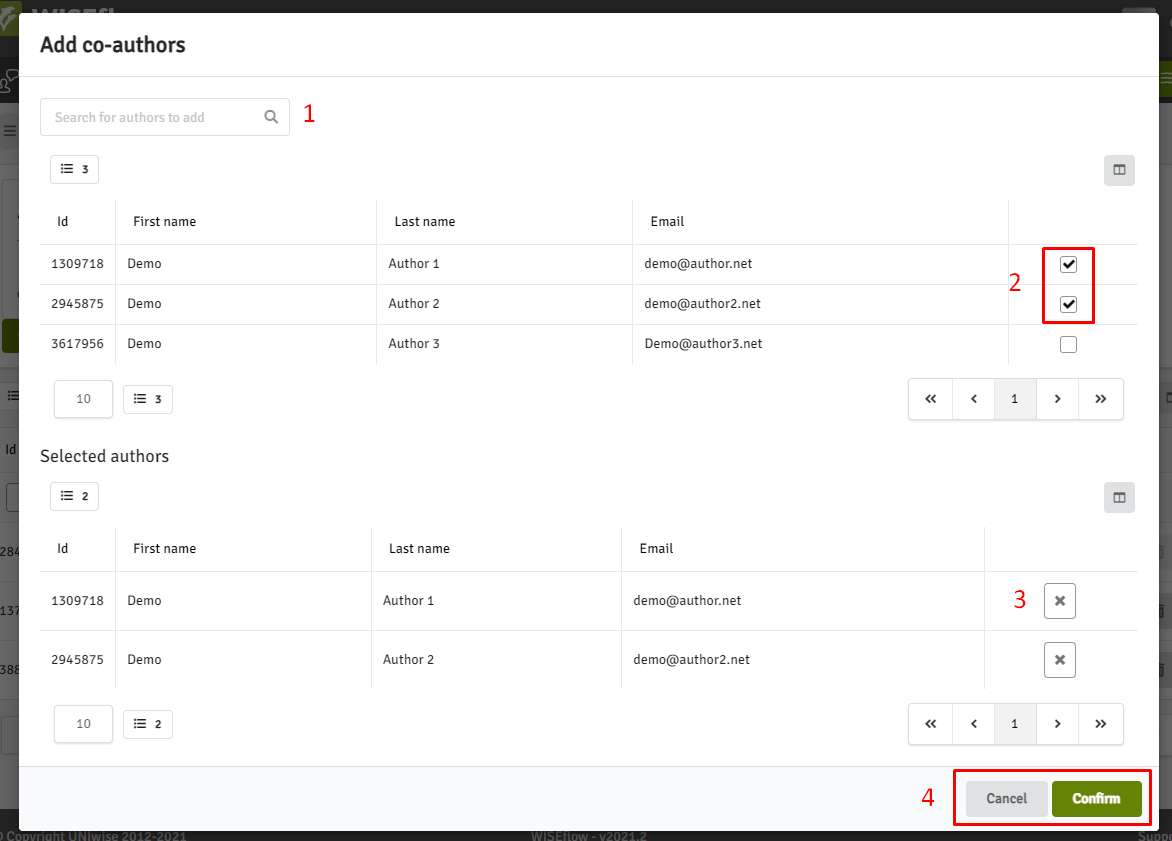
⓵ Search for the authors you want to add to the author group.
⓶ The tick box is to select the authors you want to add. → Have to check the box to add the author to the group.
③ To remove the existing authors added to the author group.
⓸ Cancel or Confirm your current amendments to authors associated with this group.
-
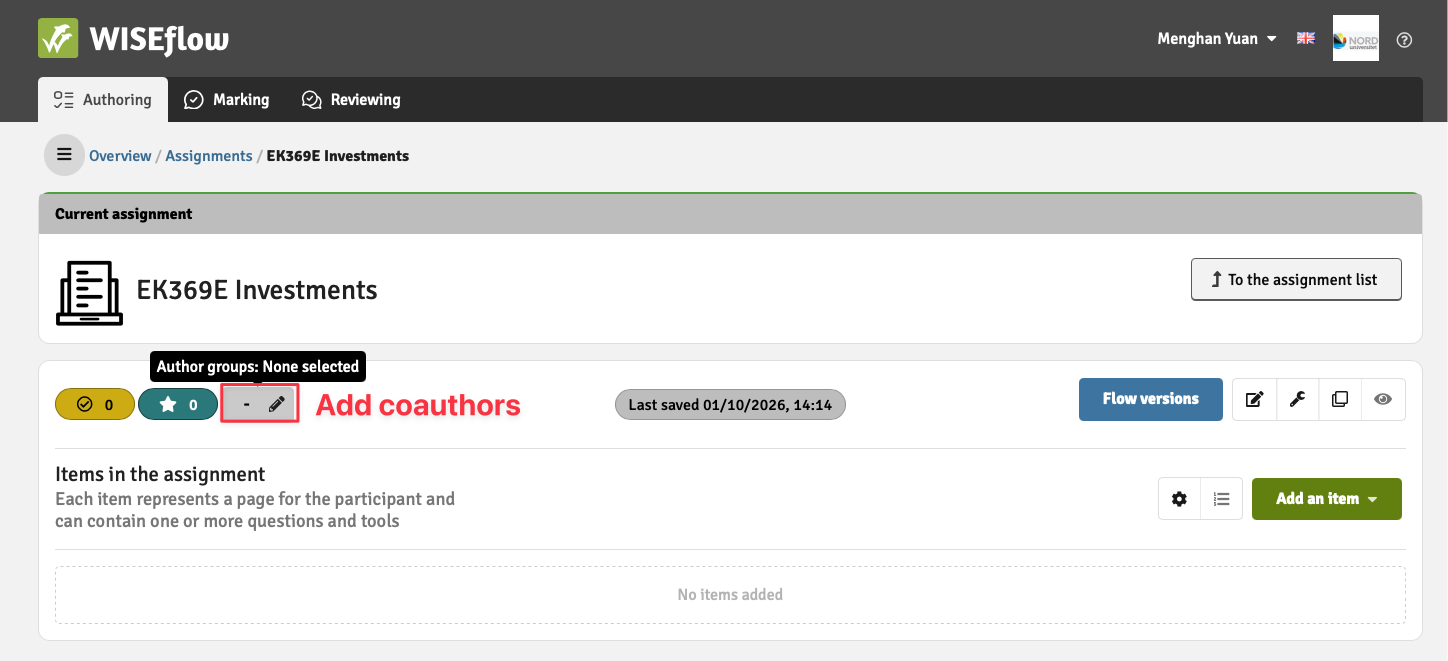
Select the author group in the assignment settings
Click the pencil icon ✎ to edit the author group.
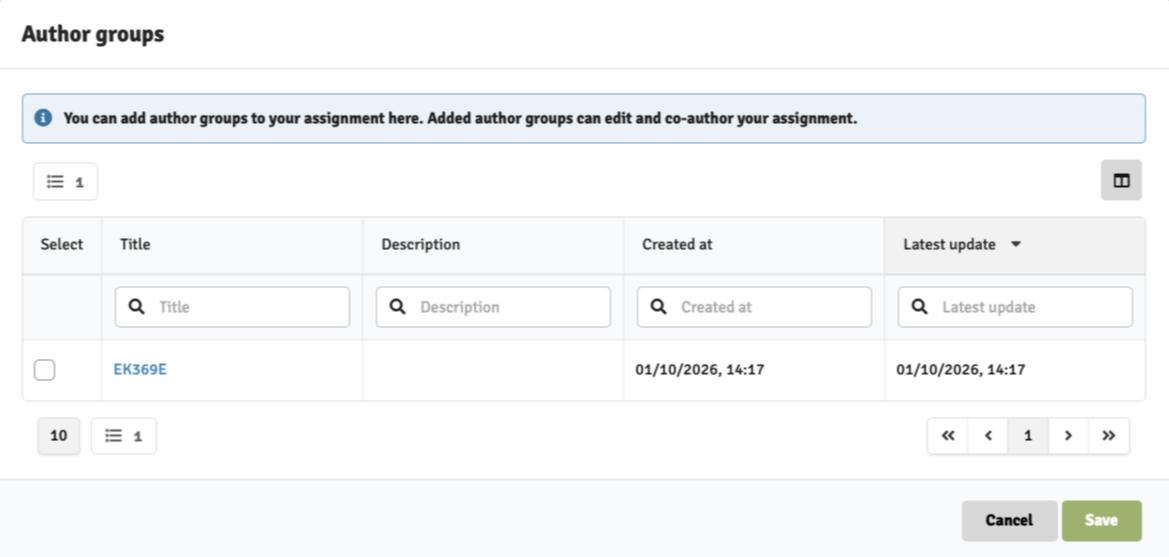
Choose the relevant author group by ticking the box before it.
ref: WISEflow Document: Using Author Groups
Question Types
WISEflow Document: Question Types Available for FLOWmulti Assignments
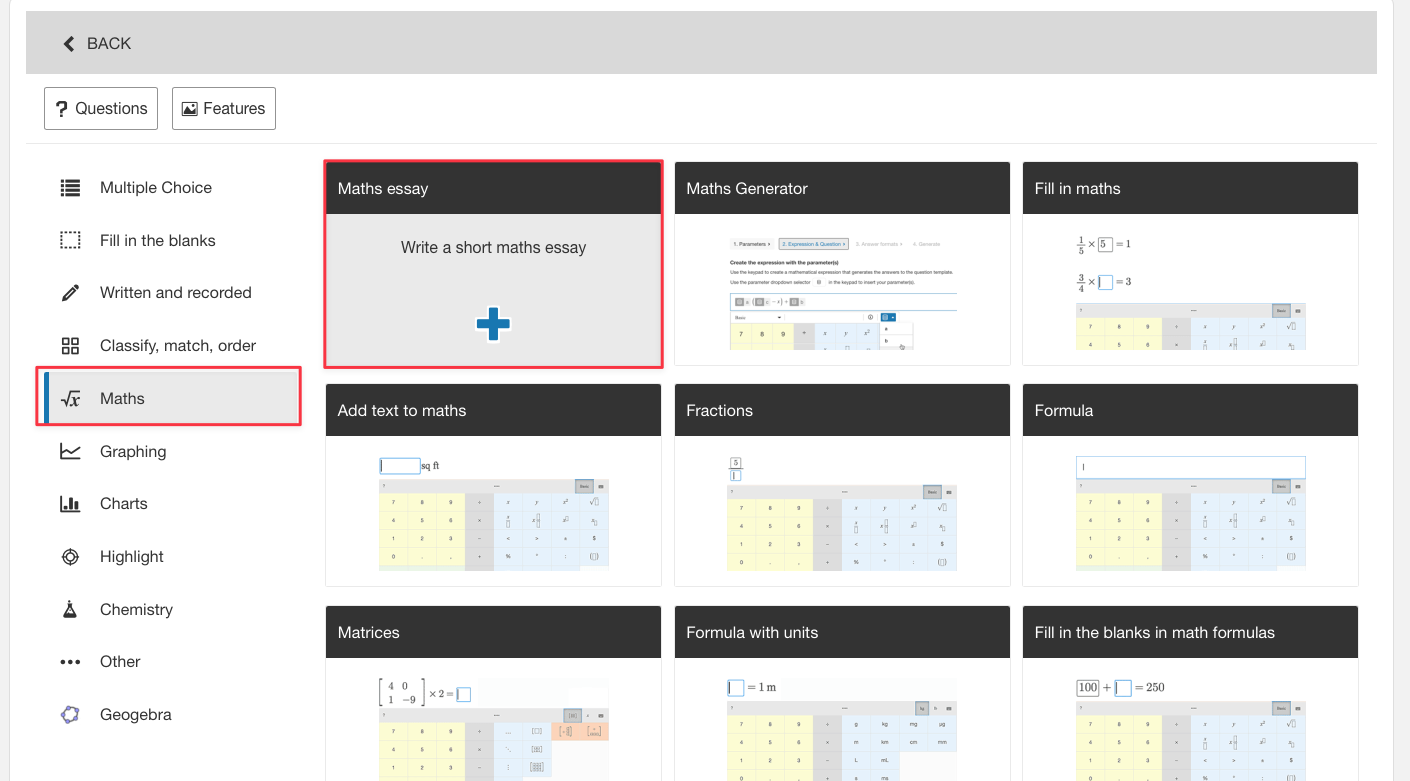
Maths Essay
For open-response questions with formula support, use “Maths Essay”, which supports math symbols.
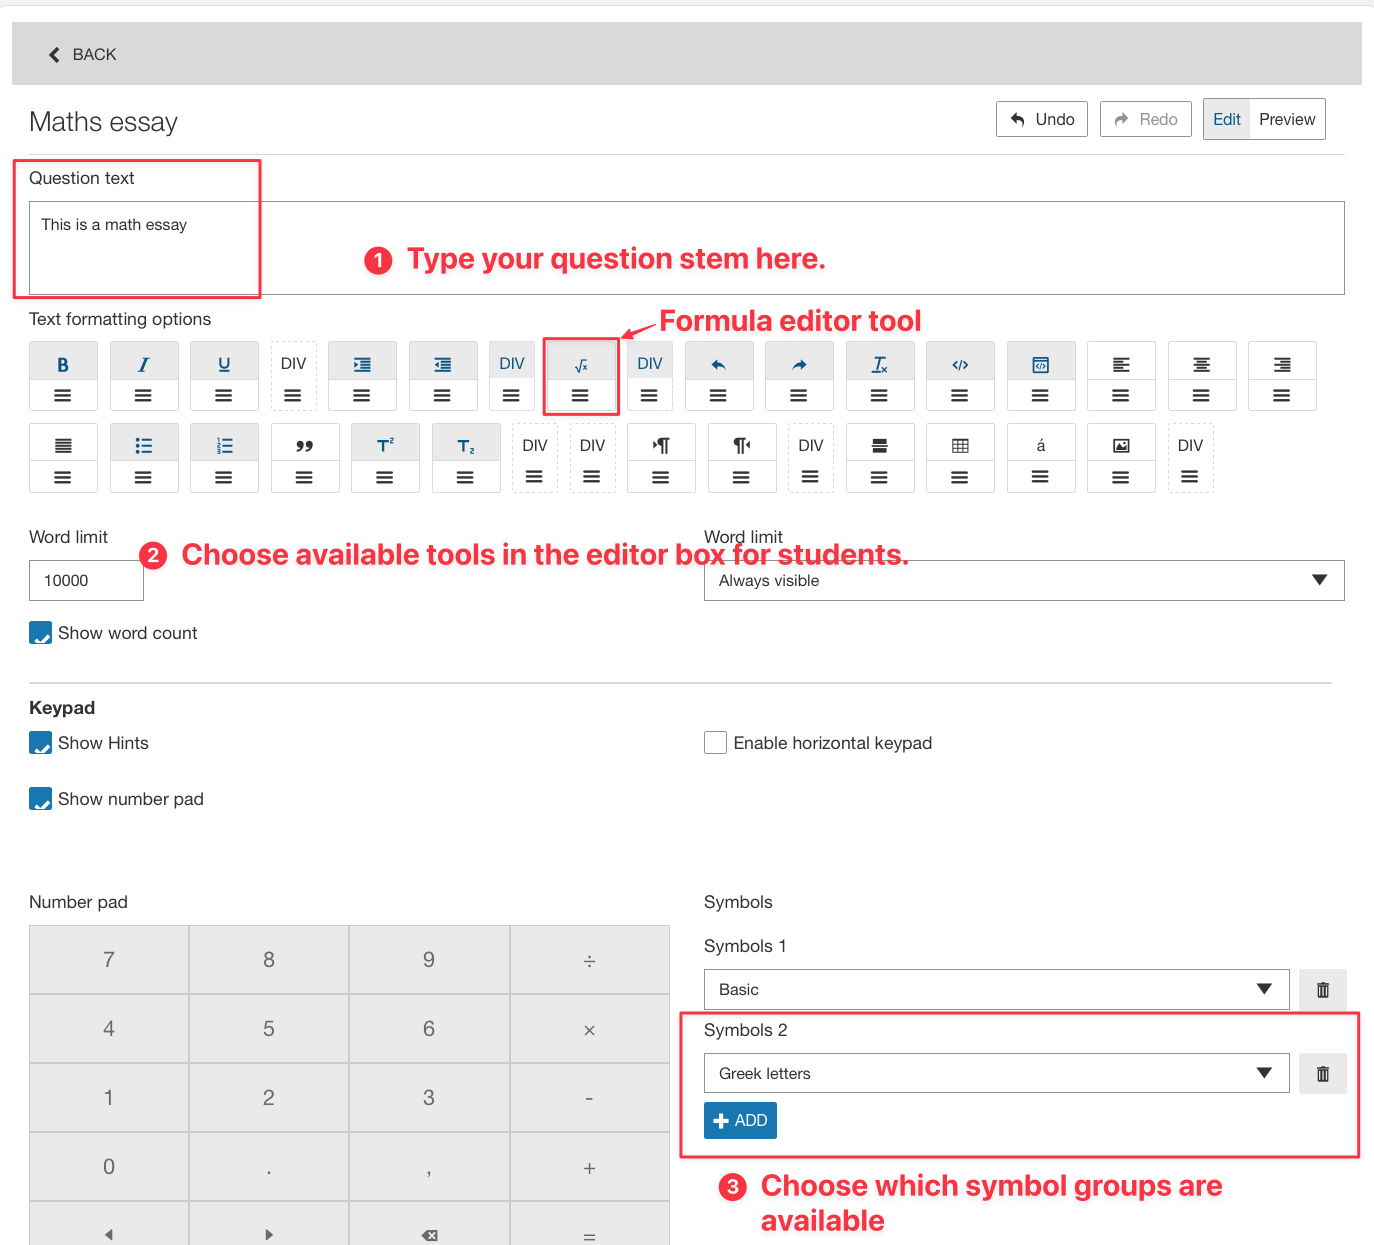
Set up Maths Essay question
-
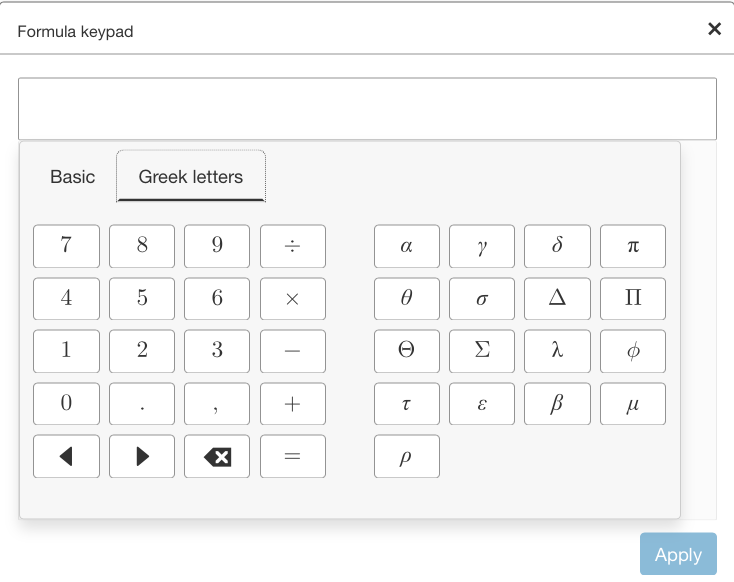
For “Symbols”, choose “Basic” and “Greek letters”.
There aren’t many available Greeks, but should be sufficient for most cases.
Check HERE for different symbol groups.
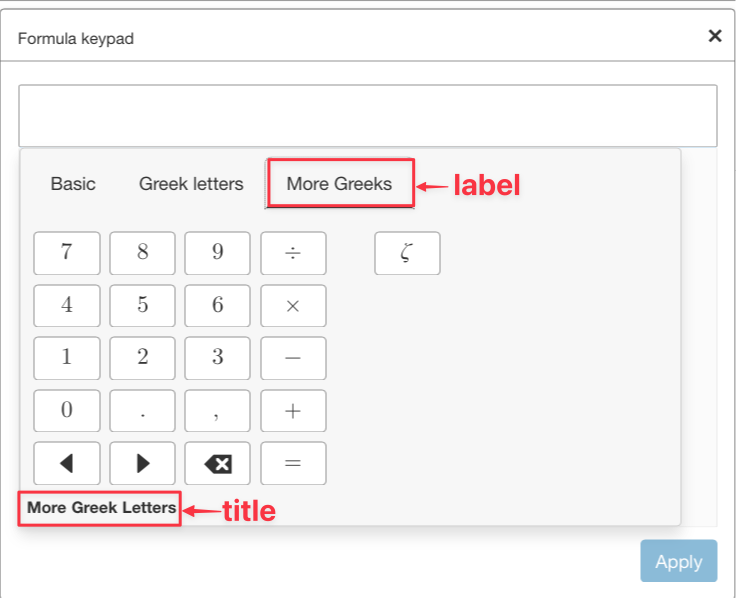
If you want to add more Greeks, add a “Custom group”. Then you can choose from a comprehensive list of symbols.
- Label: name of the group, e.g., “More Greeks.”
- Title: text at the bottom of the keypad to describe the group; more descriptive than the label, e.g., “More Greek Letters.”
Question Preview
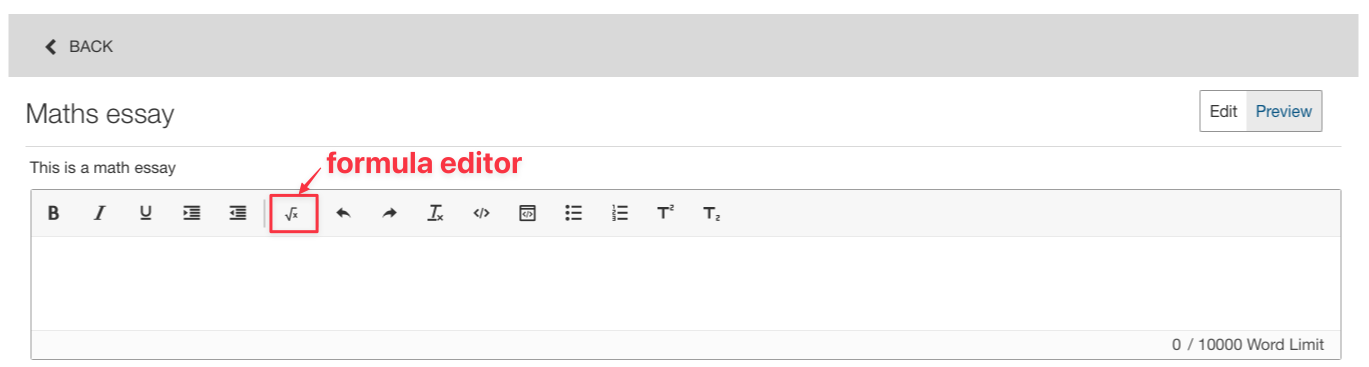
When you click the formula button $\sqrt{x}$, the formula editor will pop up.
Refs:
Marking Overview

- Re-marking: when you receive appeal requests, you can see the appeals here.
- Grade justifications: when students ask for explanation of grades, you can upload your justification here. You can also see the history of your justifications.
Refer to Flow Page Overview for page layout.
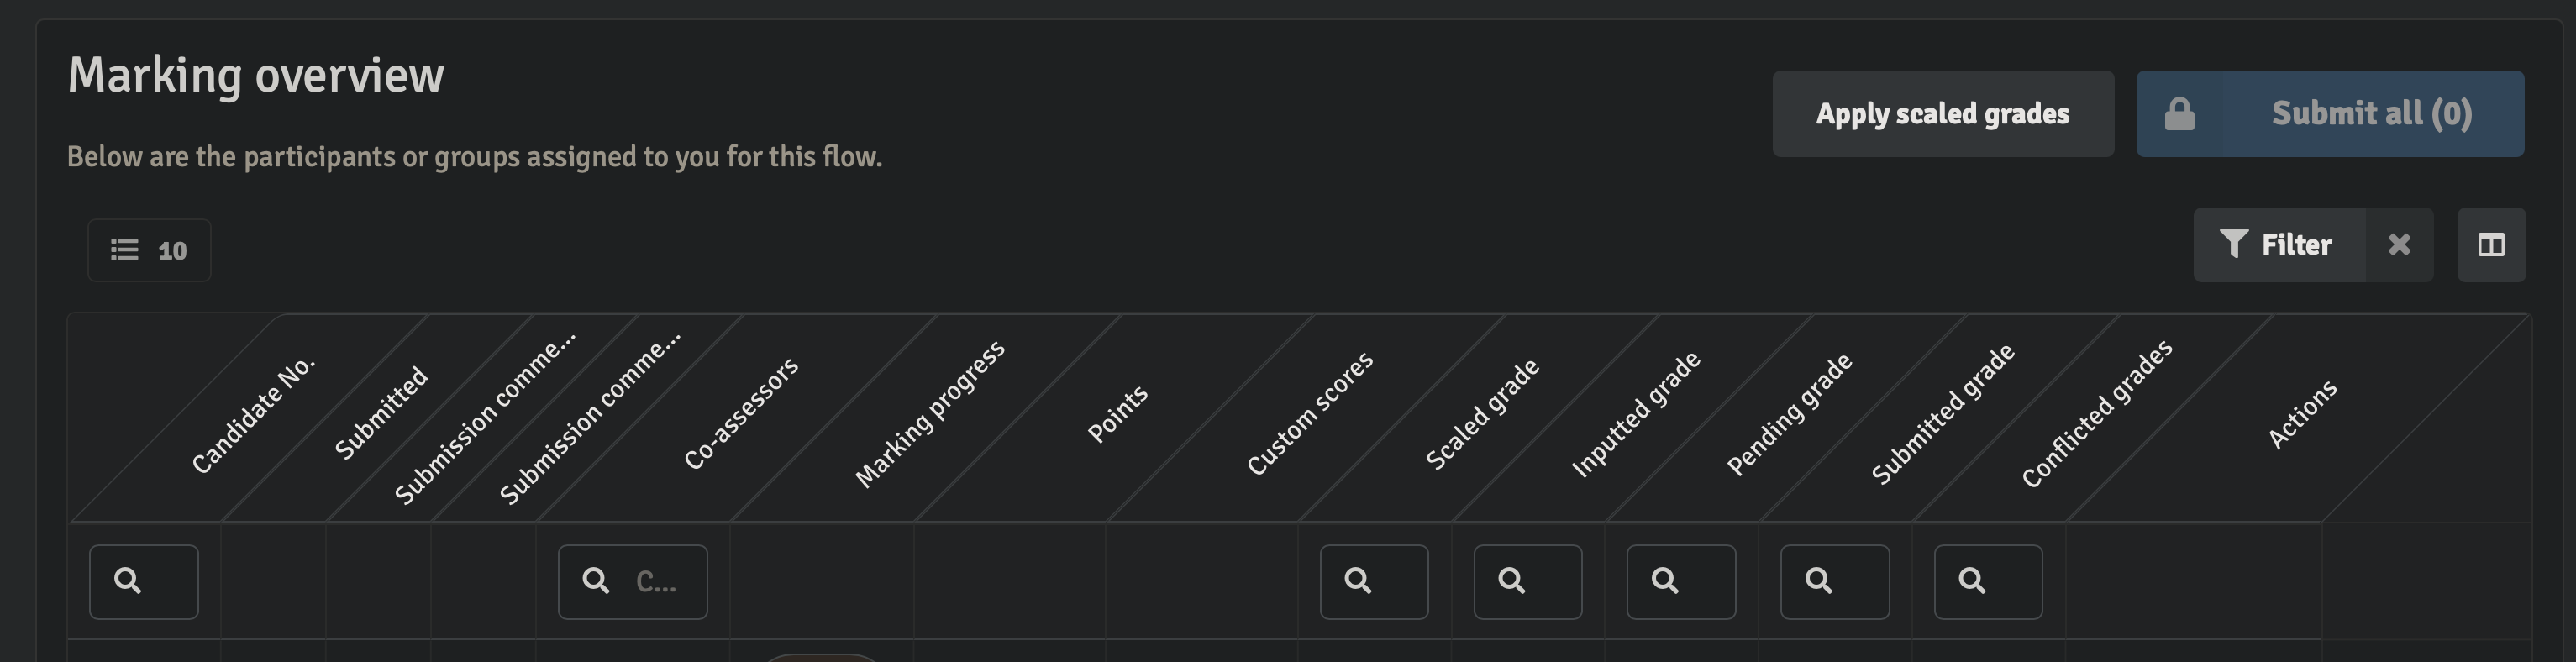
Go to each exam, an overview of the marking progress and grade distribution will be displayed.
-
Apply scaled grades: Based on the thresholds you set in the grade scaler, convert the marks to A–F grades.
When you click this button, it will bring up a pop-up window. Tick the check box to confirm the bulk action and click Confirm.
-
Submit All (#): Submit any grades that are ready to be finalised. Once submitted, they cannot be changed unless unlocked by the manager.
Grade Statuses:
-
Marking progress
- No progress yet: no marking steps have yet been taken.
- Grade inputted: a final grade has been entered.
- Grade submitted: a final grade has been submitted.
- Grade Finalised: a final grade has been agreed upon with co-assessors or approved by a reviewer.
-
Custom scores: Displays the number of scores that have been manually entered.
There won’t be any custom scores if the exam is all multiple-choice questions. If the exam has open-ended questions, the custom scores will be displayed here.
-
Inputted grade: A final grade has been entered but NOT yet submitted.
At this stage, the grades are still personal and not shared with co-assessors. You can still change the grade.
-
Pending grade: A final grade has been submitted, but it is awaiting co-assessor agreement or reviewer approval.
Once you submit the grade, the pending grade will show.
-
Submitted grade: A final grade has been submitted and finalised.
When you reach agreement with your co-assessor, the grade will show here.
-
Conflicted grade: When there is discrepancy between the co-assessors’ grades, the grade will show as conflicted.
When there is more than one assessor and marker agreement is the selected marking model, a warning will appear in this column is the markers are in conflict with each other and need to reconcile their final grades.
See HERE for the meaning of the other columns.
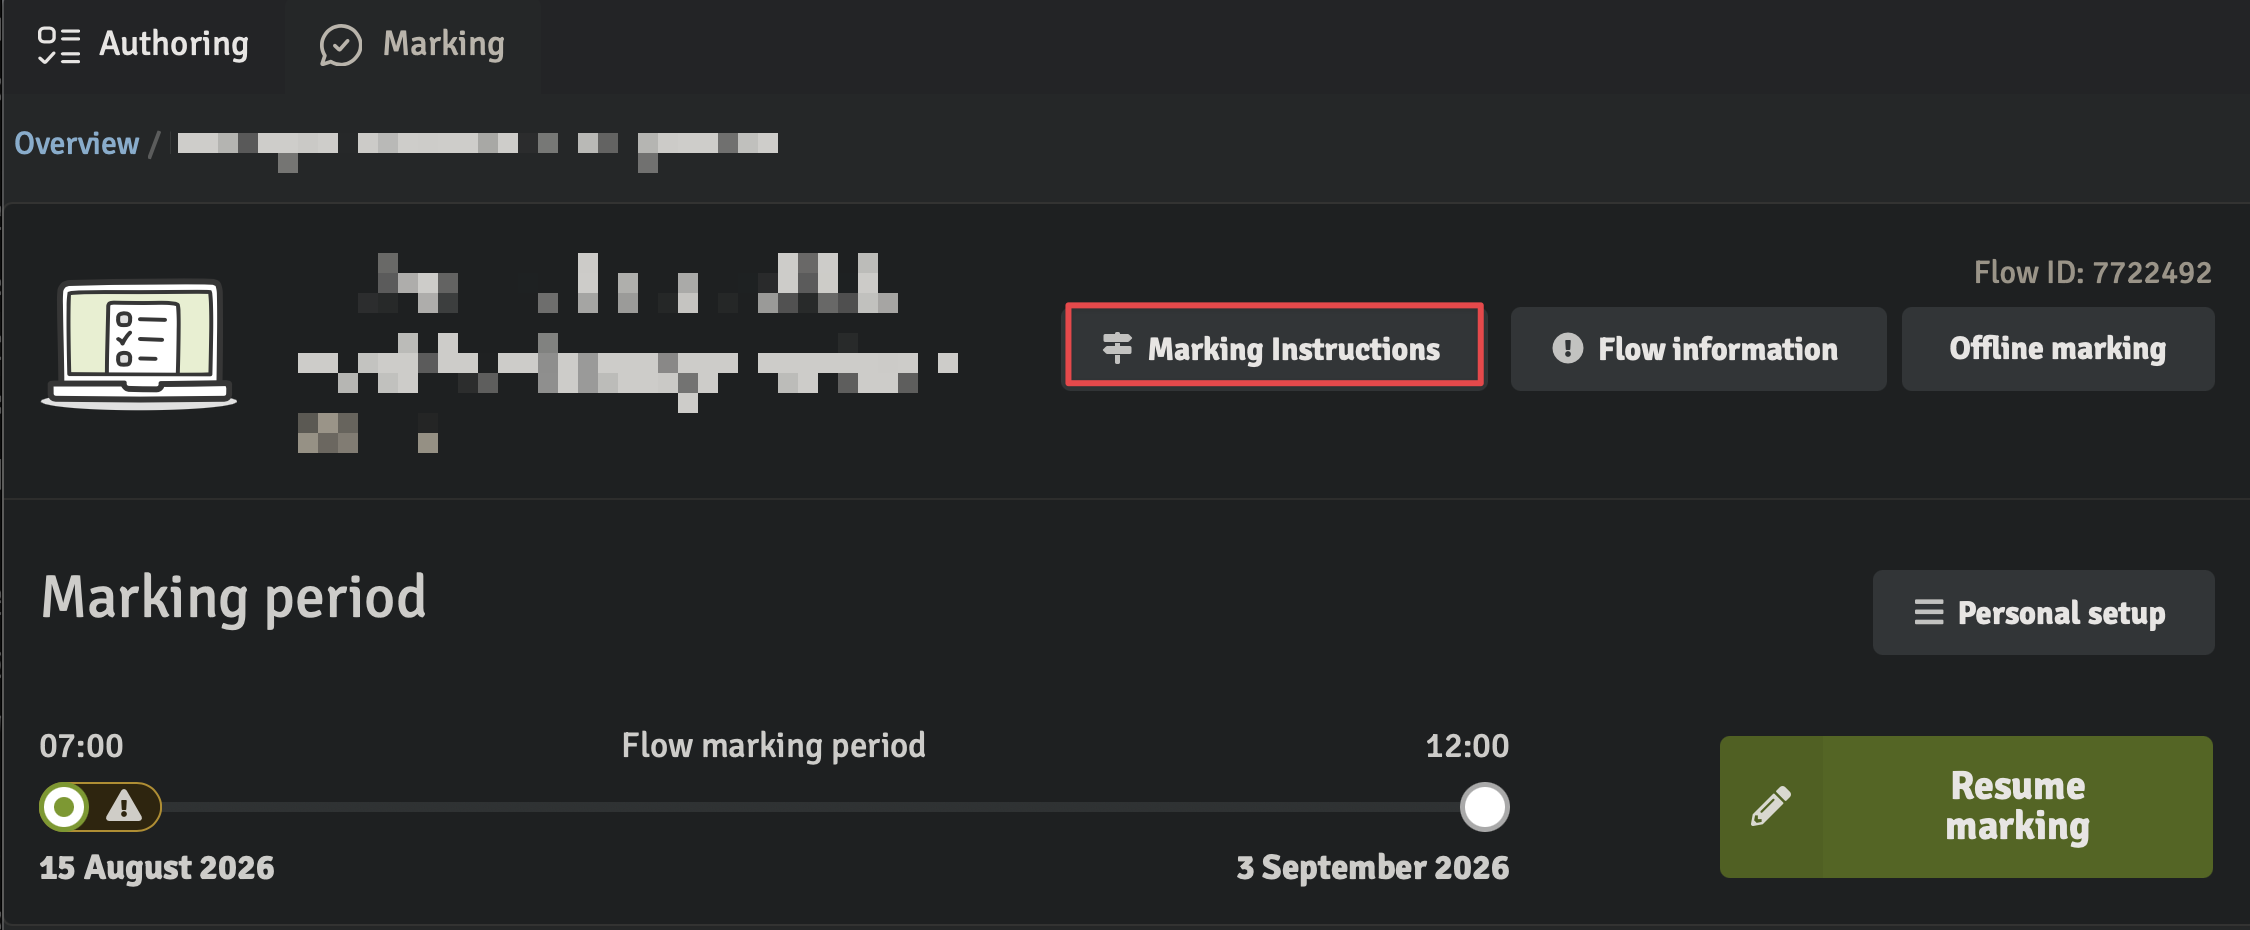
Q: Where is the sensorveiledning (grading guidelines)?
A: Choose “Marking Instructions” at the top of the exam page → Scroll down to find “Marking Material”
Q: How to set grading scales?
A: To add the thresholds, click the Personal setup button on the flow page and then Grade scaling (from scores):
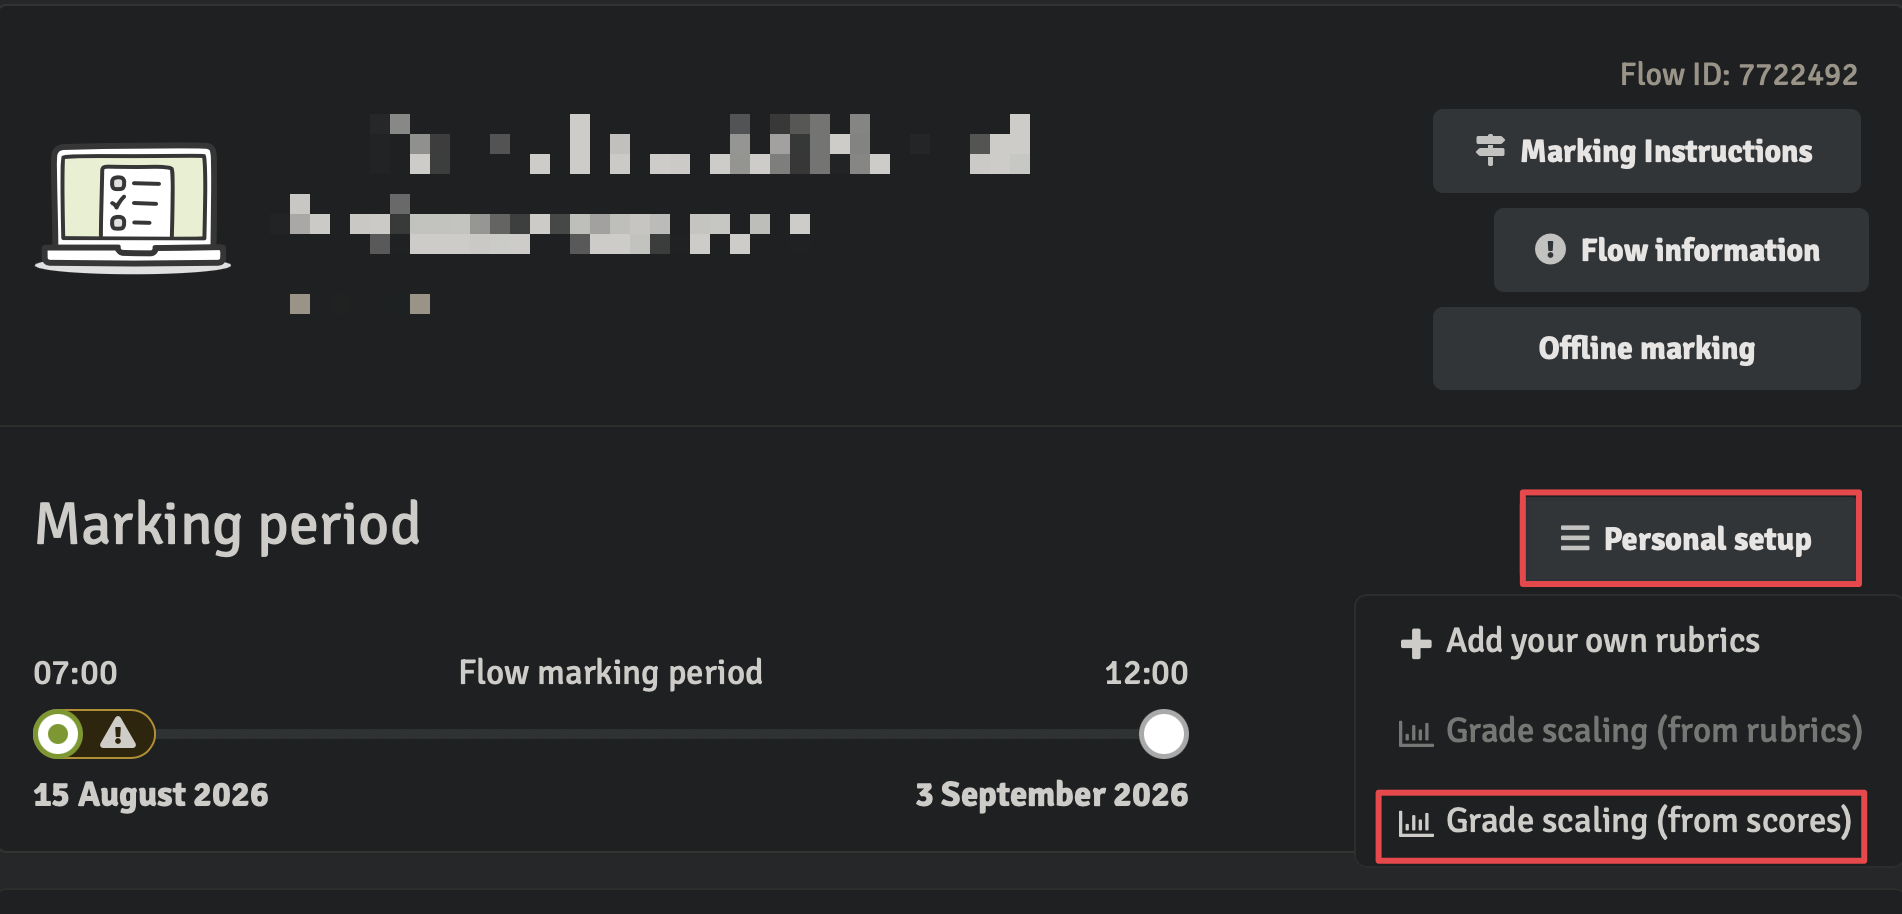
A grade scaler window will pop up. You can adjust the thresholds for each grade and click Save when you are done.