GitHub Tutorial
- Apply for free GitHub Team, which allows unlimited users and private repositories.
Install
brew install git
Log in to your GitHub account
git config --global user.name "Menghan Yuan"
git config --global user.email my1396@nyu.edu
Push an existing repository
-
Initialize an existing project to start tracking with
git.-
Go into the directory containing the project.
-
Type
git init. - Type
git add .to add all of the relevant files. This step is called “staging.”- You’ll probably want to create a
.gitignorefile right away, to indicate all of the files you don’t want to track. Usegit add .gitignore, too.
- You’ll probably want to create a
-
Type
git commit -m 'commit message'.commitrecords changes to the local repository.git generally requires a non-empty commit message.
-
-
Create a online repo and connect it to your local git project.
- Go to GitHub, click the new repository button in the top-right. You’ll have an option there to initialize the repository with a README file.
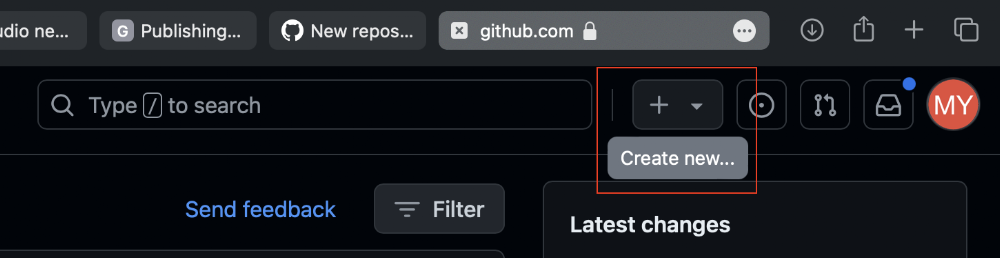
- Click the “Create repository” button.
- Connect your local repo to the remote repo you just created using the following cmds.
Note that# add repo name "origin" to the remote repo at the URL $ git remote add origin https://github.com/my1396/Damage-Function.git # rename the "current" local branch to main $ git branch -M main # push update from the current local branch (main) to remote (origin) repo's main branch; -u is a shortname for --set-upstream; first parameter is upstream then 2nd parameter is local repo # local and remote branch names should be matching $ git push -u origin mainmaincan be replaced bymasterfor older repositories. - Then use GitHub Desktop to manage the repo committing, syncing, ..., later on.
git branch -M mainrenames the current local branch tomain. This is necessary because GitHub usesmainas the default branch name for new repositories, while older Git repositories often usedmaster. By renaming your local branch tomain, you ensure that it matches the default branch name on GitHub, which can help avoid confusion and streamline the workflow when pushing changes to the remote repository.To configure the initial branch name as
mainto use in all new repositories, you can run the following command:git config --global init.defaultBranch main - Go to GitHub, click the new repository button in the top-right. You’ll have an option there to initialize the repository with a README file.
Ref: https://kbroman.org/github_tutorial/pages/init.html
Q: Is it worth using GitHub Desktop?
A: Yes and no. It is useful if you just want to do basic management of your repositories. There are many things you cannot do with GitHub Desktop, e.g., you cannot rename a file. You need to do it with command line or using online GitHub. Github desktop hides a lot of the details of handling git, making it difficult to debug. Additionally, git integration into almost any IDE is available and possibly more powerful, such as VS code git extension allows to rename a file directly.
Troubleshooting
Error: git pull origin main returns
You have divergent branches and need to specify how to reconcile them.
You can do so by running one of the following commands sometime before your next pull:
git config pull.rebase false # merge
git config pull.rebase true # rebase
git config pull.ff only # fast-forward onlyfatal: Need to specify how to reconcile divergent branches.
“Divergent branches” 常出现于 remote repo 初始化时不是空的。这种情况下,需要先 git pull 合并 remote 和 local,然后再 git push。
Fix: run git pull origin main --rebase.
Github common commands
Documentation: https://git-scm.com/docs/git-push
You can change the language using the top-right language tab.
中文:https://git-scm.com/book/zh/v2/Git-分支-分支简介
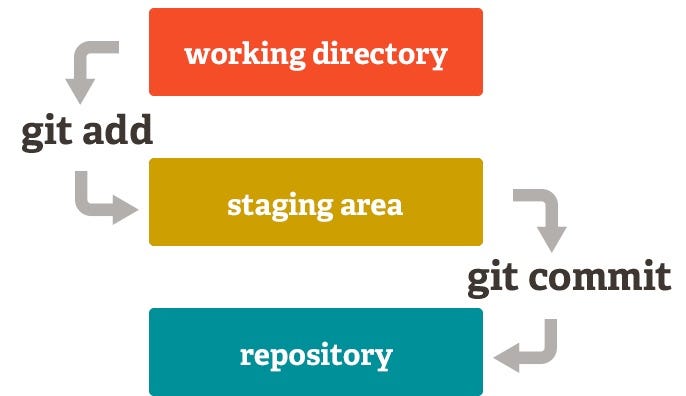
- working direcotry: the files you are actively working on.
- staging area: a file, also called “index”, that lives in your
.gitdirectory. It acts as a middle ground between the working directory and the repository. - repository: where Git stores all the changes as a series of commits.
git add Add file contents to the staging area.
git add . recursively stage changes from the current working directory
git add -A | --all stage all changes in the Git repository
Q: How to view the commit history?
A: Use git log. Executing the command would display:
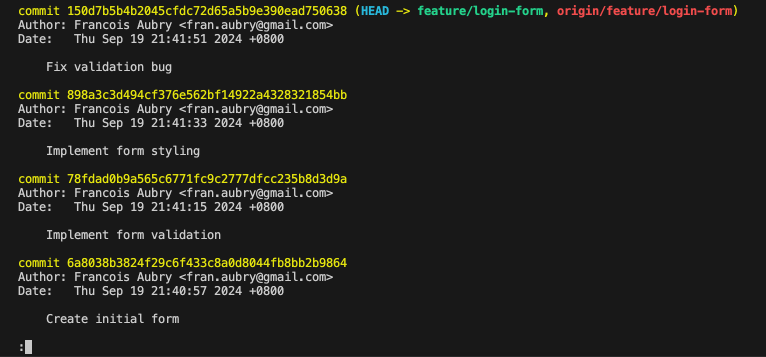
To navigate the list of commits, use the up and down arrow keys. To exit, press q.
Q: Should I push every single commit?
A: Committing to your local repository you are basically saying “I trust this code.” When you feel you want your teammates to see your changes, you push to remote. If you collaborate with others, pushing more frequently would have a lower risk of conflict.
Q: What are local and remote repositories?
A:
- Local repositories are about tracking your changes to protect the work you do.
- Remote repositories are for distributing the work to all your teammates and tracking everyone’s changes.
Git Remote Configurations
git remote Creating and modifying git remote configurations
Commonly used git remote subcommands:
-
Create a new connection to a remote repository.
git remote add <name> <url>
# Example: add repo name "origin" to the remote repo at the URL
git remote add origin https://github.com/my1396/Damage-Function.git
After adding a remote, you’ll be able to use
<name>as a convenient shortcut for<url>in other Git commands. -
Remove the connection to the remote repository called
<name>.git remote rm <name> -
Rename a remote connection from
<old-name>to<new-name>.git remote rename <old-name> <new-name> -
Show your remotes
git remotewithout any flags will list previously stored remote connections$ git remote origingit remote [-v | --verbose]show remote URL after name.-vstands for “verbose.”$ git remote -v origin https://github.com/my1396/Econ-Study.git (fetch) origin https://github.com/my1396/Econ-Study.git (push)git remote show <remote-repo-name>give detailed output on the configuration of a remote given by<remote-repo-name>.$ git remote show origin * remote origin Fetch URL: https://github.com/my1396/Econ-Study.git Push URL: https://github.com/my1396/Econ-Study.git HEAD branch: main Remote branch: main tracked Local branch configured for 'git pull': main merges with remote main Local ref configured for 'git push': main pushes to main (up to date)
Repo’s configuration file
-
Path:
./.git/configgit remote addcommand will modify the configuration file.You can directly edit the
./.git/configfile with a text editor. -
Looks like the following
[core] repositoryformatversion = 0 filemode = true bare = false logallrefupdates = true ignorecase = true precomposeunicode = true [remote "origin"] url = https://github.com/my1396/R-Notes.git fetch = +refs/heads/*:refs/remotes/origin/* [pull] ff = only [branch "main"] remote = origin merge = refs/heads/main [lfs] repositoryformatversion = 0urltellsgit fetch originwhere to fetch the repositoryfetchrefspec tellsgit fetch originwhich names to create or update in your own repository.
git rev-parse --is-inside-work-tree check is a folder is a git repository. Which will print ‘true’ to STDOUT if you are in a git repos working tree.
- Note that it still returns output to STDERR if you are outside of a git repo (and does not print ‘false’).
git fetch: downloads commits, files from a remote repository into your local repo, but it doesn’t integrate any of this new data into your working files.
git pull <remote>: fetch + merge. Directly integrates changes into your current working copy files. This command does two main things:
- first, it executes
git fetchwhich contacts the remote repository and pulls down any data it doesn’t already have, including updates to branches and tags. - Second, it merges one of these branches (usually the corresponding branch) into your current branch, combining the remote changes with your local ones.
Q: Why git fetch is safer?
A: git fetch will download the remote content and not alter the state of the local repository. Alternatively, git pull will download remote content and immediately attempt to change the local state to match that content. This may unintentionally cause the local repository to get in a conflicted state.
Common options of git pull:
git pull <remote> Fetch the specified remote’s copy of the current branch and immediately merge it into the local copy.
git pull --rebase <remote> fetches the remote content but does not create a new merge commit, Instead of using git merge to integrate the remote branch with the local one, use git rebase.
Case scenario: you are working on new-feature and before you push, you pull the remote repo to make sure you have the latest code in case some has made changes.
# fectch + merge
git checkout new-feature
git fetch origin
git merge origin

# pull
git checkout new-feature
git pull --rebase origin # append your change to the main
Pull from the remote repository and overwrite local changes to match the remote exactly.
git fetch origin              # fetch the latest changes from the remote repository
git reset --hard origin/main  # reset the current branch to match the remote branch, discarding local changes
Note that git reset --hard origin/main only resets tracked files.
Sometimes, your local repo has untracked files, e.g., sync conflict files from a cloud service or NAS. In this case, you can use git clean -fd to remove untracked files and directories.
To prevent future sync conflicts, consider using .gitignore to ignore untracked files that are not relevant to your project, such as sync conflict files.
*.sync-conflict-*
This will tell Git to ignore any files that match the pattern *.sync-conflict-*, which are typically generated by cloud services during sync conflicts.
git push [options] <remote-repo> <remote-branch>: update remote repository with local changes you committed. See HERE for command arguments.
<remote-repo>: The remote repository that is the destination of a push operation. This parameter can be either a URL or the name of a remote.<remote-branch>: The name of the branch in the remote repository where the changes should be pushed.
You often encounter git push origin main when working with git. Why origin and main?
-
originis the default name given to the remote repository when you clone a repository.It acts as a shorthand for the remote repository’s URL (e.g., a repository hosted on GitHub, GitLab, or another Git server).
originspecifies the remote repository that should receive the changes. -
mainis the name of a branch in your Git repository.By convention,
mainoften serves as the default branch for a repository. It typically contains the latest stable version of the code.The branch name specifies which branch in the remote repository should receive the changes. Without specifying the branch, Git might use a default branch or require additional configuration.
Rename File
Rename a file, a directory, or a symlink
git mv [<options>] <source> <destination> Move or rename a file, directory, or symlink.
<source>which must exist and be either a file, symlink or directory<destination>is the new file name, symlink or directory
Basic Syntax
To move or rename a file using git mv, simply specify the existing and new paths of the file after the command:
git mv ./old_directory/old_file.ext ./new_directory/new_file.ext
Renaming or moving files with git mv preserves the file’s history and is especially useful in collaborative development to maintain a clear and organized project structure.
- If you do the renaming manually, the change will be recorded as delete and add a new file, the changes of the file won’t be preserved.
# if the file you plan to rename is in your current directory
# use file name directly
git mv gfg1.py gfg2.py
Troubleshooting
fatal: not under version control, source=_posts/2023-10-12-Bibli.md, destination=_posts/2023-10-12-Jekyll-Bibli.md
Cause: The error happens because the parent folder has special character (_posts/).
Fix: Enclose file names with quotes.
git mv "_posts/2023-10-12-Bibli.md" "_posts/2023-10-12-Jekyll-Bibli.md"
git rm The primary function of git rm is to remove tracked files from the Git index. Additionally, git rm can be used to remove files from both the staging index and the working directory.
-rthe option is shorthand for ‘recursive’. When operating in recursive modegit rmwill remove a target directory and all the contents of that directory.--cachedThe--separator option is used to explicitly distinguish between a list of file names and the arguments being passed togit rm. This is useful if some of the file names have syntax that might be mistaken for other options.- The cached option specifies that the removal should happen only on the staging index. Working directory files will be left alone.
Q: Do I need to quote file names?
A: Depends on your shell, has nothing to do with git.
Most shells “tokenize” the command line – that is, split it into a sequence of discrete elements – using whitespace. So, for example
rm one file
will attempt to remove a file named one and a file named file, whereas
rm 'one file'
will attempt to remove a single file named one file.
The principle is
- it does NOT matter whether you quote when your file name/path does NOT contain spaces.
- when you write
commitmessages, usually write inside quotes as it is common to have spaces inside your message.
Git doesn’t track directories, so it won’t remove ones that become empty as a result of a merge or other change. However, you can use git clean -fd to remove untracked directories (the -fd flag means force removal of untracked files and directories).
git restore . discards all unstaged files in current working directory use.
For one specific file use: git restore <path/to/file/to/revert>
git log --oneline Show a compact summary of commit history in one line per commit.
$ git log --oneline

3f5a8c2 Add new feature
a1b2c3d Update README.md
e4f5g6h Initial commit
You get the commit hash and the commit message in a concise format.
gitignore
A gitignore file specifies intentionally untracked files that Git should ignore. Files already tracked by Git are not affected.
Basic syntax of .gitignore:
-
foo/will match a directoryfooand paths underneath it.fooand/foohave the same effect. The leading slash doesn’t matter. -
foo/*will match all files directly under the directoryfoo.
The difference between foo/ and foo/* is significant when you want to re-include a subdirectory under foo/ later.
file structure:
.
├── foo
│   ├── exclude_me
│   │   └── file.txt
│   └── include_me
│       └── other_file.txt
└── other_file2.txt
If your .gitignore contains:
foo/
!foo/include_me/
It does not work as foo/ excludes everything under foo/.
What you need is:
foo/*
!foo/include_me/
With foo/*, Git will process the direct contents of foo, giving other patterns a chance to re-include subdirectories like foo/include_me/. ↩
-
*matches anything (zero, one, or more characters) except a slash/. -
?matches one single character except a slash/. - A line starting with
#serves as a comment.- To match files that begin with a hash, put a backslash (“
\”, escape character) in front of the first hash.
- To match files that begin with a hash, put a backslash (“
-
!at the beginning of a line negates the pattern.It re-includes a file that was previously excluded by a previous pattern.
The order matters. The exception rule must come after the ignore rule.
# Ignore all PDF files *.pdf # But keep this specific one !ectj template with style instructions.pdf-
File names with spaces in the middle: do NOT need special handling. Just write the file name with spaces directly.
Trailing spaces are ignored unless they are quoted with backslash (
\). → This rarely happens. -
You cannot re-include a file if a parent directory of that file is excluded.
File structure:
.
├── dir1
│   └── file.txt
└── dir2
    └── file.txt

.gitignore:
dir1/*
!dir1/file.txt  # this won't work because dir1/ is excluded
-
Delete a file in .gitignore after you have already added it to the repo.
How to make Git forget about a file that was tracked, but is now in .gitignore?
.gitignore is only for untracked files.
# This removes all files from the repository and adds them back (this time respecting the rules in your .gitignore).
git rm -rf --cached "Shared folder.Rproj"
git add .
git commit -m "clear cache"
git push
If you make changes to your repository, the workflow is add $\rightarrow$ commit $\rightarrow$ push.
You can have multiple .gitignore files in a Git project. Git will combine then hierarchically.
- Repository-level
.gitignorefile: located at the root of the repository, it applies to all files and subfolders within the repository. -
Folder-level
.gitignorefile: you can place a.gitignorefile in any subfolder of the repository. It applies to files and subfolders within that specific folder and its subfolders.Rules apply relatively to that folder.
Overrides parent rules if there’s a conflict.
Undo local changes
Until you push your changes to a remote repository, changes you make in Git are only in your local development environment.
When you make a change, but have not yet staged it, you can undo your work.
git reset --hard <SOME-COMMIT>
<SOME-COMMIT> is some good commit that you want to go back to. You can find the commit hash by using git log --oneline.
Or you can use HEAD to refer to the latest commit in the current branch.
Other related commands:
# Undo last commit
git reset --hard HEAD~1

# Move HEAD three commits back
git reset --hard HEAD~3

# Undo all local changes and match the remote repository
git reset --hard origin/HEAD
Undo staged (git add) local changes:
git reset --hard
Undo committed local changes. You will lose all local changes after the last commit.
When you commit to your local repository (git commit), Git records your changes. Because you did not push to a remote repository yet, your changes are not public (or shared with other developers). At this point, you can undo your changes.
git-blame: Show what revision and author last modified each line of a file.
Failure When Push Large Files
Github Error:
-
RPC failed; HTTP 400 curl 22 The requested URL returned error: 400 Bad Request
-
RPC failed; curl 55 Failed sending data to the peer send-pack: unexpected disconnect while reading sideband packet.
This is an HTTP buffer issue. Happens when you are pushing a large amount of data.
Fix:
- Increase the buffer will solve the issue. [Easiest solution] Or,
- you could push by small batches of changes. Or,
- use Git Large File Storage.
git config http.postBuffer 524288000
git pull && git push
Q: what does http.postBuffer do?
A: This option changes the size of the buffer that Git uses when pushing data to a remote over HTTP or HTTPS.
The default of httpBuffer size is set to 1MB for https. Please note the only acceptable values are 524288000 (500mb), 1048576000 (1 GB) and 2147483648 (2 GB). Anything above it, is considered out of range.
git config http.postBuffer 524288000 will set the httpBuffer size to 500 MB.
To remove the file that you have already committed, you are going to need to reset your HEAD to the commit before the one that contains your file. Make sure you are performing a soft reset.
git reset --soft HEAD~1
1 is the number of commits you need to move back, can be greater than 1.
Git Large File Storage
./install.sh. install Git Large File Storage from source.
Go to the Git repository where you want to use Git LFS, select the file types you’d like Git LFS to manage (or directly edit your .gitattributes). You can configure additional file extensions at anytime.
git lfs track "*.psd"
git lfs track "*.png"
Now make sure .gitattributes is tracked. Your tracked files’ details are saved inside a .gitattributesso make sure to add .gitattributes to persist tracking when other users clone the project.
git add .gitattributes
You should then be able to safely add, commit and push!
git add file.png
git commit -m "Add design file"
git push origin main
Revert a single file to a previous commit
Git doesn’t keep version numbers for individual files. It just tracks content – a commit is essentially a snapshot of the work tree, along with some metadata (e.g. commit message). So,
- we have to know which commit has the version of the file we want.
- Once we know that, we’ll need to make a new commit reverting the file to that state.
To find the commit, we can use git log -- <file> to see the history of changes to that file.
git log -- path/to/file
You’ll be able to find the SHA1 (hash) of the commit with the version of the file you want. Now, all you have to do is this:
# get the version of the file from the given commit
git checkout <commit-sha1> -- path/to/file

# alternatively, to revert to the version in the last commit
git checkout HEAD -- path/to/file

# commit this modification
git commit -m "Revert path/to/file to <commit-sha1>"
git diff tool
How to use git diff
git diff without arguments, it compares your Working Directory to the Staging Area, showing changes you’ve made but haven’t staged yet.
git diff --staged compares the Staging Area to the last commit, showing what will be included in your next commit.
git diff HEAD compares your Working Directory directly to the last commit, showing all uncommitted changes regardless of staging status.
git diff commit1-hash commit2-hash compares two specific commits, showing changes between them.
To see changes with specific files, use git diff <file-path>.
A quick preview of your Working Directory changes compared to the last commit can be done with the tool bar in the Editor view.
Just click on the top right icon - “Open changes”. This will show changes for current file.
And go back to the file, clicking on the top right icon - “Open file”
Graphical diff tool
You can use an external visual diff tool to compare changes between commits, branches, files, etc.
The following configurations in .gitconfig is for git to use VS Code as the diff and merge tool.
[core]
  editor = code --wait
[diff]
  tool = vscode
[difftool "vscode"]
  cmd = code --wait --diff $LOCAL $REMOTE
[merge]
  tool = vscode
[mergetool "vscode"]
  cmd = code --wait $MERGED
Set default editor
The default editor is vim. You can change it to VS Code.
Prerequisite: Make sure the code command is available in your PATH. It is possible that this wasn’t done as part of your installation.
To test this, run code --version in your terminal. If you see the version number, you’re good to go.
Install code command in PATH: Open command palette (⇧⌘P) and type ‘shell command’ to find the Shell Command: Install 'code' command in PATH command.
You can either use the above global git config file, or equivalently, using command-line:
git config --global core.editor "code --wait"
# Open new window opens each time
git config --global core.editor 'code --wait --new-window'
- If you only want to change it for your current project, run the same command without the
--globalgit flag.
How to set it back to the default?
git config --global --unset core.editor
Set default diff tool
The default diff tool is vimdiff. You can either use the above global git config file, or equivalently, using command-line:
git config --global diff.tool vscode
git config --global difftool.vscode.cmd 'code --wait --diff $LOCAL $REMOTE'
If you’re not feeling VS Code as your diff tool, you run the command git difftool --tool-help to see more options.
Set default merge tool
There is no default merge tool set.
When there is a conflict, you will get error messages when you try to pull or push changes. Running git mergetool will allow you to resolve conflicts.
git config --global merge.tool vscode
git config --global mergetool.vscode.cmd 'code --wait $MERGED'
If you’re not feeling VS Code as your merge tool, you run the command git mergetool --tool-help to see more options.
Ref:
Branch management
Q: What are different branches for?
A: There are different types of branches, including the main branch (usually called “master” or “main”), feature branches, release branches, and hotfix branches. Each branch serves a specific purpose and helps developers manage their codebase better.
Q: Can I clone a specific branch?
A: Yes. Run the following code
git clone --branch <branchname> --single-branch <remote-repo-url>
--branch (two hyphens) can be replaced by -b (one hyphen).
Cloning a specific branch in Git is a useful feature that allows developers to work on specific features or bug fixes without cloning the entire repository.
But you may want to clone all branches first, and then work on your own branch. When you finish, you can merge your updates into the main branch. This makes it easier to compare differences and make sure your branch is in sync with with the main branch.
To this end, you need to run
// this will clone all branches
git clone <remote-repo-url>
Then you could checkout to one specific branch to work.
These could be achieved by one combined command too with the argument --branch <branchname>.
// clone all branch then switch to <branchname>
git clone --branch <branchname> <remote-repo-url>

// or using -b alias for --branch
git clone -b <branchname> <remote-repo-url>
A downside of clone the whole repository is that you will fetch all files from each branch. You might not want this if the repository has a large history.
Collaborations
You can also open Pull Requests between separate branches on GitHub. This often presents a good way for collaborating with people who have access to the same repository. You don’t want to all be pushing to the main branch all the time. Instead, each person can create their own branch, work separately, and then open a pull request to merge that branch into main.
If you create a local branch in your repo, you can push it to GitHub as follows:
First, make sure that you are on the branch that you want to push:
# List all branches and show which one is currently active (with a * next to it)
$ git branch
Then run
# -u option will set up a link between local and remote upstream branches
# -u is used when you have your initial push of your update
$ git push -u origin <branch-name>
to push the current local (active) branch to the remote branch <branch-name>.
-u is a shortname for --set-upstream;
- the 1st parameter is the upstream repo,
- the 2nd parameter is the local repo.
After establishing the upstream at the initial push, you can use git push with no argument for later updates.
Note that branch names should be matching between local and remote repositories. When you run git push origin main, Git pushes the commits from your local main branch to the corresponding main branch on the remote repository.
-
git branchwith no argument (or with--list) will print a list of branches linked to the current repo.Could be used to check which branch I am currently on. Your current branch (i.e., the branch that
HEADpoints to) is prefixed by*and highlighted in green.(base) menghan@Nord16 Shared folder $ git branch * Menghan coauthor master -
git checkout <branch-name>switch to the branch<branch-name>. -
git branch Menghancreate a branch calledMenghan// create a branch $ git branch <branch-name> // switch (checkout) to a specific branch $ git checkout <branch-name>Or, there is a combined command first creating a branch then switching to it
// create a branch and switch to the branch
$ git checkout -b <branch-name>
Now we want to add this branch remotely. All we have to do is push it to our Git provider such as GitHub using the command below:
$ git push -u origin <branch-name> -
git branch -d Menghandelete the local branchMenghan -
git branch -rshow remote-tracking branches.Remote branched are just like local branches, except they map to commits from somebody else’s repository. Remote branches are prefixed by the remote they belong to so that you don’t mix them up with local branches.
MY-Nuffield:Shared folder Menghan$ git branch -r
  origin/HEAD -> origin/master
  origin/Menghan
  origin/coauthor
  origin/master
Q: What is
HEAD?
A:HEADstores the current commit hash ID, representing the currently checked-out-commit repository.origin/Menghan,origin/coauthor, andorigin/masterare remote-tracking names Git created for human to read, Git itself uses big ugly hash IDs.ref: https://stackoverflow.com/questions/74561949/why-does-head-show-up-in-git-branch-remote
Q: What is origin?
A: origin is the remote name, stored in your .git/config.
-
git branch -ashows both local and remote branches.(base) menghan@Nord16 Shared folder % git branch -a * Menghan coauthor master remotes/origin/HEAD -> origin/master remotes/origin/Menghan remotes/origin/coauthor remotes/origin/masterThe first three are local branchesl the last four are remote branches.
-
git branch -M <main>rename the current branch tomain.
git push <remote> <remote-branch> Push commits made on your local branch to a remote rep.
- E.g.,
git push origin mainpush your local changes to the remote repository on themainbranch.- Where git push initiates the push,
originrefers to the remote counterpart of the project, andmainis the remote branch name. This is common when you are the only contributor to your project, and you want to directly edit the default branch of your project with changes.
- Where git push initiates the push,
<remote>is the destination remote repo name of a push operation. This parameter can be either a URL or the name of a remote.- When the command line does not specify where to push with the
<remote>argument,branch.*.remoteconfiguration for the current branch is consulted to determine where to push. If the configuration is missing, it defaults to origin.
- When the command line does not specify where to push with the
<remote-branch>is a branch name in the remote repository where the changes should be pushed.
git push origin <branch> will push the current branch to the remote counterpart of that branch.
git push origin will push the current branch to the branch of the matching name in the remote repository (aka, “branch configured upstream”), if it exists.
Otherwise, it will not push and notify that the current branch has no remote counterpart (error message: “<branchname> has no upstream branch”).
-
The default branch in your project is conventionally a branch named “main”. This branch is the version of the project that goes into production or the version from which you will create further branches to isolate changes, and merge back into the default branch.
-
If a project you are working on is older, the default branch might be named “master”, which GitHub changed to remove references to slavery in conventional terminology. It’s important to check the name of the default branch.
-
-u, or--set-upstream:git push -u origin mainorgit push --set-upstream origin mainCreates a remote branch and sets it upstream of the current branch you are pushing. The relationship between the current branch and upstream branch is remembered, such that you will not have to continually connect the remote and local branches when pushing commits.
- It is recommended to use
-uflag for the first push on a specific branch. When you use the-uflag, Git will create a link between your local branch and the remote branch. - Once a link btw your local and remote branches is created, you don’t need to specify repo and branch in the future
pullandpush, Git will remember which remote branch corresponds to your local branch.
- It is recommended to use
-
-f,--force: Pushes that would delete or overwrite existing code are usually blocked. With this command, pushes from your local repository would be forced onto the remote repository, potentially deleting or overwriting other commits! -
-d,--delete: Deletes the remote branches listed. Eg,git push origin --delete <branch name> -
--all: Pushes all local branches to remote repository
Solve the no upstream branch error message: create a remote branch with the same name as the local branch and push changes to the remote branch (aka, “set upstream”).
$ git push --set-upstream origin.
Merge
git merge <source-branch> add the changes from <source-branch> into your current branch. Use this command when you have finished building a feature in a separate branch, u.e., <source-branch>, and want to bring those changes into your current branch.
To do a merge (locally), git checkout the branch you want to merge INTO. Then type git merge <branch> where <branch> is the branch you want to merge FROM.
git checkout main # switch to the main branch
git merge new-feature # merge updates in new-feature to main
Now the main branch is in sync with new-feature.
When creating a merge commit Git will attempt to auto magically merge the separate histories for you. If Git encounters a piece of data that is changed in both histories it will be unable to automatically combine them. This scenario is a version control conflict and Git will need user intervention to continue.
Resolve conflicts: git mergetool to check where the conflict occurs and why it occurs.
-
To see that which is the first edited text of the merge conflict in your file, search the file attached with conflict marker
<<<<<<<.-
You can see the changes from the HEAD or base branch after the line
<<<<<<< HEADin your text editor. -
Next, you can see the divider like
=======. It divides your changes from the changes in the other branch, followed by>>>>>>> BRANCH-NAME. In the above example, user1 wrote “<h1> Git is a version control</h1>” in the base or HEAD branch and user2 wrote “<h2> Git is a version control system </h2>”. -
Decide whether you want to keep only your branch’s changes or the other branch’s changes, or create a new change. Delete the conflict markers
<<<<<<<,=======,>>>>>>>and create final changes you want to merge.
-
To accept the changes, use the rebase command. git rebase --continue
git checkout <Menghan> switch to the branch Menghan.
git checkout .will forgo all unstaged changes.git checkout -b <new-branch>create a new branch namednew-branchand then checked out.
git branch (-m | -M) [<oldbranch>] <newbranch> <oldbranch> will be renamed to <newbranch>. If <oldbranch> had a corresponding reflog, it is renamed to match <newbranch>, and a reflog entry is created to remember the branch renaming. If <newbranch> exists, -M must be used to force the rename to happen.
git remote add <name> <url> Add a remote named <name> for the repository at <url>. This is used to configure the remote repo, created a reference using the repo <url>.
-
<name>is a short remote name for your reference. -
Now you can pass that remote name
<name>togit fetch <name>to download the contents.
Fetch a specific branch use git fetch <remote repo name> <branch name>. E.g., git fetch origin test.
Difference of fetch from pull: fetch does not merge; pull automatically merge remote to the current branch.
git update-index --skip-worktree <file> causes the following error
The following pathspecs didn’t match any eligible path, but they do match index entries outside the current sparse checkout:
-
If what you want to do is to remove that
<file>and index entry, unset theskip-worktreeflag first, withgit update-index --no-skip-worktree "Shared folder.Rproj", and thengit rmwill work as expected. -
If what you want to do is to just remove the index entry, you can do that directly, at the core-command level,
git update-index --force-remove "Shared folder.Rproj", or unset the flag as above thengit rm --cachedit.
git push origin --delete Menghan delete a remote branch.
git push -u origin Menghan push updates from Menghan (local) to origin (remote) branch. -u is equivalent to --set-upstream.
Check history on Github
Code $\rightarrow$ History $\rightarrow$ click one commit, this will show your revision history.
Local repository content will change according to which branch you checkout in terminal. You make changes at your local branch, then you merge the updates to the master branch.
If your branch is ahead of your master — You get that message because you made changes in your local master and you didn’t push them to remote. You need to navigate to master and merge the change from the local branch.
Use the following code to fix the ahead problem.
git add -A
git commit -m "My commit"
git checkout master # have to first checkout to master [receiving branch]
git merge Menghan # merge from Menghan --> master
git push -u origin master # push master changes from the current branch to the remote repo master branch.
If your branch is behind your master: navigate to the local branch and merge change from master.
git checkout master # you are switching your local branch to master
git pull # pull update from remote master
git checkout Menghan # switch back to your branch [receiving branch]
git merge master # from master --> Menghan
After merging it, check if there is a conflict or not. If there is NO CONFLICT then:
(base) menghan@Nord16 Shared folder $ git push
Everything up-to-date
If nothing was pushed, it is likely Git did NOT push the currect branch. In this case, you can explicitly specify the branch you want to push as follows.
(base) menghan@Nord16 Shared folder $ git push origin Menghan
Total 0 (delta 0), reused 0 (delta 0), pack-reused 0
To https://github.com/my1396/Damage-Function.git
   39b1b00..6d5a038  Menghan -> Menghan
If there is a conflict then manually fix your file(s), then:
git add yourFile(s)
git commit -m 'updating my branch'
git push
Merge with GitHub Desktop
You want to merge master (source) into Menghan (target)
-
Navigate to the target repo
Menghan -
Click menu bar Branch → Merge into the current branch
-
In the “Merge into
Menghan” dialog box, click the source repomaster -
Now
Menghanis in sync withmaster. You can push your local changes to the remote repository, in the repository bar, clickPush origin.
Best Practices for Team Collaboration
Your repository’s main branch, which is regarded as the authoritative branch, is the only branch present by default. Each co-author has their own branches where they make changes on. When they fill the changes are mature/final, they push to the main branch.
For instance, you might have the following remote branches in your repo:
origin/main(the default branch, where the production-ready code lives)origin/Menghan(a branch for your development work)origin/coauthor(a branch for your co-author’s development work)
-
Open the repo:
cd Repo-Name(e.g.,cd budget-frontend) -
Ensure you are on the main branch:
git checkout main -
Ensure you are up-to-date:
git pullYou definitely want to make sure your project is up to date before you push your changes. Otherwise, you risk breaking the build for others.
-
Create a new branch for your task:
git checkout -b Your-Branch -
Code on
Your-Branch -
Add updates, commit, push to your remote branch
origin/Your-Branch. -
Merge with the
mainbranch.git checkout main # switch to main branch git pull origin main # pull the latest code from remote main branch git merge Your-Branch # merge your personal branch to main git push origin main # push the updated main branch to remoteNow the
mainbranch contains all the changes you made inYour-Branch(your personal branch).
It’s a good practice to run git pull -r before making any changes in your local repository.
This makes sure you have got the latest code in case someone may have changed the remote repo. If there are changes on the remote branch that you haven’t pulled, you might encounter conflicts when you try to push your changes later.
-r or --rebase bases your changes from the current version from the repository. If you started doing some development and then another developer made an unrelated change.
git rebase would fetch the changes from the remote repository and put them before/under your local branch without creating a merge commit. It’s particularly useful for maintaining a linear project history.
The following is a diagram of rebasing a Feature branch onto main. After rebasing, your Feature will be on the tip of main branch. This is like saying, “add my changes to what my team members have already done.”
By default, the git pull command performs a merge, but you can force it to integrate the remote branch with a rebase by passing it the --rebase option.
The major benefit of rebasing is that you get a much cleaner project history.
- First, it eliminates the unnecessary merge commits required by
git merge. - Second, as you can see in the above diagram, rebasing also results in a perfectly linear project history—you can follow the tip of
featureall the way to the beginning of the project without any forks.
Q: Are there any downsides/pitfalls with rebase?
A: TL; DR: git rebase will rewrite the project history, make it impossible for Git and your teammates to track any follow-up commits added to the feature.
Long Answer:
- Because a
rebasemoves commits (technically re-executes them), the commit date of all moved commits will be the time of the rebase and the git history might look like it lost the initial commit time.- So, if the exact date of a commit is needed in all tooling for some reason, then
mergeis the better option. But typically, a clean git history is much more useful than exact commit dates. - And the author-date field will continue to hold the original commit date where needed.
- So, if the exact date of a commit is needed in all tooling for some reason, then
- If the rebased branch has multiple commits that change the same line and that line was also changed in the base branch, you might need to solve merge conflicts for that same line multiple times, which you never need to do when merging. So, on average, there’s more merge conflicts to solve.
The following shows a diagram of merging main to Feature.
An example of when git pull --rebase could be useful: see Stack Overflow Page.
Q: When you use git rebase instead of git merge?
A: See a full discussion HERE. But in short,
mergeexecutes only one new commit.rebasetypically executes multiple (number of commits in current branch).mergeproduces a new generated commit (the so called merge-commit).rebaseonly moves existing commits.
Q: What is a merge?
A: A commit, that combines all changes of a different branch into the current.
Q: What is a rebase?
A: Re-committing all commits of the current branch onto a different base commit.
Q: In which situations should we use a merge?
A: Use merge whenever you want to add changes of a branched out branch back into the base branch.
Q: In which situations should we use a rebase?
A: Use rebase whenever you want to add changes of a base branch back to a branched out branch.
Q: What does it mean by “merge creates unnecessary merge commits”?
A: If multiple merges were needed in a feature branch, then the feature branch might even hold more merge commits than actual commits! Below is an example of Git history when using merge:
Note the many commits starting with Merge branch 'main' into .... They don’t even exist if you rebase (there, you will only have pull request merge commits). Also many visual branch merge loops (main into feature into main).
Q: How does a Git history look like when using rebase?
A: Much cleaner Git history with much less merge commits and no cluttered visual branch merge loops whatsoever. Looks like the following:
Squash Commits
“Commit early, commit often” is a popular mantra in software development when using Git. However, this can also lead to an overabundance of commits.
This is where the importance of squashing commits comes into play. Commits can be combined into a single commits by squashing.
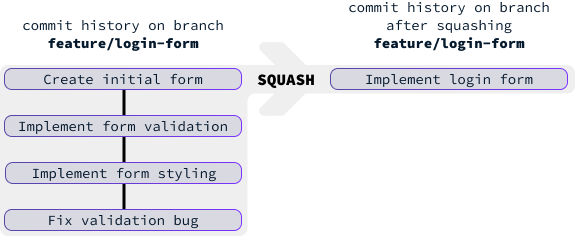
For instance, let’s say we work on a feature implementing a login form, and we create the following four commits:
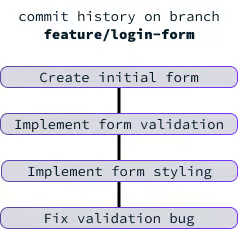
Once the feature is completed, for the overall project, these commits are too detailed. To ensure a clean history in the main branch, we squash these commits into a single commit:
The most common method to squash commits is using an interactive rebase. We start it using the command:
git rebase -i HEAD~<number_of_commits>
Replace <number_of_commits> with the number of commits we want to squash.
In our case, we have four commits, so the command is:
git rebase -i HEAD~4
Remember again that this is a rebasing command — every commit in the range HEAD~4..HEAD with a changed message and all of its descendants will be rewritten.
❗️Don’t include any commit you’ve already pushed to a central server — doing so will confuse other developers by providing an alternate version of the same change.
Executing this command will open an interactive command-line editor that looks something like this:
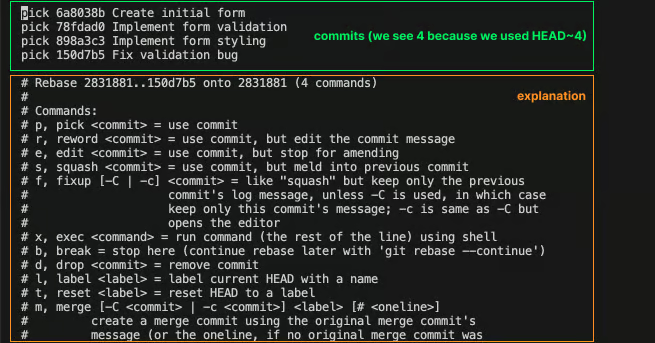
We see four commits that are listed in the opposite order. For each, we must decide which command to execute. We care about the pick (p) and squash (s) commands.
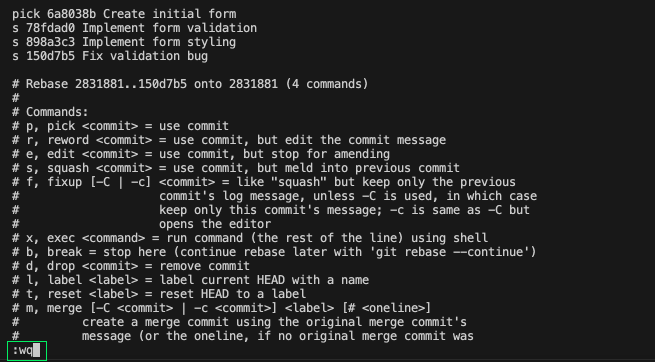
To squash these four commits into a single commit, we can pick the first one and squash the remaining three.
After we have made the changes, the scirpt should look like:
When you save and exit the editor, Git will execute the script and open a new text editor. The editor will display a default message comprising the messages from the four commits we are squashing:
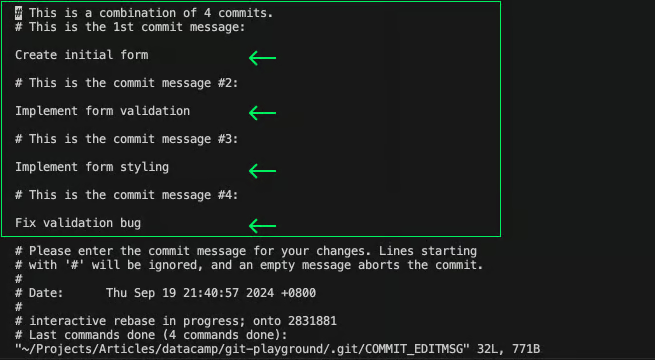
Enter the commit message to accurately reflect the changes implemented by these combined commits.
Pusing Squashed Commits
The command above will act on the local repository. To update the remote repository, we need to push our changes. However, because we changed the commit history, we need to force push using the --force-with-lease option:
git push --force-with-lease origin feature/login-form
This option ensures we only force push if the remote branch hasn’t been updated since our last fetch or pull.
References:
https://www.datacamp.com/tutorial/git-squash-commits
https://git-scm.com/book/en/v2/Git-Tools-Rewriting-History
Gists
Q: When should I use a Gist instead of a full-fledged Git repo?
A: Gist is meant for sharing code snippets. Useful for sharing standalone pieces of code, such as config files, scripts, or small code examples. It shows history and allows for versioning.
-
Gist: If it’s pieces of code designed to demonstrate a technique, teach a principle, or share a solution, it goes in a Gist.
-
GitHub: If it’s actual code intended to be run, used as is, or forked as boilerplate I put it in a proper repository.
For each project, you build a Git repository, where you can have multiple directories and organize different file types, track changes, etc.
Q: Should I clone Gist locally so that I manage it as a regular Git repo?
A: No, I wouldn’t do it. Each Gist will be one folder named by the Gist ID. It is not human readable. You can put it in a parent folder with a readable name, but imagine you have many Gists, then you have many (at least) two-level folders.
There is a workaround if you really need to edit locally. You can use the GistPad extension on VS Code. You can open, create, delete, fork, archive, and star gists/repositories, and then seamlessly begin editing files as if they were local, without ever cloning, pushing or pulling anything.
Q: How about put all Gist in one regular repo?
A: Not good as you are putting lots of unrelated things together.
GitHub Status Page
Check GitHub’s status page to see if there are any ongoing issues with GitHub Actions or infrastructure that might be causing delays.
GitHub Education Benefits
GitHub Copilot is free to use for open source maintainers, teachers and students. We check eligibility monthly, per our policies.
See the following for various plans and pricing.
- GitHub Copilot Plans
- GitHub Docs: About individual GitHub Copilot plans and benefits
- Free access to Copilot Pro through GitHub Education
Here is a summary of various plans
-
Free: 50 agent mode or chat requests per mont; 2,000 completions per month
For everyone to try out Copilot. 相当一个试用版。
A “completion” is counted each time Copilot provides a code suggestion, regardless of whether it’s accepted or not.
So nearly every
charI type is one completion (as the suggestions change while I type) – no wonder that the free credits are gone in no time.- Premium requests: up to 50 per month
-
Pro: Unlimited agent mode with GPT-4.1 and chats with GPT-4.1. Unlimited code completions.
一般人最佳性价比之选。基本来说也够用了。
偶尔需要大量使用时,可能额度不够。可以以每次 $0.04 的价格购买额外请求。
学生和教师凭借学校邮箱可以免费申请 Pro 版。↩︎
- price: $10/mon.
- Premium requests: up to 300 per month, with additional requests at $0.04/request.
-
Pro+: \$39/mon. 土豪专供,一般人还算了。按年付也要 $390/yr.
- 1,500 premium requests per month (3x the Pro plan); with the option to buy more (additional at $0.04 USD each). 3倍的高级请求额度。


Q: What counts for Premium requests?
A: Copilot Chat, agent mode, code review, and Copilot Extensions use premium requests, with usage varying by model. Purchase additional premium requests at $0.04/request.
Q: How to see how many requests I have left?
A: Click Copilot icon in the bottom left corner of VS Code
You can view information about
- features included in your plan,
- your progress towards any limits on your plan, and
-
the date your allowance resets.
The allowance resets on the first day of each month.
Application
After uploading proof, application was approved within five minutes.
Your academic benefits will become available within 72 hours of your verification.
The waiting time may vary depending on different factors, such as the volume of requests; it usually takes a few days, but sometimes it can take a little longer, even a couple of weeks.
You will receive an email and the GitHub show “coupon applied.” Click the link to accept the access.
To redeem your Copilot Pro coupon, please sign up via this link.
After you click the link, the following page shows up.
If you have the GitHub Copilot extension already installed for your code editor and have it open, please restart your editor in order to access GitHub Copilot.
Valid for two years once approved. Expires in July 2027.
Once the benefits become available, you will be able to upgrade your organizations to GitHub Teams via your GitHub Education dashboard.
Benefits
Use of GitHub Copilot
-
GitHub Copilot is specifically designed for programming.
-
Copilot for inline code completion: the gray text represents ghost text with Copilot’s suggestions.
Accept suggestions with Tab.
- Copilot Chat
- Type
/explainand hit enter. Copilot will give you a detailed explanation of what’s happening in the code. - Type your request and hit enter. Copilot will give you a plan, an updated code block, and a list of suggested changes. Hover over the code block, click the “Apply in Editor” button to accept the changes, and GitHub Copilot will make the updates for you.
- Type
- Use plan mode (VS Code, Copilot CLI) to improve task efficiency. Plan mode also improves task success.