Linux Tutorial
Which shell I am using?
Starting with macOS Catalina (10.15), Apple set the default shell to the Z shell (zsh). In old Mac machines/systems, the default was Bash.
-
In
zsh, the configuration file is~/.zshrc. (M chip, Apple Silicon)New Macs with M chips ship with Zsh as the default shell.
-
In
bash, it’s~/.bash_profile. (Intel Mac, x86)Old Macs ship with Bash as the default shell. But as you upgrade macOS to newer versions, you may find that the default shell has been changed to Zsh.
You can also install Zsh regardless of the Mac CPU architecture or OS version.
You can install with Homebrew and set Zsh as the default shell.
# Check which shell you are using
# Print the configured default shell
$ echo $SHELL
/bin/zsh

# Print the name of the current shell instance/process
$ echo $0
-zsh

# Check shell version
$ zsh --version
Every time you make changes with the configuration file, run the following command for the changes to take effect:
source ~/.bash_profileif you havebash. [Outdated]source ~/.zshrcif the shell iszsh.
Relative Path
- a dot (
.) represents the current directory - a double dots (
..) represents the parent directory
If your path comes with spaces, you need to wrap the path with quotes "root_path/file name with spaces".
Q: How to enable mouse in Terminal?
A: Press opt then click.
Commonly used keyboard shortcuts in Terminal:
| Shortcut | Action |
|---|---|
| ⌃+L | Clear the screen |
| ⌘+L | Clear to the previous mark |
Use Vim Keystrokes On The Command Line In Bash
By default, the Bash command line uses Emacs style keyboard shortcuts, such as CTRL+A to go to the beginning of the line and CTRL+E to go to the End of the line.
| Emacs | Vim | Result |
|---|---|---|
| Ctrl+A | 0 | Move cursor to beginning of line. |
| Ctrl+E | $ | Move cursor to end of line. |
| Alt+B | b | Move cursor back one word. |
| Alt+F | w | Move cursor right one word. |
| Ctrl+B | h | Move cursor back one character. |
| Ctrl+F | l | Move cursor right one character. |
| Ctrl+P | k | Move up in Bash command history. |
| Ctrl+R | j | Move down in Bash command history. |
Ref: https://dev.to/brandonwallace/how-to-use-vim-mode-on-the-command-line-in-bash-fnn
Q: How to make my terminal console behaves like Vim?
A: Enable Vim keystrokes for editing command line using
set -o vi
You can set that permanently if you include this command in your ~/.zshrc file.
To get back to Emacs keystrokes, run
set -o emac
Get help
man <cmd> get manual page for cmd. E.g., man ls will display detailed info about the ls cmd, including its usage, options, and examples.
Once you’ve accessed a manual page, you can navigate through it using various commands. The common navigation keys include:
- Spacebar: Move forward one page.
- Enter: Move forward one line.
- B: Move backward one page.
- Q: Quit the manual viewer.
whatis <cmd> get a short description of a command and what it does.
Linux man pages online: https://man7.org/linux/man-pages/index.html
You can search cmds online using the following search box.
Apple bash commands: https://ss64.com/mac/
Q: What is CLT?
A: Common Line Tools.
Error: Cannot find man command.
Error Message looks like:
This system has been minimized by removing packages and content that are not required on a system that users do not log into.
To restore this content, including manpages, you can run the ‘unminimize’ command. You will still need to ensure the ‘man-db’ package is installed.
Cause: Typically man pages for Ubuntu commands not installed on a minimal cloud server or container-based images. To save hard disk space and to keep container image rebuild time smaller, man pages not installed.
Fix: install man pages.
Steps:
-
Run the following commands as the root user using the
sudocommand orsucommand.sudo -i ## OR ## su -Now you become the root.
-
Search for Ubuntu man pages
# search apt search manpages # see what the page does apt info man-db -
Install man pages on server
First update package index and then install manpages-posix package for all missing commands:
sudo apt update
sudo apt install man-db manpages-posix
Now you have installed
man-dbpackage. -
Install man pages for software development
sudo apt install manpages-dev manpages-posix-dev -
Then run
unminimize. That may takes a while.Now you can run
man lsto check the syntax forlscommand.
Reference: https://www.cyberciti.biz/faq/how-to-add-install-man-pages-on-ubuntu-linux/
which [flags] [program] locate a program file executed by the shell.
It locates the executable file associated with a given command including binaries, scripts, and aliases. This can be particularly useful when you have multiple versions of a program installed or when you want to verify the path of a command.
# basic syntax
# location of `vim` program
$ which vim
/usr/bin/vim
# location of the `ls` cmd
$ which ls
/bin/ls
Common options:
-
-aList all instances of executables found (instead of just the first one of each).If you have multiple versions of Python installed, run which to determine which version will be executed in the shell.
$ which -a python -
--versionDisplays the version information of the which command. -
--helpProvides a summary of the which command’s usage and options.
Specify flags/options for cmds: use a single dash (-) or a double dash (--).
-
-can be followed by any number of single-character flags. -
--can be followed only by a single, multi-character option.Using
-is more compact, but it gets even MORE compact when you want to specify multiple flags.Consider:
$ ls -l --size --human-readable --group-directories-first
$ ls -lshg
While the two commands listed above are identical, the second one is clearly much quicker to type. If you use the wrong type of hyphen, for example specifying
ls -sizeinstead ofls --size, would be interpreted by the shell as equivalent tols -s -i -z -e. As it happens, the-soptions is the same as--size, but because there are nozoreoptions for thelscommand, they are simply ignored.
printenv prints all environment variables.
ps stands for “process status.” It displays information about a list of active processes.
If ps is run with no argument, it will print all processes which were started from the current shell. Other processes will not be shown in this case.
It displays the process ID (pid=PID), the terminal associated with the process (tname=TTY), the cumulated CPU time in [DD-]hh:mm:ss format (time=TIME), and the executable name (ucmd=CMD). Output is unsorted by default.
ps -A will show all processes being run on the system.
echo displays a message on screen.
echo -e enables interpret backslash escapes
INPUT: echo "abc\n def \nghi"
OUTPUT:abc\n def \nghi

INPUT: echo -e "abc\n def \nghi"
OUTPUT:abc
 def
ghi
-nDisplays the output while omitting the newline after it.-EThe default option. Disables the interpretation of escape characters.-eEnables the interpretation of escape characters.
$PATH Variable
Viewing the $PATH
You can check the value of the $PATH variable with the echo command”
-
echo $PATHprint$PATHenvironment variable. -
echo -e ${PATH//:/\\n}print each directory in$PATHon its own line.
How the $PATH works
The $PATH variable enables the system to locate the necessary programs without needing the full path for execution.
- When you type a command, the shell looks for executable files in the directories specified by your
PATH.- The directories are recursive, meaning if the parent folder is included, every file/folder inside is also included.
- The order stands for precedence.
-
It’s a list of directory paths, separated by colons (
:).For example, a default
$PATHlooks like/usr/local/bin:/usr/bin:/bin:/usr/sbin:/sbin.If you have installed Homebrew, the
$PATHshould contain/opt/homebrew/bin(for Apple Silicon, such as M1, M2, or M3 CPUs) or/usr/local/bin(for Intel chip mac).
It should be among the highest priority directories, in a left-most position.
You can check your Homebrew installation by running
echo $(brew --prefix). -
If you try to run an executable file or command that isn’t in one of the directories in your path, you’ll receive an error that says the “Command not found”.
This often happens for programs you have installed that are not basic shell commands.
If you don’t set the Mac
$PATH, you’ll need to specify the full path to an executable every time. This can be tedious and annoying, especially for commands you use frequently.For example, if you install have an executable file
Kandoin the/Applications/Kando.app/Contents/MacOS/directory, you may add the path to the folder to$PATH, or else you will need to type/Applications/Kando.app/Contents/MacOS/Kandoevery time you want to run the program.- Remember you may not be the only one trying to run the
Kandoprogram:
If the
cowsayprogram is called by another program and the$PATHis not set, it won’t be found and the program will fail. - Remember you may not be the only one trying to run the
-
Many applications and scripts rely on the
$PATHvariable to find necessary dependencies. Without a properly set$PATH, these applications will fail.- When you install a software package, the instructions will often tell you to add a directory to the
$PATHvariable. Make sure you do NOT overlook the step to add the directory to the$PATHvariable.
- When you install a software package, the instructions will often tell you to add a directory to the
Default Mac $PATH
-
Directories named
binare for “binaries” or executable command line programs. -
The
sbindirectories are for system management programs. -
The
binand/usr/bindirectories are for basic command line programs provided by Apple. -
The
/usr/local/binis for user-installed executables.
Add a new directory to the $PATH
Add the following line to the bottom of ~/.zprofile.
export PATH=/Users/menghan/anaconda3:$PATH
~ refers to /Users/<user-name>; it is the home directory.
The new $PATH variable will be exported to the environment as a combination of the previous $PATH plus a new directory.
-
In the above case, the new directory comes first; it will take precedence over any directories present in the previous
$PATH.Alternatively, the new directory can be appended to the end of the
$PATH:export PATH="$PATH:/new/dir1:/dir2:/dir/path/no3" -
A
:colon character separates the new directory path from the existing directories in the previous$PATH.
## Example ~/.zprofile file

# Add Kando menu editor to PATH
export PATH="$PATH:/Applications/Kando.app/Contents/MacOS"

# Created by `pipx` on 2025-07-20 08:32:24
export PATH="$PATH:/Users/menghan/.local/bin"

# Add plum (Rime input method installer)
export PATH="$PATH:/Users/menghan/plum"
Q: What’s the difference of writing export PATH=$PATH:/new-dir in the shell vs. in the ~/.zprofile file?
A: If you write it in the shell, it only takes effect for the current terminal session. Once you close the terminal window, the change is lost. To make the change permanent, you need to add it to the ~/.zprofile file (Shell configuration file). This way, every time you open a new terminal window, the new directory will be included in your $PATH.
Set the $PATH in script
There are a number of config files containing PATH information. The following are some examples:
System-wide:
/etc/pathsUser-specific:
1) Bash Shell (outdated): ❌
~/.bash_profile
~/.bashrc
2) Zsh Shell (current in use): ✅
~/.zshrc
~/.zprofile
~/.zshenv
~/.zlogin
Set the $PATH environment variable in the ~/.zprofile (Zsh Shell) or ~/.bash_profile (Bash Shell) file.
The tilde ~/ is a Unix abbreviation for your home directory. That is, the .zprofile file belongs in your home directory.
Zsh recognizes four different configuration files in the user’s home directory: ~/.zshenv, ~/.zprofile, ~/.zshrc, and ~/.zlogin. The article .zshrc or .zprofile explains the differences. Here is a summary:
-
~/.zshrc(Zsh Run Control): This file is best for adjusting the appearance and behavior of the shell, such as setting command aliases and adjusting the shell prompt.-
Loaded only for interactive shell sessions. It is loaded whenever you open a new terminal window or launch a subshell from a terminal window.
-
This is the configuration file that most developers use for customizing the look and feel of the interactive terminal.
Use it to set aliases and a custom prompt for the terminal window.
You can also use it to set the
PATH(which many people do) but~/.zprofileis preferred. -
Note that On My Zsh will overwrite your
~/.zshrcfile when you install or update the framework.This means, if you have changed
$PATHin~/.zshrc, you will lose the changes when you install or update On My Zsh. This could break your development environment and lead to a failure of compilation or execution of programs.A common error message is
<command> not found...❗So do NOT use
~/.zshrcto set the$PATHvariable. It is susceptible to being overwritten.
-
-
~/.zprofile(Zsh Profile): This file is ideal for commands that should be executed only when the terminal window is opened, such as setting the$PATHenvironment variable.-
Loaded for login shells (both interactive and the rare non-interactive sessions).
-
Homebrew recommends setting the
PATHvariable here.There’s a reason
PATHshould be set in~/.zprofileand not the universal~/.zshenvfile: the macOS runs a utilitypath_helper(from/etc/zprofile) that sets thePATHorder before~/.zprofileis loaded. -
MacOS uses this to set up the shell for any new terminal window. Subshells that start within the terminal window inherit settings but don’t load
~/.zprofileagain.
-
-
~/.zshenvThis is loaded universally for all types of shell sessions (interactive or non-interactive, login or non-login).- It is the only configuration file that gets loaded for non-interactive and non-login scripts for automated process like cron jobs. However, macOS overrides this for
PATHsettings for interactive shells. - As a beginner, you will not use this configuration file. In fact, few experienced macOS developers use it.
- It is the only configuration file that gets loaded for non-interactive and non-login scripts for automated process like cron jobs. However, macOS overrides this for
-
~/.zloginOnly used for login shell configurations, loaded after.zprofile. This is loaded whenever you open a new terminal window.
Q: What is a login shell vs. non-login shell?
A: A login shell is a shell session that starts when you log in to your user account on the system. It typically requires you to enter your username and password. A non-login shell, on the other hand, is a shell session that starts without requiring a login, such as when you open a new terminal window or run a script.
When you open a new terminal window on macOS, it starts a login interactive shell by default. This means that the shell reads and executes commands from the ~/.zprofile file (and other login shell configuration files) to set up the environment for your session.
Q: What files are sourced when a new terminal window is opened on macOS?
A: When you open Terminal.app, it’s an interactive login shell by default. On zsh, the following files are sourced in order:
/etc/zshenv(system-wide configuration for all zsh shells)~/.zshenv(user-specific configuration for all zsh shells)/etc/zprofile(system-wide configuration for login shells)~/.zprofile(user-specific configuration for login shells)/etc/zshrc(system-wide configuration for interactive shells)~/.zshrc(user-specific configuration for interactive shells)/etc/zlogin(system-wide login initialization for login shells)~/.zlogin(user-specific login initialization for login shells)
Q: What’s the difference between an interactive shell and a non-interactive shell?
A: An interactive shell is a shell session where you can type commands and receive immediate feedback. It allows you to interact with the system in real-time. A non-interactive shell, on the other hand, is a shell session that runs scripts or commands without user interaction. It executes a predefined set of instructions without waiting for user input.
By default, the ~/.zprofile and ~/.zshrc configuration files do NOT exist for a user on a new Mac. You’ll need to manually create the file in your home directory to properly configure your development environment.
You can create a new file from the command line with the touch command:
$ touch ~/.zprofile
After you create the file, you can edit it.
You can use TextEdit, the default macOS graphical text editor, to edit the shell configuration files. You can open a file in TextEdit from the Mac Terminal:
$ open -e ~/.zprofile
You also can use the command line editors nano or vim to edit the shell configuration files. See Shell Configuration for more about editing shell configuration files.
For the changes in ~/.zprofile to take effect, you have to log out and log in again.
Alternatively, to apply the changes immediately in an existing session, you can source:
$ source ~/.zprofile
The source command reads and executes a shell script file, in this case resetting the shell environment with your new $PATH setting.
Finally, you can verify the new path settings
$ echo $PATH
Reference: https://mac.install.guide/terminal/path
Install tar.gz on macOS
-
Finder
https://stackoverflow.com/questions/62988753/install-tar-gz-on-mac
-
Double click the
tar.gzfile to open it -
One of the new files might be a unix executable that looks like this:
-
-
Command line
Download the desired .tar.gz or (.tar.bz2) file. Open Terminal, extract the .tar.gz or (.tar.bz2) file with the following commands:
tar xvzf PACKAGENAME.tar.gz
tar xvjf PACKAGENAME.tar.bz2
Navigate to the extracted folder using cd command
cd PACKAGENAMENow run the following command to install the tarball
 ./configure
 make
 sudo make install
tar [options] [archive-file] [file or directory to be archived] options:
xextract the archive;vprint its action on console;ftelltarwhich file to perform the action on;zcompress the tar file usinggzipjcompress the tar file usingbzip2
tar xvjf PACKAGENAME.tar.gz -C / -C means changing directory.
man tar to show help page for tar.
echo $PATH check $PATH variable.
-
stored in
~/.bash_profile. -
in R
Sys.getenv("PATH")
cabextract is a program that un-archives files in the Microsoft cabinet file format (.cab) or any binary file which contains an embedded cabinet file (frequently found in .exe files).
Use man cabextract to check its full syntax
-F <pattern> Only files with names that match the pattern shall be listed, tested, or extracted.
-d <dir> extracts all files into the directory dir.
File Management
Basic Operations
touch ~/.R/Makevars create a file ~/.R/Makevars
open will open files and directories, just as if you had double-clicked the file’s icon.
mkdir [option] <directory> stands for “make directory.”
Create the direcotry(ies), if they do not already exist.
Common cmd flags:
-
-p,--parentsno error if existing, create parent directories as needed. Otherwise, if parent directories do not exist, will return an error.Ex.
mkdir -p /home/demo/sub2/TestTo create a directory called
Testwith default permissions in the/home/demo/sub2directory. The-pflag creates the/home,/home/demo, and/home/demo/sub2directories if they do not already exist. -
-m,--modeset file mode, i.e., permissions, (as inchmod).The
mkdircommand givesrwx(read, write, and execute) permissions for the current user only by default. To add all the permissions for all users, specify the-moption with the user777when creating a directory.# create a directory DirM with rwx permissions mkdir –m777 DirMTo create a directory called
Testwithrwxr-xr-xpermissions in a previously created/home/demo/sub1directory, type the following:mkdir -m 755 /home/demo/sub1/Test
cp [option] <source> <destination> copy the <source> file to the <destination> file or directory. If multiple <source> is provided, then copy all files to the <destination> directory. Options:
-iinteractive copying. Warn the user before overwriting the desitnation file.-ror-Rrecursive copying the entire directory structure.
rm DeleteMe.odt DeleteMe2.odt delete multiple files.
-
If there are special characters in file names, simply add quotes to file names. E.g.,
rm '4-way mini-roundabout.png' 'DTC.png' 'Heyford.png' 'image-20220824132439609.png' 'image-20220824133418559.png' -
If the file doesn’t exit, there will be warning message
No such file or directory.
Q: How to resolve “XYZ Is Damaged and Can’t Be Opened. You Should Move It To The Trash”?
A: $ xattr -c <path/to/application.app>
Delete dot underscore ._ system files
When copy files from Mac to your non-mac devices, such as your MP3 player, it creas a bunch of obnoxious ._ files. You can use dot_clean command to get rid of these ghost files.
dot_clean -m [dir] Recursively remove dot-underscore files. Merges ._* files with corresponding native files.
Removing dot-underscore files (with -m) is useful when sharing files with non Mac machines.
-m: Always delete dot underbar files
Check if there are still ._ files in the directory:
ls -la [dir] | grep '^\._'

# count the number of `._` files
ls -a [dir] | grep '^\._' | wc -l
Remove .DS_Store file:
rm 'path/to/.DS_Store'
Q: When I open a mp3 file, metadata has wrong encoding. How to fix it?
A: Use ffmpeg to fix the encoding of the metadata.
ffmpeg -i 'input.mp3' -metadata title="Correct Title" -metadata artist="Correct Artist" -metadata album="Correct Album" -metadata year="2023" -metadata genre="Correct Genre" -metadata comment="Correct Comment" -codec copy 'output.mp3' -y
-
-codec copytellsffmpegto copy the audio stream without re-encoding it, which preserves the original audio quality and speeds up the process since only the metadata is being modified. -
-ytellsffmpegto automatically overwrite output files without asking for confirmation.Otherwise, if
output.mp3already exists,ffmpegwill prompt you to confirm whether you want to overwrite it, which can interrupt the workflow if you’re processing multiple files.
File Permissions
Symbolic mode
chmod u=rwx,g=rwx,o=rwx [file_name]
Three permission groups: u for user/owner, g for group, o for others.
- Read. (r) The read permission allows users to view the contents of a file or list the contents of a directory.
- Write. (w) The write permission allows users to modify a file’s contents or add, remove, or rename files within a directory.
- Execute. (x) The execute permission allows users to execute a file or traverse (i.e., enter) a directory. For files, execute permission is required to run the file as a program or script. For directories, execute permission is required to access the contents of the directory.
# with symbolic mode
chmod u=rw,g=r,o=r test.txt
# with absolute mode
chmod 644 test.txt
Read and write for the user. Read for the members of the group. Read for other users.
How to read linux permission
If you type ls -l [file_name], it will list the file/directory information in a long list format.

The output provides the following information:
- File permissions.
- The owner (creator) of the file.
- The group to which that owner belongs.
- The creation date.
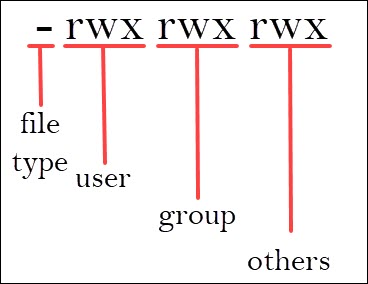
The following example shows the permissions for a file:
-rw-r--r--
- The first character indicates the file type - a regular file (
-), directory (d), symbolic link (i), etc. - The next three characters represent the user’s (owner’s) permissions.
- The three characters after that are the group’s permissions.
- The final three characters are the permissions for all other users.
Permission groups
- Owner. The owner of a file or directory is the user who created it. By default, the owner has full control over the file or directory, including the ability to read, write, and execute it.
- Group. Every file and directory in Linux is associated with a specific group. Users who belong to this group have the permissions defined for the group category. Groups provide a more granular control over access to files and directories, especially in environments with multiple users.
- All users. The last set of symbols in the permission string represents the permissions for all other users on the system, excluding the group owner. These permissions apply to anyone who is not the owner or a member of the group associated with the file or directory.
Absolute mode
chmod [number] [file_name] change permissions of a file.
The [number] is a three-digit number in which digits represent user, group, and all users permissions, respectively. Each digit corresponds to the sum of the permissions.
For example, 755 means read, write, and execute permissions for the owner, as well as read and execute permissions for the group and others.
The numerical values of the permission types are:
- read has a value of 4.
- write has a value of 2.
- execute has a value of 1.
- no permission has a value of 0.
Change the permissions of the test.txt so that only the user can read, write, and execute it:
chmod 700 test.txt
Q: What is the wheel user?
A: wheel is the system administrator group in BSD, much like root is the system administrator user. It is common to add sudo permissions to users in the wheel group.
Download Files
wget is a versatile tool for retrieving files from web servers and other online locations. It supports popular protocols like HTTP (web downloads), HTTPS (secure web downloads), and FTP (File Transfer Protocol) for retrieving files from dedicated servers.
wget URL downloads the file at the specified URL.
curl is installed by default on macOS. cURL is short for “client URL” and pronounced “curl”.
- It is an open-source command line tool that allows you to request and transfer data over a URL using different protocols.
- By providing the URL and the options needed, you can request and download data from URLs, transfer data to URLs, and more.
curl URL is a simple GET request that retrieves the content of the web page and displays it in the terminal.
curl -o URL -o means output to a file;
To get a list of posts downloaded as a JSON file, we can use the command:
curl -o posts.json https://jsonplaceholder.typicode.com/posts
This file will be saved in the current directory where you ran the cURL command.
To dive deeper into more complex commands, see the cURL documentation.
R codes to generate the shell cmd to delete files
# R codes to generate the shell cmd to delete files

# delete repetitive files
post_image <- list.files("~/Documents/PhD Courses/Econ-Study/images")
post_image

google_drive <- list.files("~/Library/CloudStorage/GoogleDrive-my1396@nyu.edu/My Drive/Typora_images")
google_drive

mask <- google_drive %in% post_image
google_drive[!mask]

file_delete <- google_drive[mask]
file_delete <- as_tibble_col(file_delete, column_name = "name")
# add quotes to file names to escape special characters
file_delete <- file_delete %>%
  mutate(new_name = paste0("'", name, "'")
  )
file_delete
nrow(file_delete)

# cmd to delete files
paste0("rm ", paste(file_delete$new_name[1:5], collapse = " "))

length(google_drive)
length(post_image)
length(list.files("~/Library/CloudStorage/GoogleDrive-my1396@nyu.edu/My Drive/Typora_images"))
Hardlink vs symbolic link
-
Once a hard link has been made the link is to the inode. Deleting, renaming, or moving the original file will not affect the hard link as it links to the underlying inode. Any changes to the data on the inode is reflected in all files that refer to that inode.
-
Hardlinks can only refer to files within the same volume otherwise symbolic links will be needed.
-
Symbolic links point to the original file, changing the symboliclink should change the original file.
What will break a symbolic link is when the original file is moved to a different file or deleted.
ln original_file link_file # hardlink
ln -s original_file link_file # softlink (more felxible)
ln –s /Users/admin/Documents /Users/admin/Desktop # create a symbolic link for my Documents folder on the Desktop
rm /Users/admin/Desktop/Documents # remove symbolic link, target file
When you remove the symbolic link, the target file remains intact.
Q: When to use symbolic link?
A: A useful scenario is that you want to refer to the same file across different projects/directories. You can create a symbolic link in each project directory that points to the same file. This way, you can access and modify the file from any of the project directories, and changes will be reflected across all projects.
Q: Do I need to use absolute path for symbolic links?
A: It is recommended to use absolute paths when creating symbolic links to avoid issues with relative paths, especially if the link is accessed from different directories.
ls -s SOURCE_FILE TARGET_FILE
When creating symbolic links, if your SOURCE_FILE is a relative path, it will use the TARGET_FILE location to find the SOURCE_FILE. You cannot first go to the SOURCE_FILE location and then create a link using the file name and an absolute path of TARGET_FILE.
// Incorrect way to create symbolic link
cd /path/to/source_directory
ln -s source_file /absolute/path/to/target_directory/target_file
This will create a symbolic link at /absolute/path/to/target_directory/target_file that points to itself, which is NOT what you want.
However, you can first go the the TARGET_FILE location and then create a link using the absolute path of SOURCE_FILE.
# Correct way to create symbolic link
cd /absolute/path/to/target_directory
ln -s /path/to/source_directory/source_file target_file
Check if the symbolic link is created correctly:
$ ls -l target_file

# Output:
lrwxr-xr-x  1 menghan  staff  82  Feb 1 09:21 /absolute/path/to/target_directory/target_file -> /absolute/path/to/source_directory/source_file
ls -l means list in long format. It includes file type and permissions (lrwxr-xr-x), number of links (1), owner name, group name, file size (82 bytes), time of last modification (Feb 1 09:21), and the file or directory name.
Principle: Use absolute path for SOURCE_FILE, optionally use relative path for TARGET_FILE.
Use examples of symbolic links:
-
Shared resources: linking a config file into several projects:
ln -s ~/common/.vimrc ~/project1/.vimrc ln -s ~/common/.vimrc ~/project2/.vimrc- This can be used for MathJax config file. Need to be aware of the different versions in the projects though. It’s a headache that configuration for various versions are NOT compatible.
-
Version switching: Point a generic name to different versions.
ln -s /opt/python3.12/bin/python3 ~/bin/python
And to check the current status of the service, units, system state, you’d have to use the systemctl command in the following manner:
systemctl status <service-name>
Understanding systemctl states:
active (running): Service is actively running in the background.active (exited): Indicates the service was meant to be executed one time or periodically. So the service did its job and then exit upon completion.-
active (waiting): It indicates the service is running but it is waiting to be triggered by some condition like a specific event. -
inactive: Service is not currently running. -
enabled: Service will be enabled at system boot time. -
disabled: Service is disabled and won’t be started at system boot. -
static: It means the specific service can’t be managed using systemd (or the systemctl command) and you’d need to have another init service or manage it manually. -
masked: This means the service is masked and can’t be stated directly using the systemctl command. This can be helpful when you want to prevent accidental starting of service. -
alias: It indicates the service name is an alias and the service is a symlink pointing to another unit file. linked: It indicates that the service or the unit file is symbolically linked to another unit file.
Useful Commands
open will open files and directories, just as if you had double-clicked the file’s icon.
-aopen an application.-nOpen a new instance of the application(s) even if one is already running
# open a new instance of RStudio, useful for coding in multiple sessions
open -n /Applications/RStudio.app
# open URL with specified browswer
open -a "Google Chrome" "https://stackoverflow.com"
clear clear screen; deletes all previously typed commands from the Terminal app’s view except for the name of your mac.
source $SHELL restart your session to enable new settings.
Network
ping [hostname-or-IP-address] Test if a remote host is reachable on the network.
curl -o [URL]/[filename] download files.
ssh [username]@[hostname-or-IP-address] establish an SSH connection with a remote server.
When connecting to a remote host for the first time, you may need to generate an SSH key:
ssh-keygenCopy
After generating the key, copy it to the remote host:
ssh-copy-id -i [path-to-PUB-key] [username]@[hostname-or-IP-address]
Bash Script
A Bash script is a plain text file containing a series of commands that the Bash shell can interpret and execute sequentially.
A Bash script starts with the Shebang line (#!). This line specifies the path to the interpreter that should be used to execute the script.
For instance, we create a Bash script named bash_script.sh with the following two lines:
#!/bin/bash

# Store a number in a variable
number = 10

# Print the number
echo "The number is: $number"
You need to make the Bash script executable with the chmod command:
$ chmod +x bash_script.sh
Now you can execute the script with either of the below commands:
# option 1:
$ ./bash_script.sh
# option 2:
bash bash_script.sh
Update: for Zsh shell, the shebang line should be #!/bin/zsh
FAQ
Q: How to have a line break for long commands in terminal?
A: Use backslash \ at the end of the line to indicate that the command continues on the next line.
# example of long command with line break
echo "This is a really long line that I want to \
split over multiple lines in the shell"

# example 2 with find command
find /path/to/search \
    -type f \
    -name "*.txt" \
    -size +1M