VPS
Shadowsocks 科学上网
一句话总结 SS 搭建流程: 购买 VPS 服务器,在服务器端安装 SS 服务端,在本地电脑或手机或路由器上安装 SS 客户端。
购买 VPS 服务器的时候可以关注一下优惠码,各大平台经常推出促销活动。
如果不想要自己搭建,可选择 Just My Socks.
详细步骤
-
购买 VPS 服务器 https://www.vultr.com/
选择套餐
2.5美元/月的服务器配置信息: 单核 512M 内存 10G SSD硬盘, 带宽1G, 500G流量/月 (不推荐,仅提供ipv6 ip,不推荐)
2.5美元/月的服务器配置信息: 单核 512M 内存 10G SSD硬盘, 带宽1G, 500G流量/月 (推荐)
5美元/月的服务器配置信息: 单核 1G 内存 25G SSD硬盘, 带宽1G, 1000G流量/月 (推荐) -
选择服务器系统,Ubuntu 24.0ƒ4。
-
连接 VPS 服务器
打开 Mac Terminal 输入
ssh root@43.45.43.21(将45.45.43.21换成你的IP),之后输入你的密码就可以登录了。 -
Set up Shadowsocks-libev Server
首先安装 Shadowsocks 代理。这一步通常叫作“部署服务器端”或者“搭建服务端”。这一步是在 VPS 上面的操作。
Shadowsocks 简称 SS 或者 ss,有4个常见版本,
-R,-Python,-Go,-libre。其中Shadowsocks-libev是目前唯一在持续更新且最为轻量的版本。-Python版本是 OG 祖宗版本 (original release),支持多用户。https://github.com/shadowsocks/shadowsocks-libev?tab=readme-ov-file#debian--ubuntu
一键安装四选一服务端 (Shadowsocks-Python, ShadowsocksR, Shadowsocks-Go, Shadowsocks-libev)
https://bwgvps.github.io/build-shadowsocks-shadowsocksr-on-bandwagonhost-vps/#more
-
Ubuntu 16.10 or higher
aptis a command-line utility for installing, updating, removing, and otherwise managing deb packages on Ubuntu, Debian, and related Linux distributions.# update the package lists sudo apt update # install shadowsocks-libev sudo apt install shadowsocks-libev
然后是编辑配置文件。
After installing Shadowsocks, you need to configure it. 可以用以下命令来打开配置文件。
nano /etc/shadowsocks-libev/config.json意为用
nano这个编辑器打开config.json这个配置文件。nano是系统自带的软件。如果没有,可以用sudo apt install安装。The default contents of the server config file are as follows.
{
    "server":["::1", "127.0.0.1"],
    "mode":"tcp_and_udp",
    "server_port":8388,
    "local_port":1080,
    "password":"ACRrobo9ymXb",
    "timeout":86400,
    "method":"chacha20-ietf-poly1305"
}
Make the following changes to the default configuration file:
- We need to change
127.0.0.1to0.0.0.0, so Shadowsocks-libev server will listen on the public IP address. 服务器端口。 -
Then change
server_portto other port numbers like 8888. This is the port number that Shadowsocks will listen on. 此处的server_port跟租的 VPS SSH port 不是一个port, 事实上,VPS SSH port 在 SS 配置文档中从来没有用到过。 - The password was randomly generated, so you can leave it as it is.
注意: 这里的
server,server_port,password都与你从 Bandawagon 那里得到的信息不同!这里的信息用户自定义的,用于后面配置客户端。Save and close the file. Then restart shadowsocks-libev service for the changes to take effect.
sudo systemctl restart shadowsocks-libev.serviceEnable auto-start at boot time.
sudo systemctl enable shadowsocks-libev.serviceCheck its status. Make sure it’s running.
sudo systemctl status shadowsocks-libev.serviceSample output:
● shadowsocks-libev.service - Shadowsocks-libev Default Server Service Loaded: loaded (/usr/lib/systemd/system/shadowsocks-libev.service; enabled; preset: enabled) Active: active (running) since Thu 2024-05-16 07:31:11 UTC; 11s ago Docs: man:shadowsocks-libev(8) Main PID: 8215 (ss-server) Tasks: 1 (limit: 629145) Memory: 424.0K (peak: 1.0M) CPU: 10ms CGroup: /system.slice/shadowsocks-libev.service └─8215 /usr/bin/ss-server -c /etc/shadowsocks-libev/config.json -
-
Install and Configure Shadowsocks-libev Client
完成 Shadowsocks 服务端搭建后,我们就需要在本地客户端 (个人自己的设备) 配置Shadowsocks(R)了,支持iOS、Android手机、Mac、Windows等,其实就是在客户端上填入上一步的连接信息即可。

Shadowsocks client Github page: https://github.com/shadowsocks
Mac users can download this Shadowsocks client – ShawdowsockX-NG.
Next, you need to add a new server in the client software.
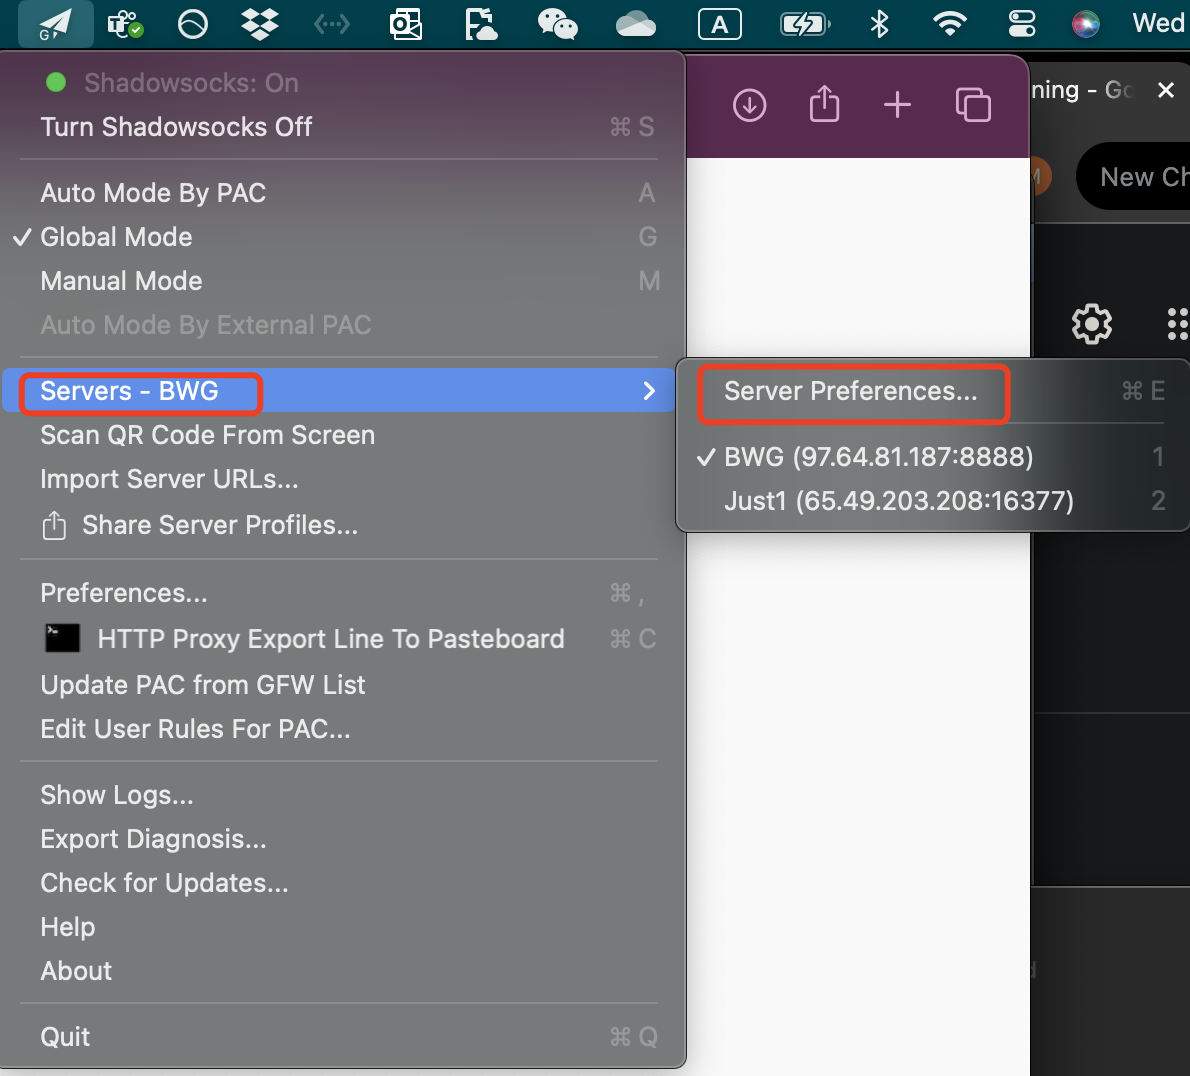
一般用客户端软件即可,不需要手动编写配置文档。
但是如果有配置文档的话,看起来如下。
配置服务器—客户端
-
Specify the following:
-
server IP address, The IP address or hostname of the Shadowsocks server.
This is the VPS IP, 租的服务器 IP。
-
server port (8888), the port number that Shadowsocks is listening on. SS 服务器端口
-
password. SS 服务器密码
This password is the password you set in the server configuration file, which is automatically generated during installation.
Note that it is NOT the Root password!
-
-
You can also change the Timeout value (It should be less than 20 seconds).
-
Leave other settings as default.
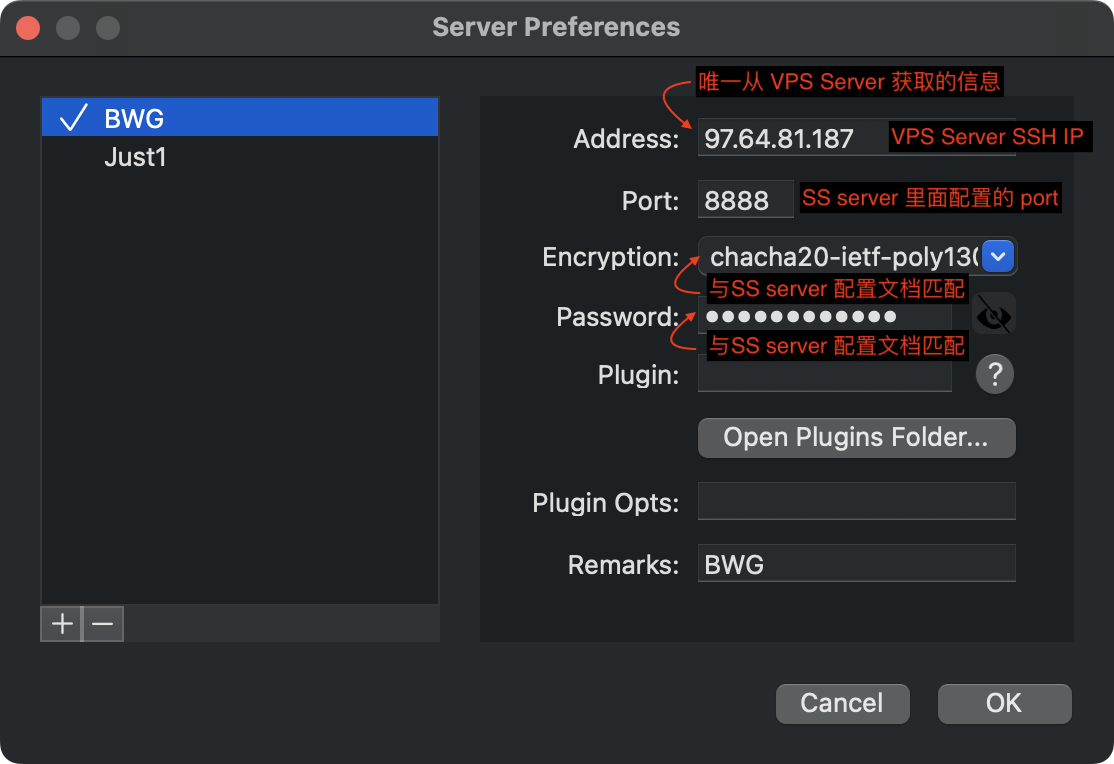
The client config file (if there is one) will look like this:
{
   "server":"your-server-ip-address",
   "mode":"tcp_and_udp",
   "server_port":8888,
   "local_address":"127.0.0.1",
   "local_port":1080,
   "password":"ACRrobo9ymXb",
   "timeout":60,
   "method":"chacha20-ietf-poly1305"
}
与 SS 服务端相比,客户端配置文档的主要不同为
server. 此处 IP 为 VPS Server SSH IP。其他参数,两个配置文件 (原则上) 要保持一致,如mode,local_port,password,method.Restart your client if you use command line client for the configuration to take effects. If you use User Client 客户端小飞机软件, don’t need to restart.
至此为止,应该可以科学上网了。
-
-
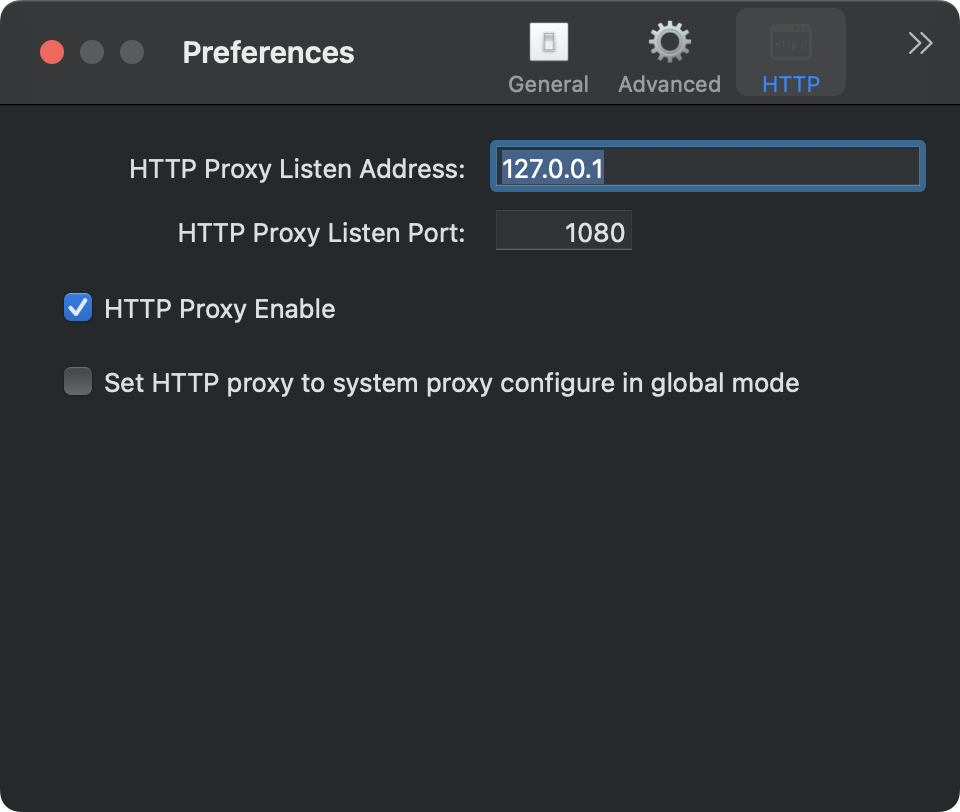
Configure web brower proxy access to the internet
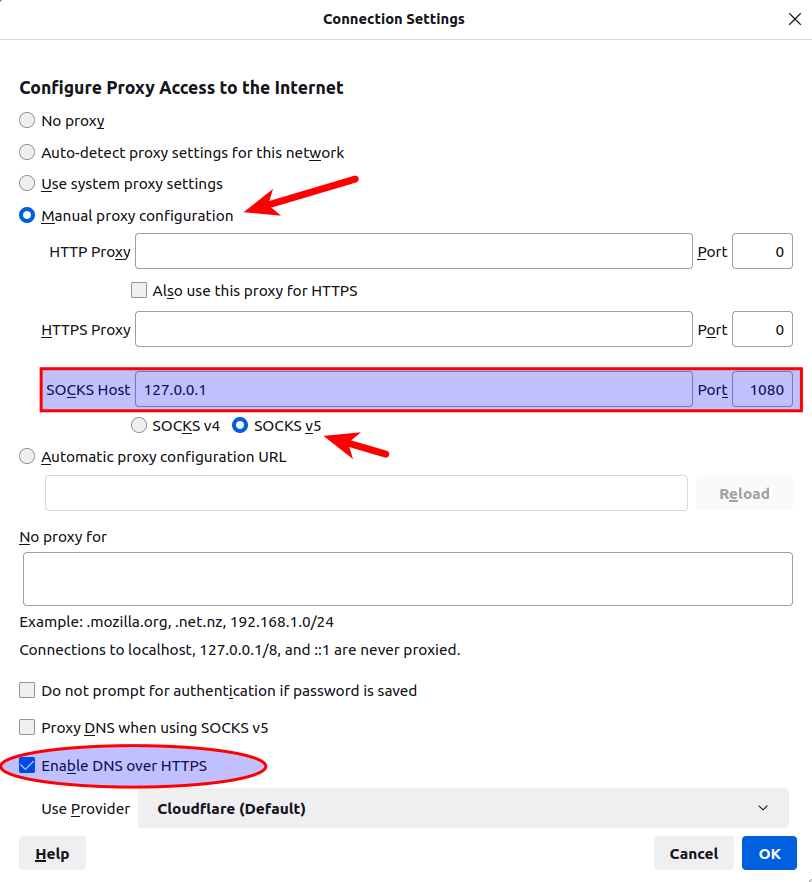
Configure a proxy server as follows:
- Choose the
SOCKS5protocol. - Set
127.0.0.1as the server address. - Set
1080as the port number.
Firefox
- Choose the
-
Go to dnsleaktest.com. You will see your Shadowsocks server’s IP address, which indicates that your proxy is working.
四合一Shadowsocks代理一键安装
Reference:
- Bandwagon: https://bwgvps.github.io/build-shadowsocks-shadowsocksr-on-bandwagonhost-vps/#more
- Teddysun 秋水逸冰: https://teddysun.com/486.html
Shadowsocks 脚本是四合一,我们只需要安装一种代理就可以了。
输入下面命令搭建Shadowsocks,一共3个命令,分别表示下载脚本、赋予脚本执行命令和执行脚本。每次输入一行、回车,等待屏幕上的操作完成后再输入下一条。
wget --no-check-certificate -O shadowsocks-all.sh https://raw.githubusercontent.com/teddysun/shadowsocks_install/master/shadowsocks-all.sh

chmod +x shadowsocks-all.sh

./shadowsocks-all.sh 2>&1 | tee shadowsocks-all.log
这里如果提示 wget: command not found,则先安装curl:
- Ubuntu/Debian系统安装wget方法:
apt-get update -y && apt-get install wget -y
关于此脚本:
-
每次运行可安装一种版本;
-
支持以多次运行来安装多个版本,且各个版本可以共存(注意端口号需设成不同);
-
若已安装多个版本,则卸载时也需多次运行(每次卸载一种);
默认配置
服务器端口: 自己设定(如不设定,默认从 9000-19999 之间随机生成)
密码: 自己设定(如不设定,默认为 teddysun.com)
加密方式: 自己设定(如不设定,Python 和 libev 版默认为 aes-256-gcm,R 和 Go 版默认为 aes-256-cfb)
协议(protocol): 自己设定(如不设定,默认为 origin)(仅限 ShadowsocksR 版)
混淆(obfs): 自己设定(如不设定,默认为 plain)(仅限 ShadowsocksR 版)
**备注: **脚本默认创建单用户配置文件,如需配置多用户,请手动修改相应的配置文件后重启即可。
安装完成后,脚本提示如下
Congratulations, your_shadowsocks_version install completed!
Your Server IP :your_server_ip
Your Server Port :your_server_port
Your Password :your_password
Your Encryption Method:your_encryption_methodYour QR Code: (For Shadowsocks Windows, OSX, Android and iOS clients)
ss://your_encryption_method:your_password@your_server_ip:your_server_port
Your QR Code has been saved as a PNG file path:
your_path.pngWelcome to visit:https://teddysun.com/486.html
Enjoy it!
Shadowsocks Server 常用命令
启动 ShadowSocks 服务
-
To run in the backgroud 后台运行
ssserver -c /etc/shadowsocks-libev/config.json -d startOption Meaning -c <config_file>Use a configuration file -f <pid_file>The file path to store pid. man ss-serverto check help page. Note there is a dash afterss, but no dash when you run the cmd. -
To run in the foreground 前台运行
ssserver -c /etc/shadowsocks-libev/config.json
查看 ShadowSocks 服务状态
Check that Shadowsocks is operating error-free by looking at the service status
sudo systemctl status shadowsocks-libev
关闭 ShadowSocks 服务
ssserver -c /etc/shadowsocks-libev/config.json -d stop
重启 ShadowSocks 服务
ssserver -c /etc/shadowsocks-libev/config.json -d restart
启动脚本后面的参数含义,从左至右依次为: 启动,停止,重启,查看状态。
Shadowsocks 4 个常见版本:
Shadowsocks-Python 版:
/etc/init.d/shadowsocks-python start | stop | restart | status
ShadowsocksR 版:
/etc/init.d/shadowsocks-r start | stop | restart | status
Shadowsocks-Go 版:
/etc/init.d/shadowsocks-go start | stop | restart | status
Shadowsocks-libev 版:
/etc/init.d/shadowsocks-libev start | stop | restart | status
配置文件路径
Shadowsocks-Python 版:
/etc/shadowsocks.json(老版) 或者/etc/shadowsocks-python/config.json(新版)
ShadowsocksR 版: /etc/shadowsocks-r/config.json
Shadowsocks-Go 版: /etc/shadowsocks-go/config.json
Shadowsocks-libev 版: /etc/shadowsocks-libev/config.json
需注意的是,如果你更新了配置文件,得重启 ss 才能生效。重启命令如下
ss-server -c ~/ss/ss.json -d restart
Create a configuration file for SS server: /etc/shadowsocks-libev/config.json.
Example
{
    "server":["::1", "127.0.0.1"],
    "server_port":8388,
    "mode":"tcp_and_udp",
    "local_address": "127.0.0.1",
    "local_port":1080,
    "password":"ACRrobo9ymXb",
    "timeout":86400,
    "method":"chacha20-ietf-poly1305"
    "fast_open":false
}
Explanation of the fields:
| Name | Explanation |
|---|---|
| server | the address your server listens on 用户自定义,注意此 IP 非 VPS Server IP,此处非常容易混淆。 新手通常容易错误设置为 VPS Server IP,导致连接不成功。❌ |
| server_port | server port, the port number that Shadowsocks will listen on 用户自定义 |
| local_address | the address your local listens, listen IP 标准,不用改 |
| local_port | local port, listen port 标准,不用改 |
| password | password used for encryption, clients will use to connect to the Shadowsocks server. 用户自定义,注意此处 password 非 VPS Server Root Password. ❌ Root password 在配置 SS 中跟本用不到。 |
| timeout | the number of seconds before a connection times out. |
| method | default: “aes-256-cfb”, see Encryption 用户自定义,记得服务器端和客户端要一致 |
| fast_open | use TCP_FASTOPEN, true / false |
| workers | number of workers, available on Unix/Linux |
Feature Comparison across Different Versions
Servers
| Python | libev | Go | |
|---|---|---|---|
| Fast Open | Y | Y | N |
| Multiple Users | Y | Y | Y |
| Management API | Y | Y | N |
| Workers | Y | N | N |
| Graceful Restart | Y | N | N |
| ss-redir | N | Y | N |
| ss-tunnel | N | Y | N |
| UDP Relay | Y | Y | N |
| AEAD | Y | Y | Y |
| Plugin | Y | Y | N |
The (initial) Python implementation of Shadowsocks hasn’t been updated for a long time. It is created by Clowwindy.
It is recommended that you use the C implementation: Shadowsocks-Libev.
Clients
| Windows | ShadowsocksX | Qt5 | Android | iOS App Store | iOS Cydia | |
|---|---|---|---|---|---|---|
| System Proxy | Y | Y | N | Y | N | Y |
| CHNRoutes | Y | Y | N | Y | Y | Y |
| PAC Configuration | Y | Y | N | N | N | N |
| Profile Switching | Y | Y | Y | Y | N | Y |
| QR Code Scan | Y | Y | Y | Y | Y | Y |
| QR Code Generation | Y | Y | Y | Y | N | Y |
- shadowsocksX-NG: MacOS client.
- shadowsocks-qt5: Cross-platform client for Windows/MacOS/Linux.
Table Source: Shadowsocks Wiki, https://github.com/shadowsocks/shadowsocks/wiki
Ping
ping is a basic debugging step to verify a server is available by sending an ICMP packet and receiving a reply.
The following code pings 192.0.2.22 four times.
ping -c 4 192.0.2.22
IP check tool
https://www.vpsgo.com/ip-check-tools.html
https://www.toolsdaquan.com/ipcheck/
检测 IP 在中国大陆以及海外区域的可用性,端口可以指定为SSH端口,或者任意服务的监听端口。
Ping是基于 ICMP 协议的,所以服务器 IP 能 Ping 通说明 ICMP 协议可用;TCP可用说明你这个端口的服务可用,包括SSH,MySQL数据库服务等。
- ICMP不可用: 检查服务器是否宕机或者是否禁Ping
- TCP不可用: 服务器是否需要手动开放防火墙
Linux 重装 OS 后登录报错
ECDSA host key for X.X.X.X has changed and you have requested strict checking 当linux重新装机后,其他linux机器ssh访问该服务器时会产生报错,报错信息如下: ECDSA host key for X.X.X.X has changed and you have requested strict checking。
需要执行如下操作更新密钥即可(X.X.X.X为IP地址):
ssh-keygen -R X.X.X.X
执行之后即可解决!!!
Bandwagon
Bandwagon homepage: https://bandwagonhost.com
KiwiVM Control center:
Client area: https://bandwagonhost.com/clientarea.php
Documentation: https://bandwagonhost.com/kb.php?action=displayarticle&id=30
Client Area Navigation
依次点击页面上方“Services” $\rightarrow$ “My Services”. It shows the list of all VPS in the account. $\rightarrow$ 然后点击”KiwiVM Control Panel“即可进入后台控制页面。
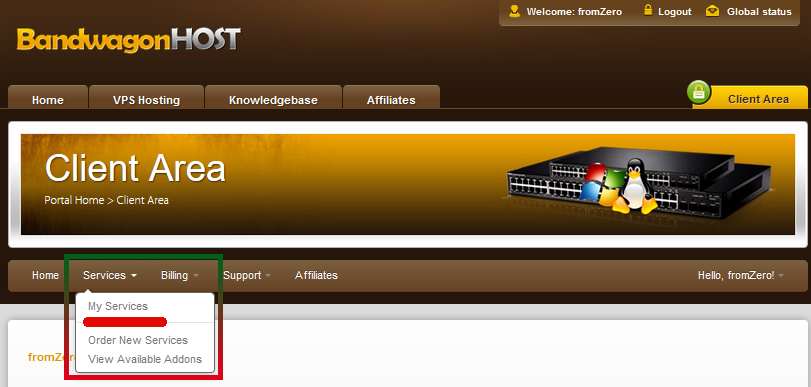

在进入搬瓦工 KiwiVM 后台后,就能看到 VM 的配置信息,包括搬瓦工 SSH IP、端口和一些基本信息。
搬瓦工的 SSH 用户名是 root,而 SSH 密码会在你购买套餐/重装系统/重置密码后发至你注册时所填的绑定邮箱里。如果没有收到或忘记密码了,可以通过重置密码的方式获取 root 密码。
-
查看 VPS 基本信息
最重要的信息为 Server IP, Root password, SSH port.
Root password 为登录服务器时使用。没有必要重置。
如果想要重置 Root password,参考以下步骤。
-
因为重置密码需要保证VPS开机状态,所以在进行密码重置前我们要格外注意。在搬瓦工实例管理界面,确保VPS状态为”Running“。
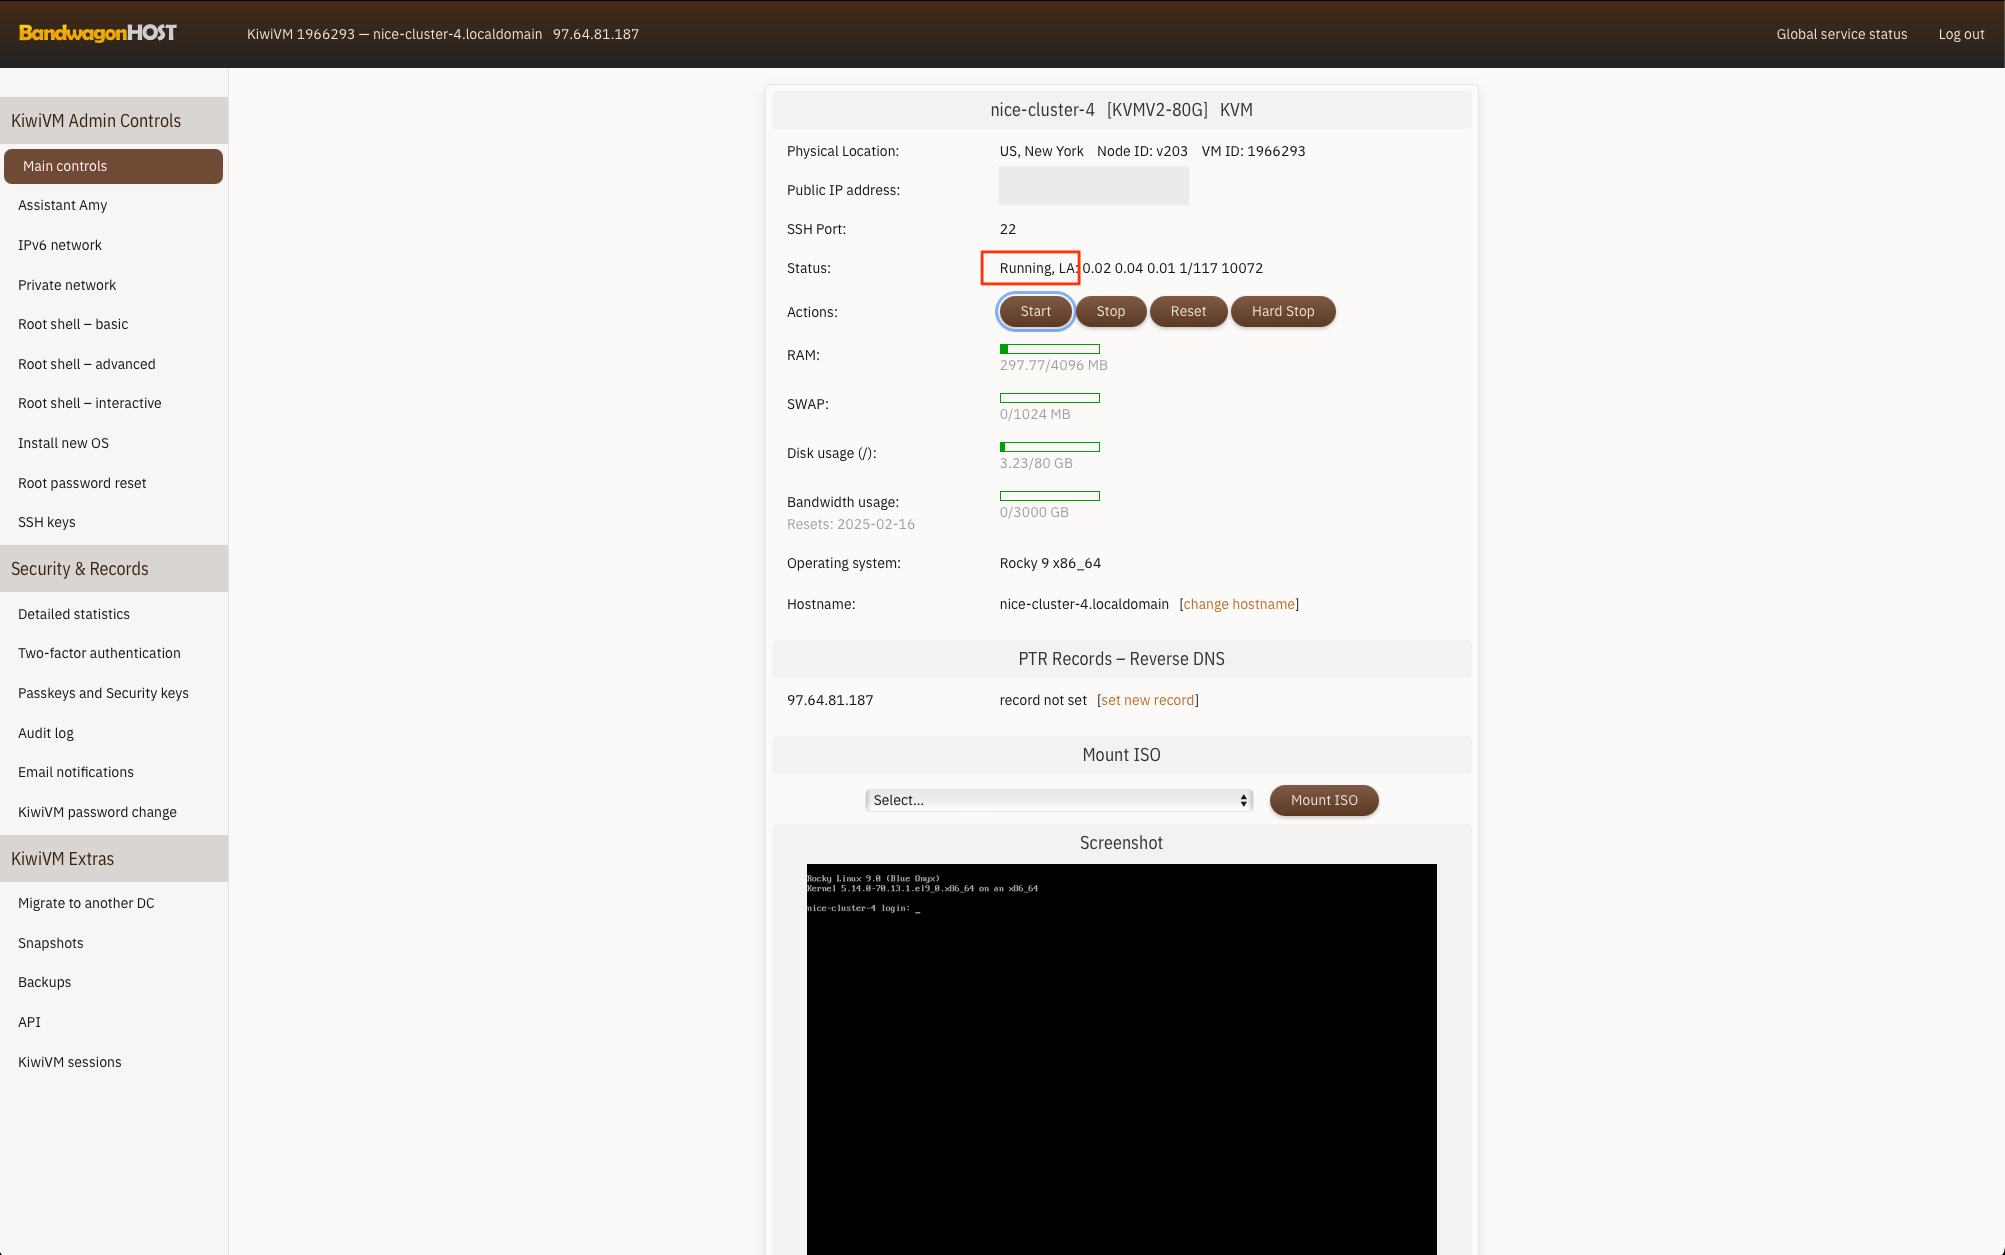
KiwiVM Control Panel first look. -
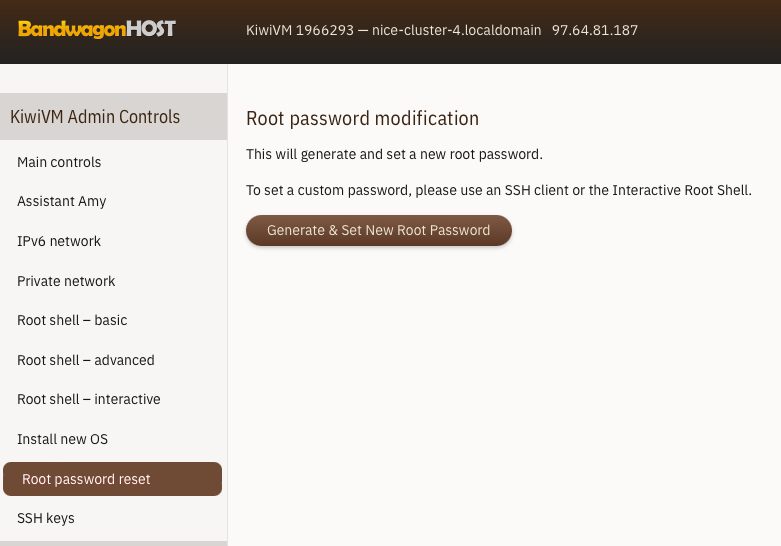
之后选择左侧的”Root password modification“,进入搬瓦工的修改 ROOT 密码栏目,再点击”Generate and set new root password“就可以修改并设置搬瓦工的 ROOT 密码了。
Important first step: Change your KiwiVM Control Panel password (before you Log off).
Q: Why would I need a KiwiVM password?
A: Strictly speaking, you are not required to set a KiwiVM password. You could always use “KiwiVM Control Panel” button in the “Client Area” to log into KiwiVM. You may want to set a KiwiVM password for convenience (so you can login to KiwiVM without first logging into Client Area), or to share KiwiVM login information with your colleagues without having to give them access to the entire Client Area.Q: How to change your KiwiVM Control Panel password?
A: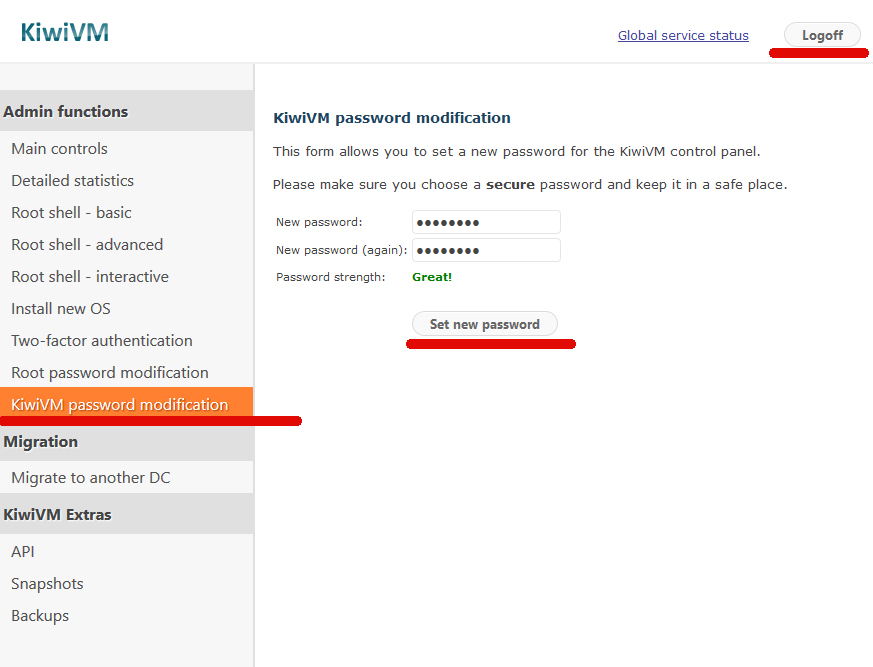
Q: When to use your KiwiVM Control Panel password?
A: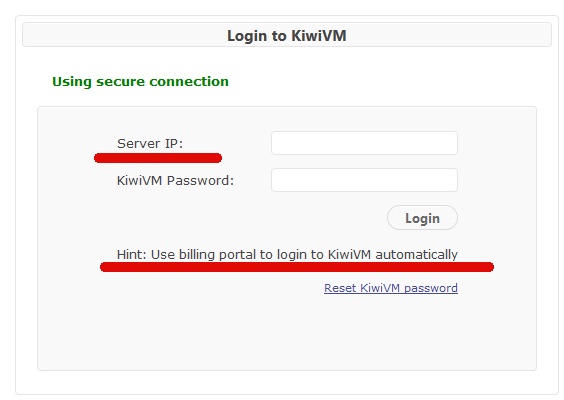
-
-
安装操作系统
默认安装Rocky 9x86。选择重新安装服务器系统 。
注意: 重装系统之前,需要关闭当前服务器。
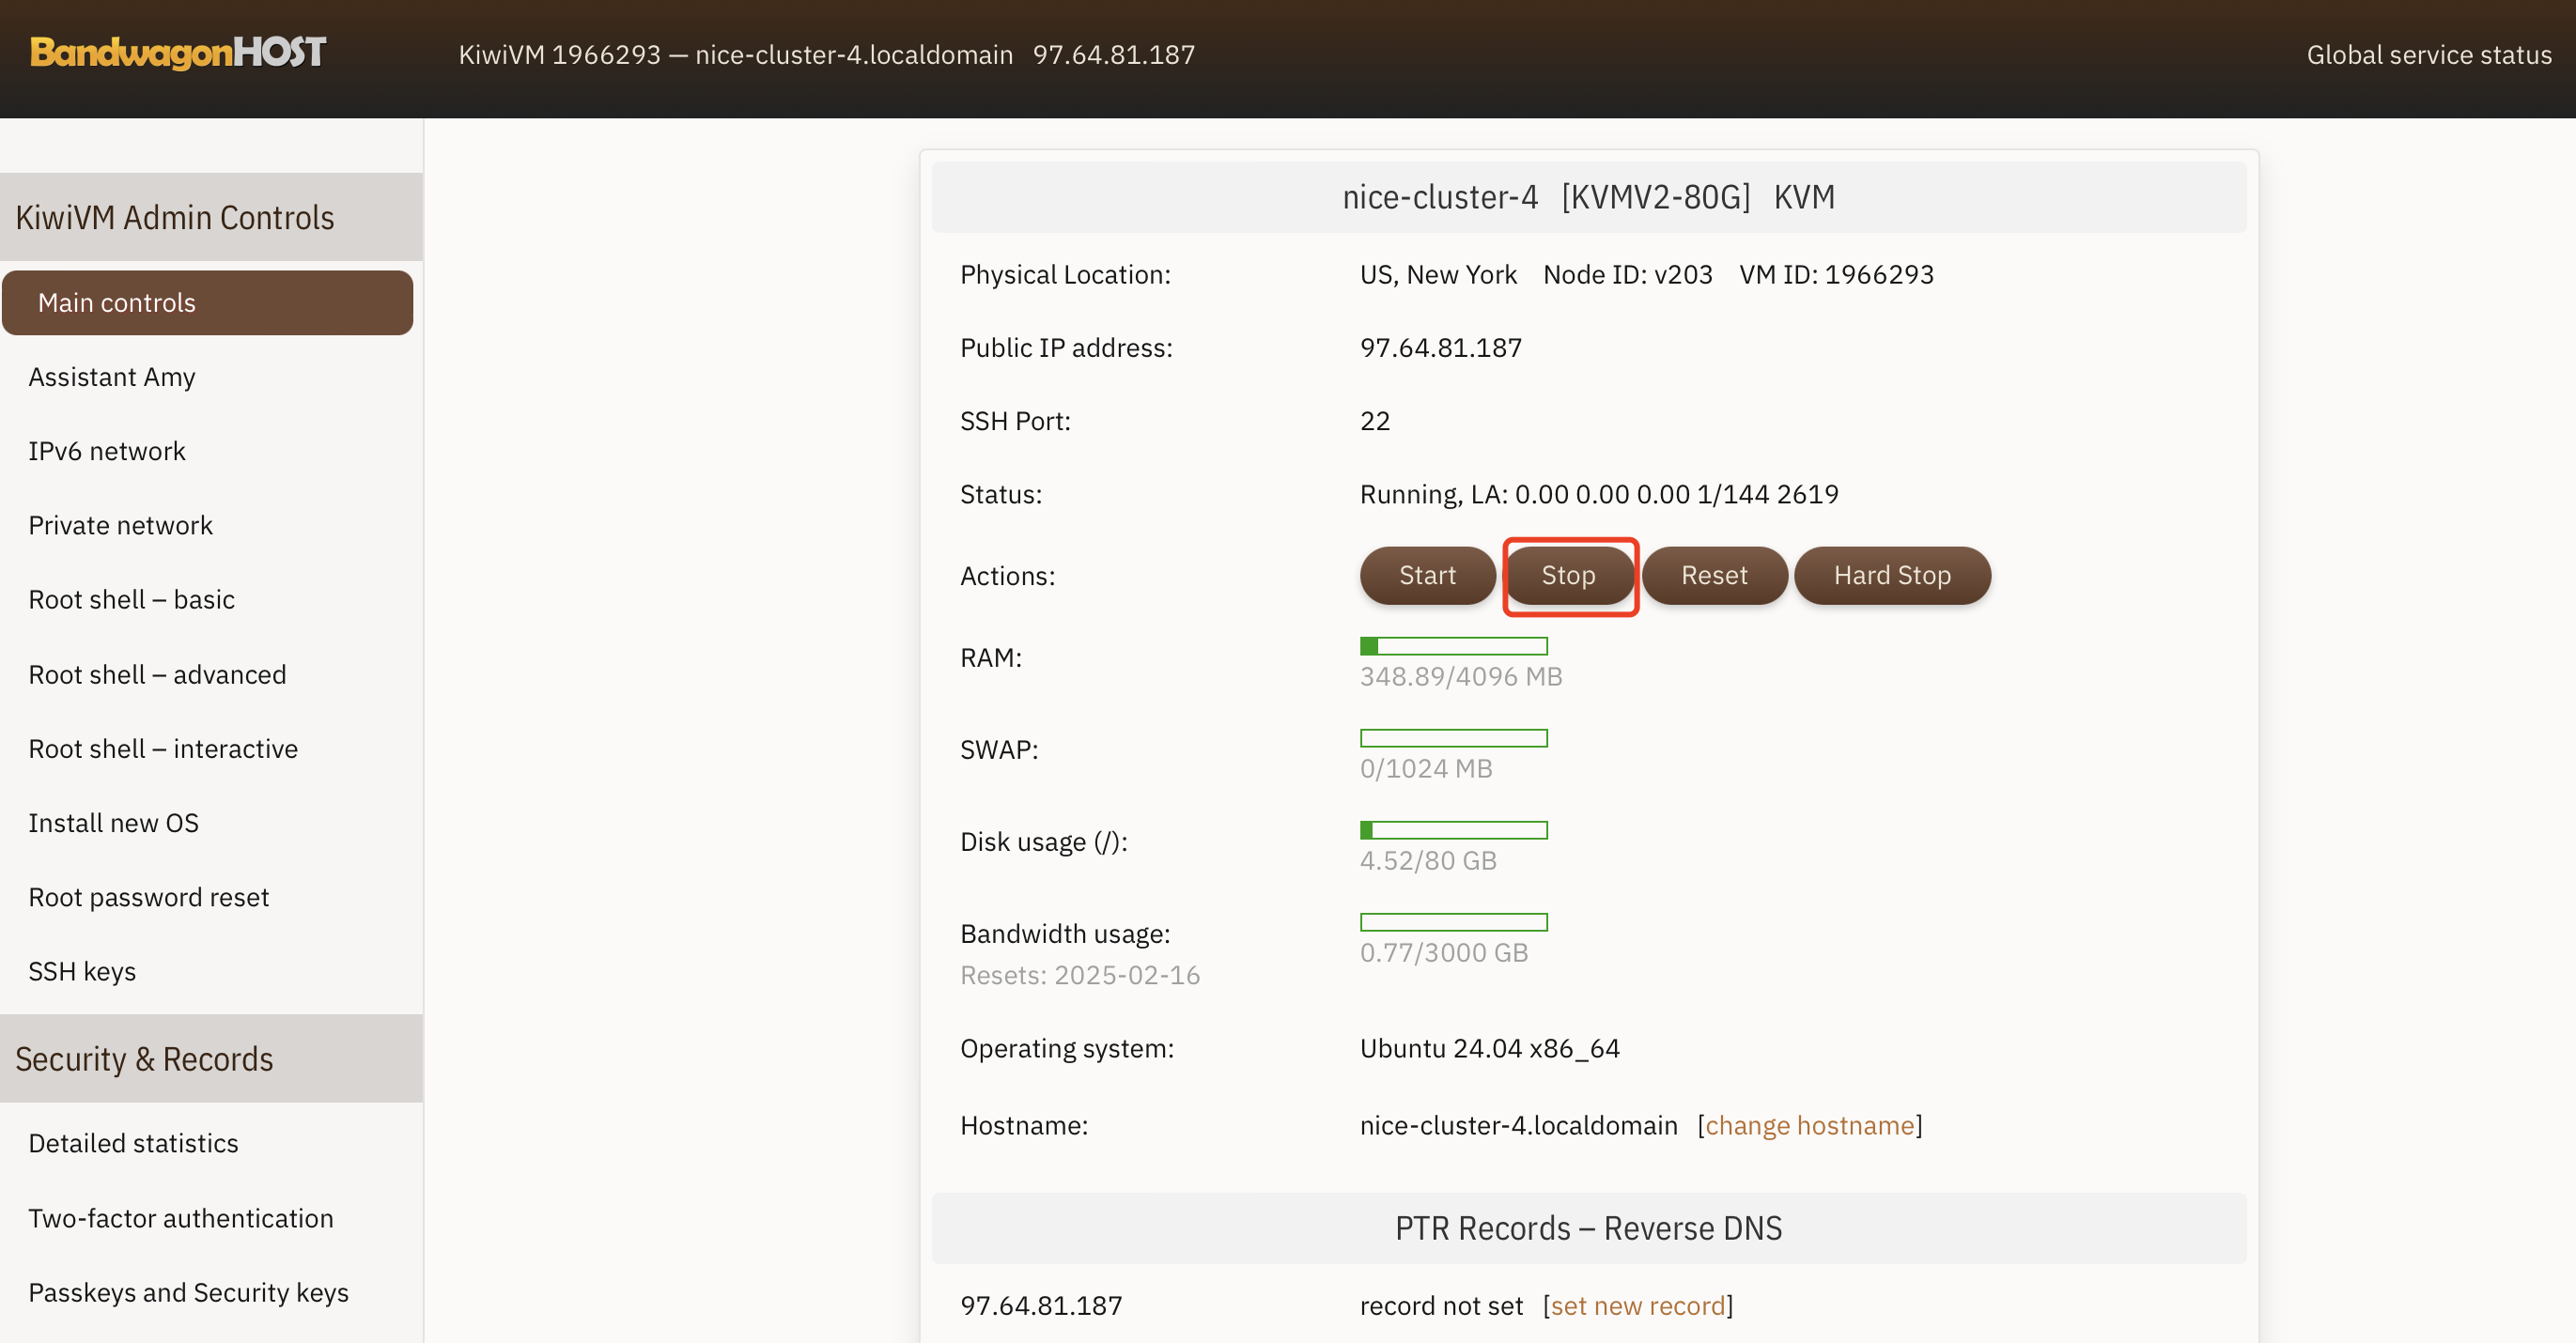
Stop your current VM $\rightarrow$ Install new OS $\rightarrow$ Choose Ubuntu 24.04.
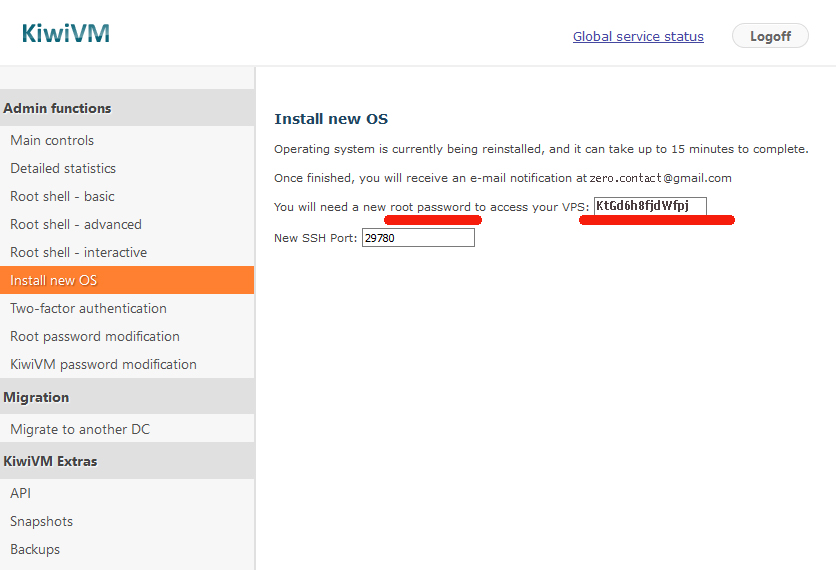
It may take as long as 15 mins to install a new OS. You will receive an Email notification when your new OS is installed.

The system begins the installation. Make sure to save the Root Password shown.
-
登录服务端,连接VPS
二选一,可以从 KiwiVM 或者 Mac 登录。推荐使用 Mac Terminal 登陆。
-
KiwiVM
Talking to VPS via
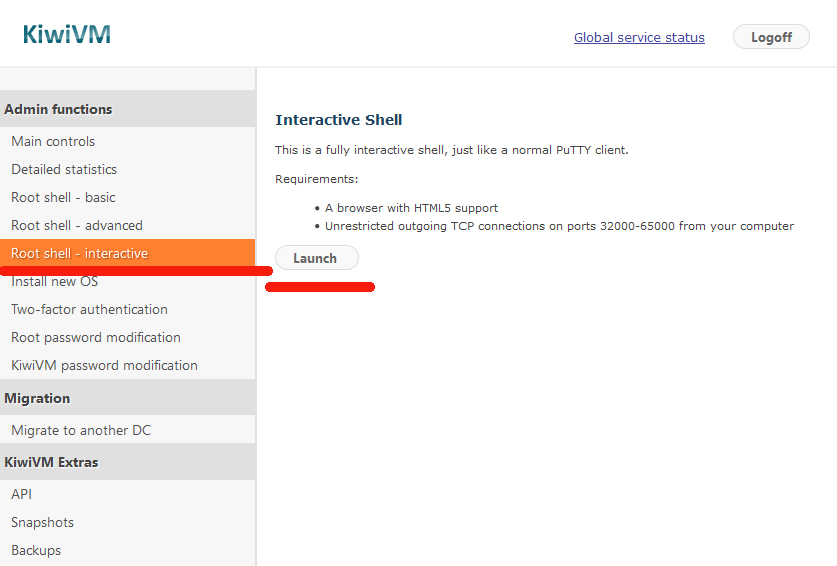
Root Shell – Basic. Don’t need to log in. Can type cmds directly.Talking to VPS via
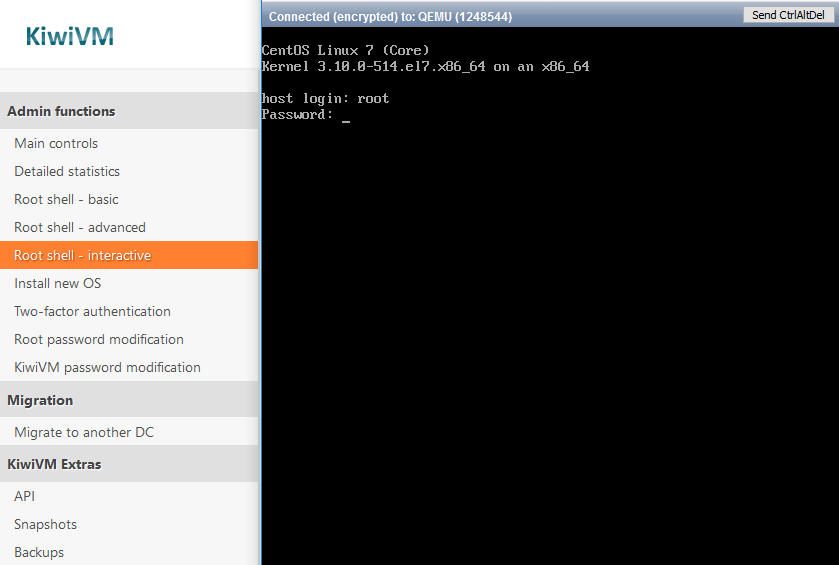
Root Shell – Interactive. This is a fully interactive shell, similar to a standard PuTTY client. Must log in to type cmds. ❌非常慢,一直在 loading, connecting …
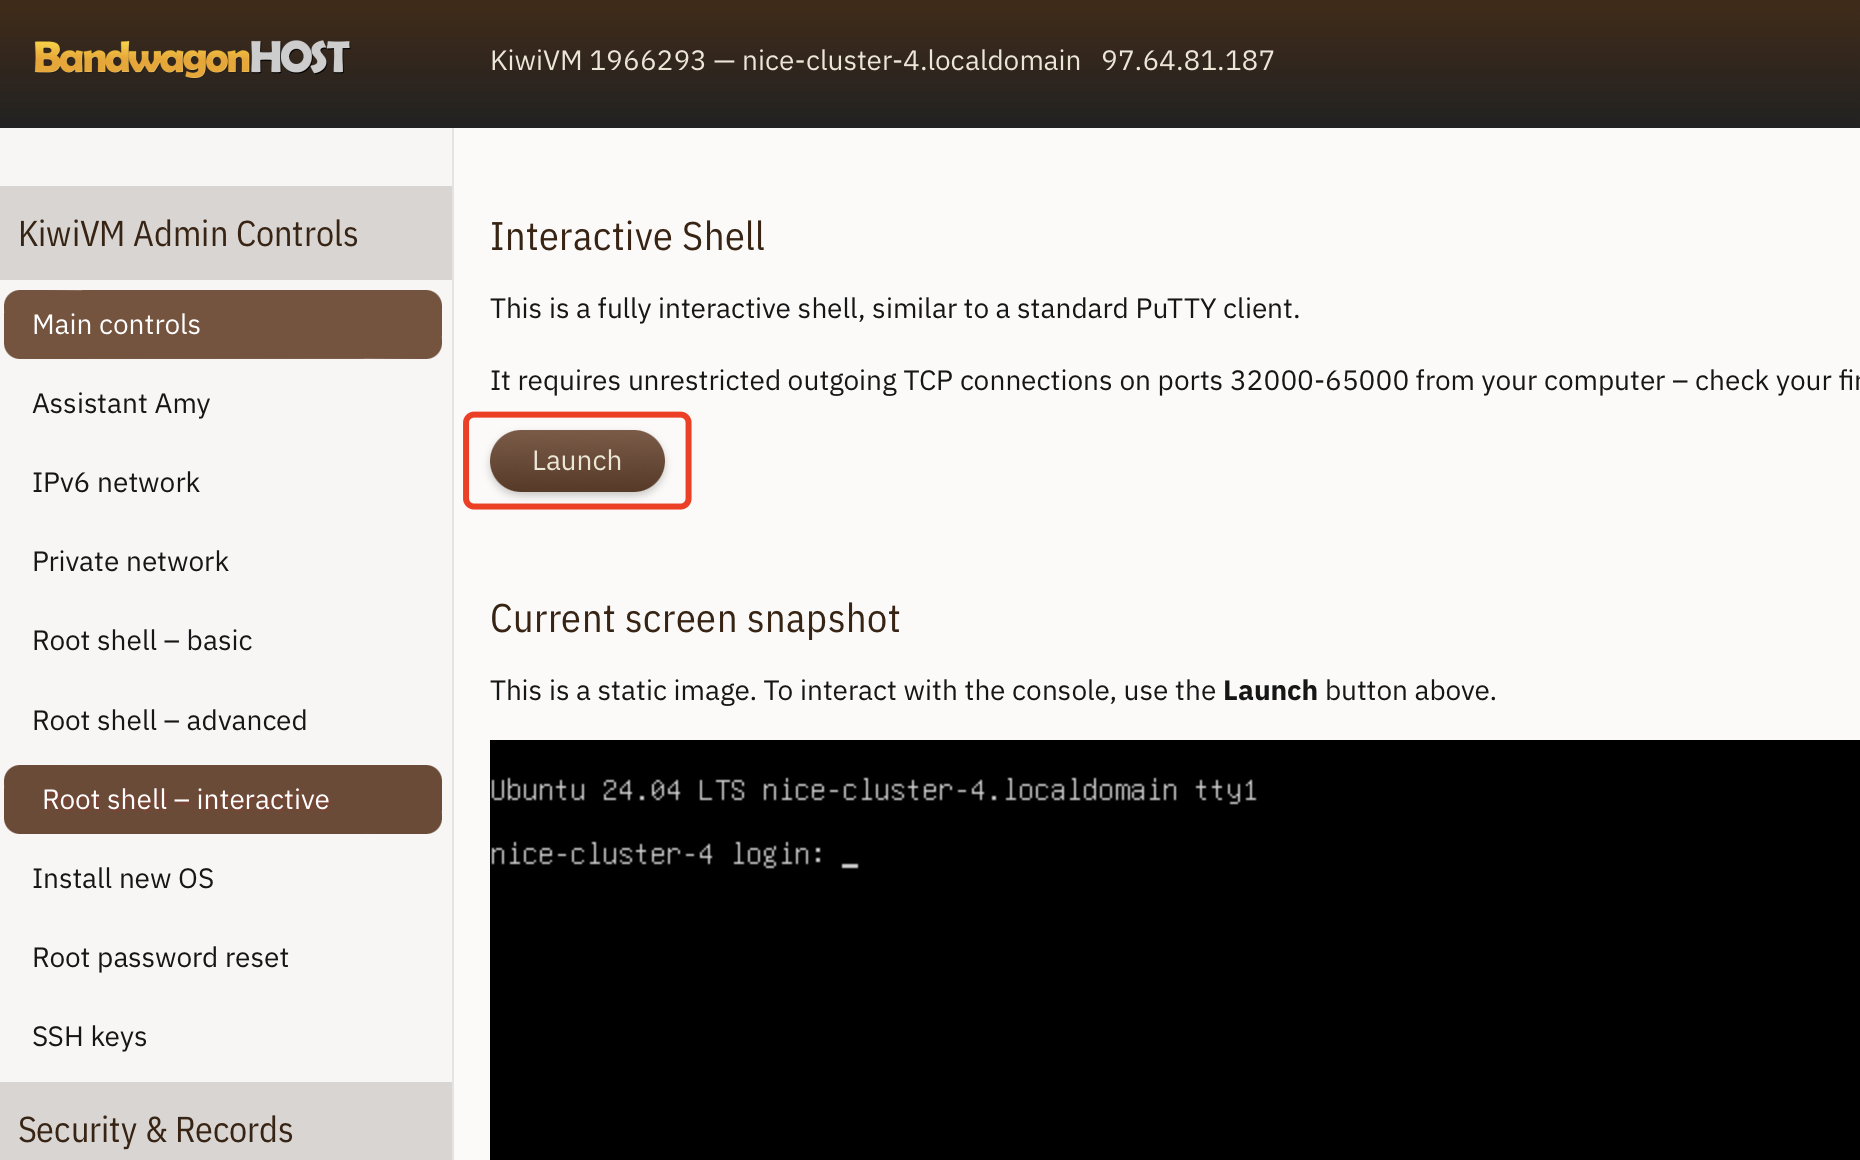
How to log in Root Shell Interactive?
Type in word:
rootand pressEnter.Root passwrod is required. Now go ahead and type it in.
Note, you cannot Copy & Paste anything in Linux… So the password is to be entered manually (make sure to respect the Upper case letters). In addition, as you type in the password, it won’t be show on the screen, kind of blind typing.. Once finished, press [Enter].
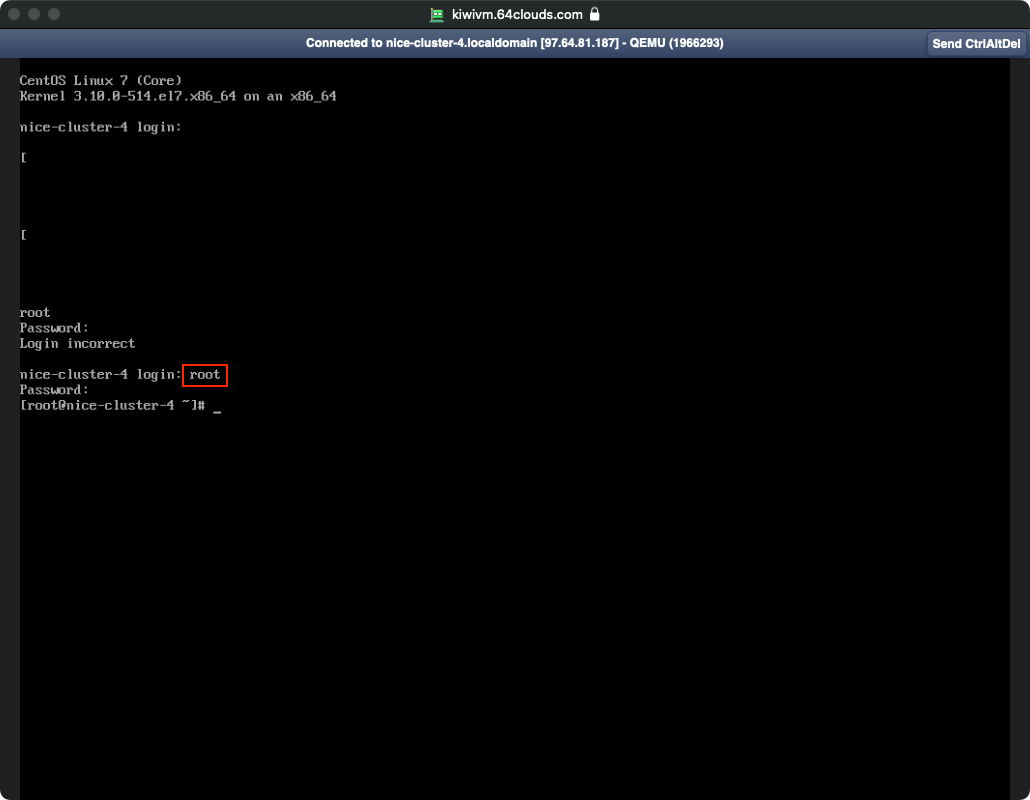
-
Mac ✅
打开 Mac Terminal 输入
ssh root@43.45.43.21(将45.45.43.21换成你的 IP)屏幕上会出现一连串提示如下
The authenticity of host '97.64.81.187 (97.64.81.187)' can't be established.
ED25519 key fingerprint is SHA256:JYmUQrTJOts6jTU2sMMGzdsgtuyNnMZfwN5e9TeJ/oI.
This key is not known by any other names.
Are you sure you want to continue connecting (yes/no/[fingerprint])?
意为无法确认 host 主机的真实性,只知道它的公钥指纹,问你还想继续连接吗?直接输入
yes并回车。之后输入Root Passwrod 并回车。

当屏幕出现
[root@nice-cluster-4 ~]#时,说明已成功登录,以后再登录 ssh 时就不会出现公钥指纹提示了。-
Mac Terminal 的方便之处在于可以 copy & paste.
-
重装系统后,会出现登录错误。删除
/.ssh/known_hosts之后,重新登录即可。
-
-
-
配置Shadowsocks 服务器端
检查和配置 Shadowsocks
/etc/init.d/shadowsocks-libev status -
安装Shadowsocks 客户端
Summary of all passwords you’ll need to remember.
Password #1. Client area Log in and Password
Gets you into your Client Area, where you buy & renew all your VPS services:
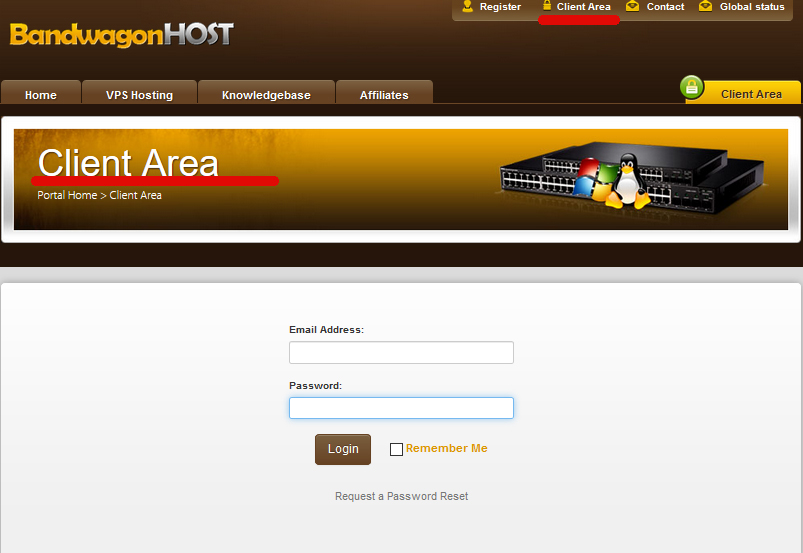
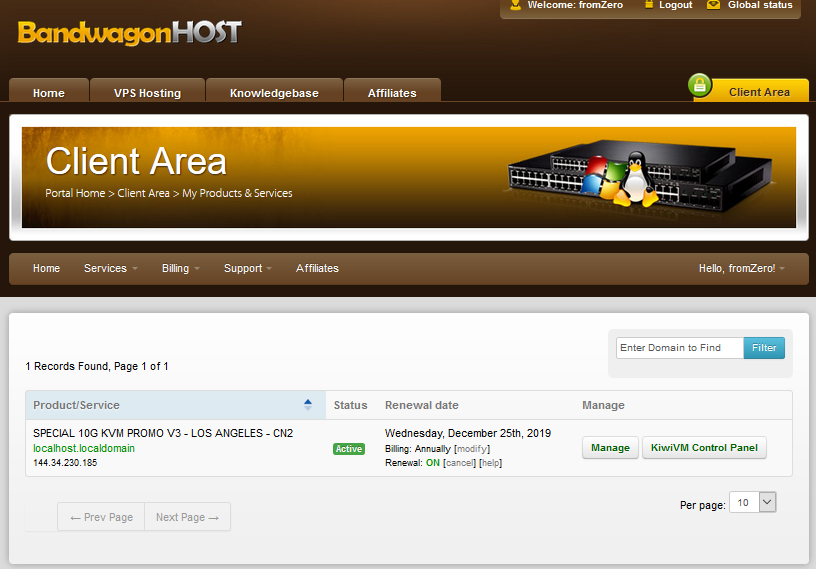
It can be changed in the Client Area (under your profile).
Password #2. Control Panel Log in and Password
Gets you into your VPS Control Panel where you manage & “talk” to your VPS:

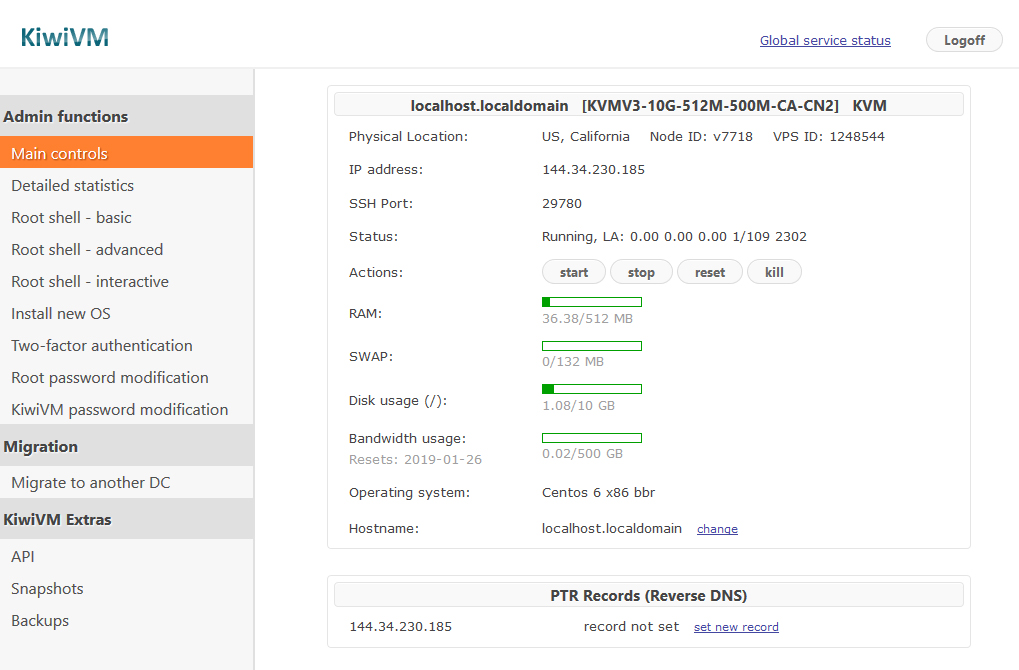
It can be changed in the KiwiVM Control Panel (under “KiwiVM Password Modification”).
Tip: Use auto-login from Client Area to access KiwiVM Control Panel (in the Client Area, Navigate to Services -> My services. Click “KiwiVM Control Panel” button).
Password #3. Root Shell Log in and Password
Gets the root access (“inside access”) to your VPS where you talk to you VPS and execute Linux commands.
It can be changed in the KiwiVM Control Panel (under “Root Password Modification”).
移动设备的配置
完成电脑端的配置,此处我们介绍如何配置手机和平板。原则是用一个 Proxy Client,iPhone上的选择有:
- 付费 app: Shadowrocket
- 免费 app: Jamjams, V2BOX – V2ray Client, Potatso
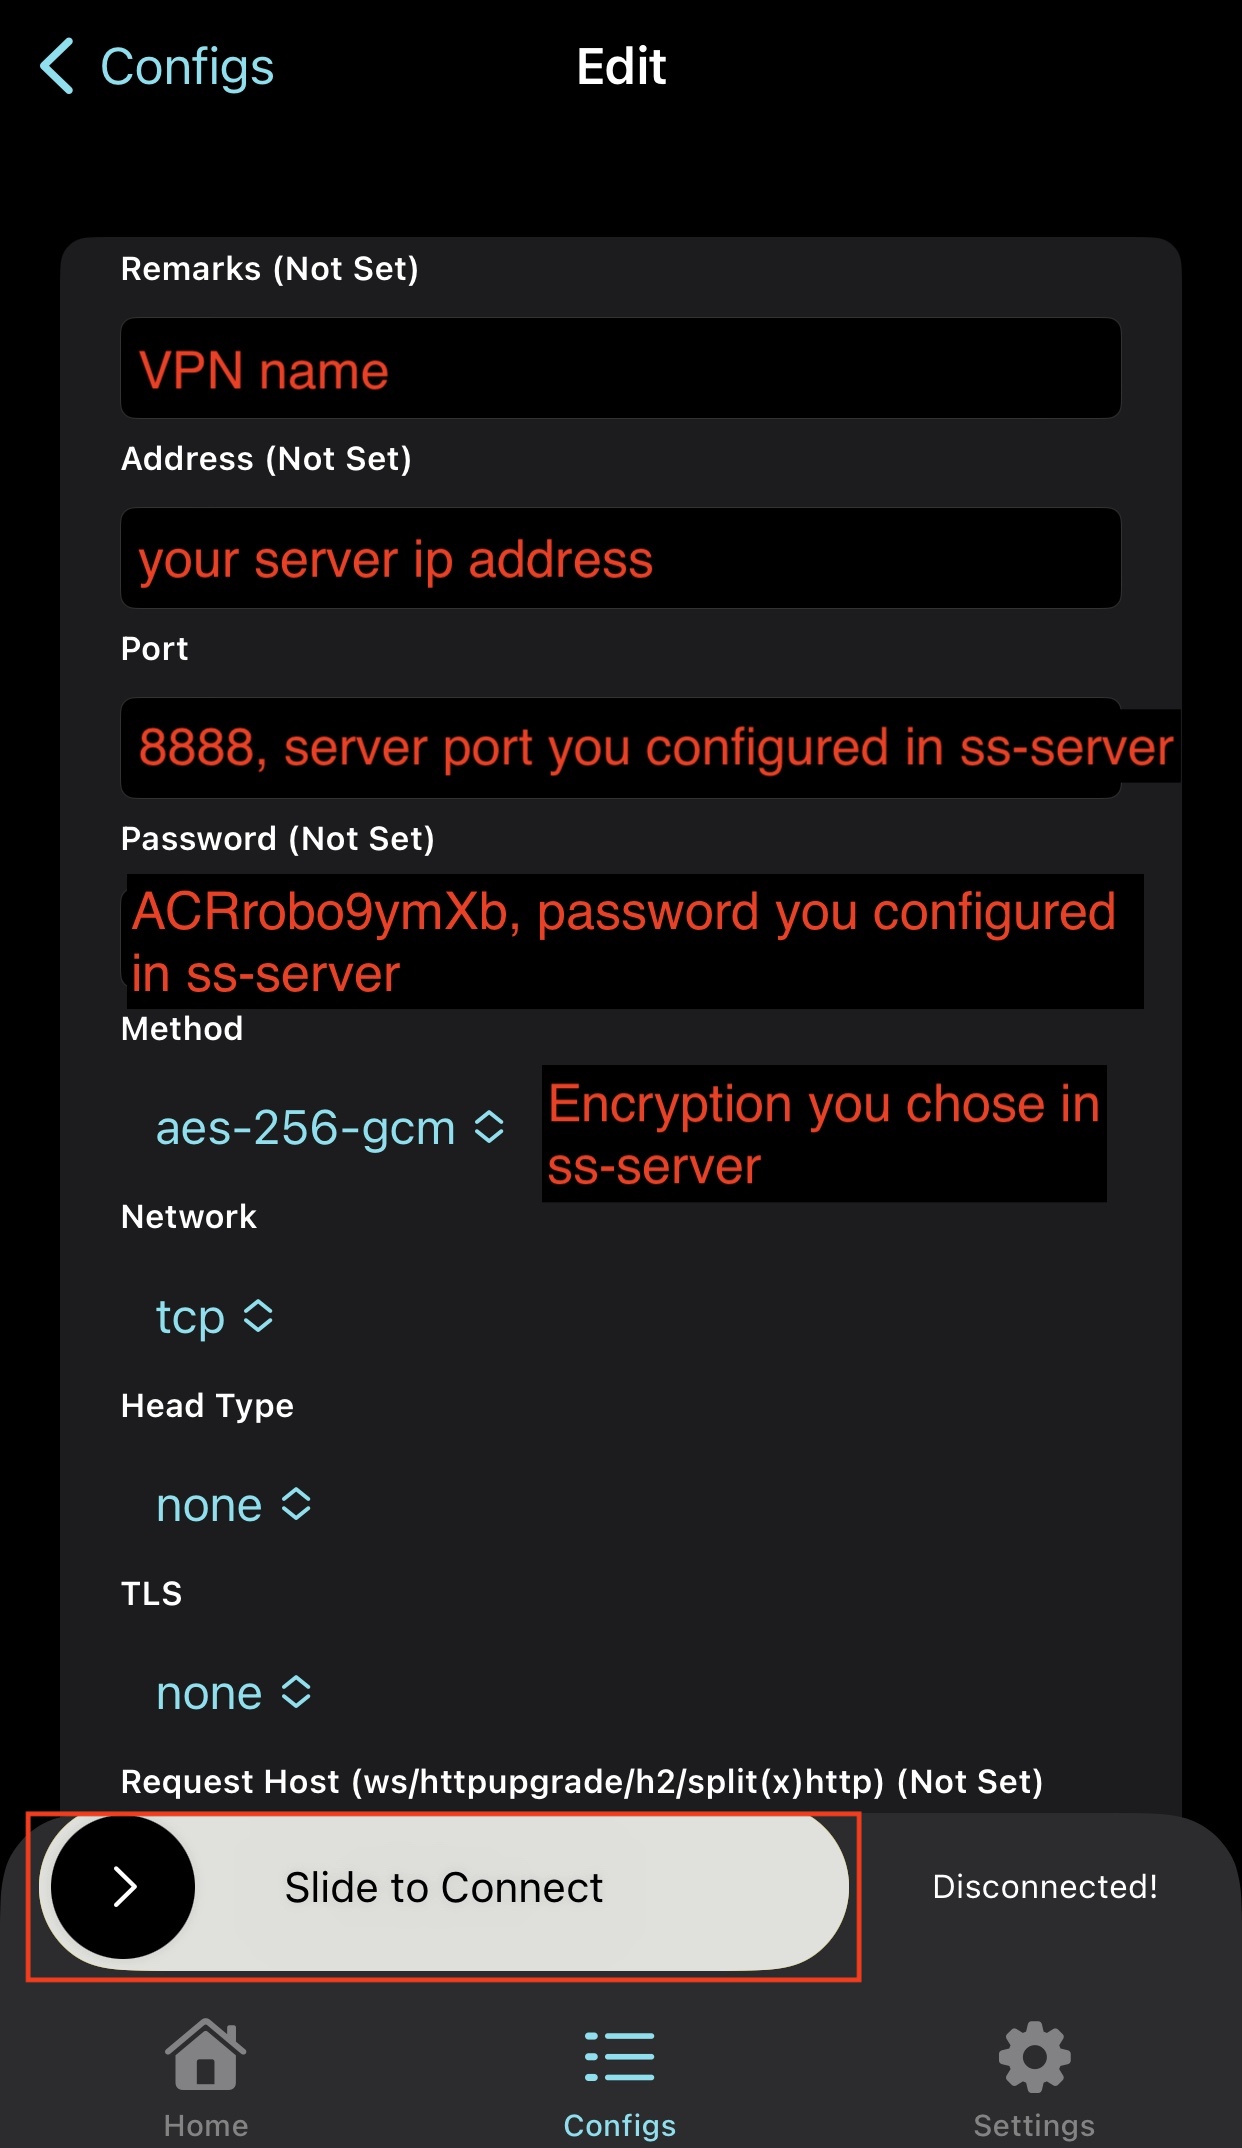
以下以 V2BOX 为例介绍如何配置,其他代理都大同小异。
-
Allow V2BOX to add VPN configuration.
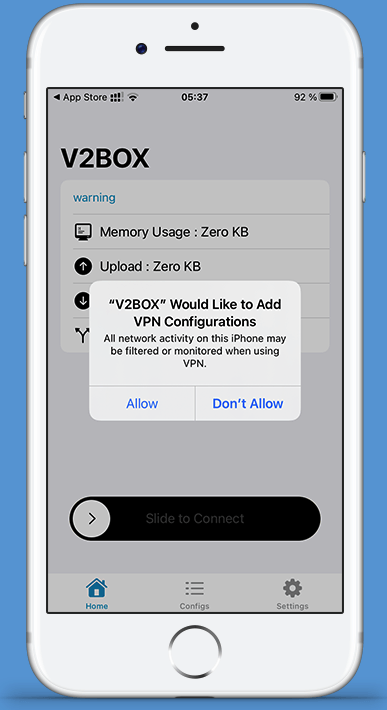
-
Click on
Configs$\rightarrow$ Click the Plus Sign $\rightarrow$ ChooseAdd manual config.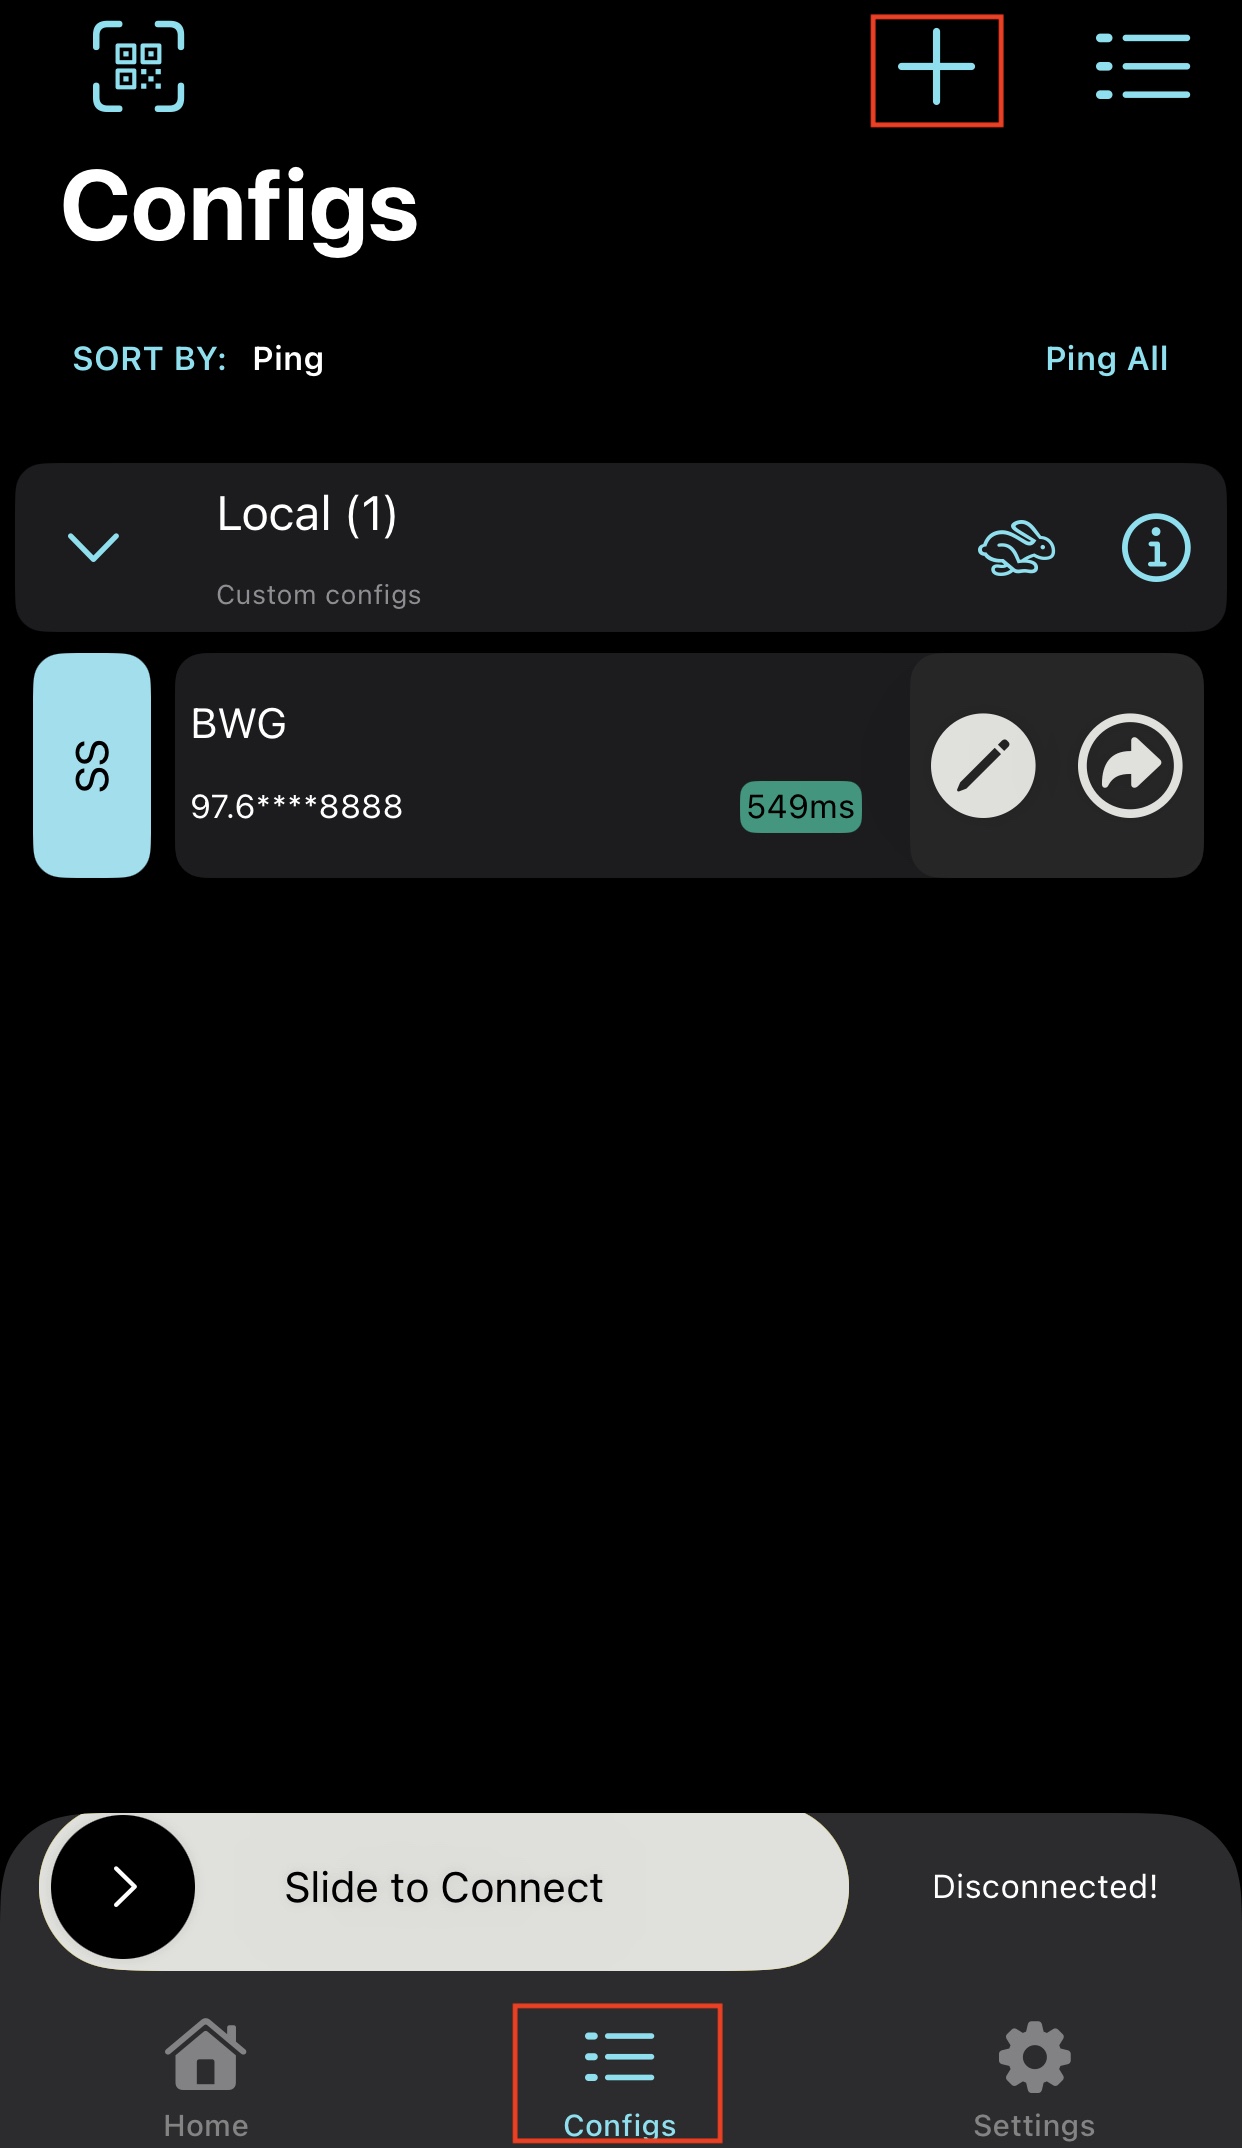
-
To connect, move the slider to the right.
Just My Socks
Just My Socks 是搬瓦工官方机场,提供 Shadowsocks 和 V2ray 服务。✅
优点: 便宜 ($6 /mon) 又容易设置,不需要自己配置 Server 和 Client。支持多设备在线。
缺点: 流量限制,500 GB/mon ,其实够用。
与自己租服务器,搭建服务器的价格 (每月$20, 3000G流量) 相比,确实自己搭建服务器单价划算。但是考虑到学习成本,配置服务器时间成本,最容易的懒人选择就是 Just My Socks.
在购买 Just My Socks 时,我们可以使用 Just My Socks 优惠码: JMS9272283 获取 5.2% 循环优惠,输入优惠码后点击 Validate Code 即可使用优惠码,点击 Checkout 付款。
Just My Socks 官网 (用于购买): https://justmysocks.net/members/clientarea.php?action=services
中文教程:

My Services

Just My Socks uses Jamjams to set up iPhone and Mac. Just add the subscription link to Jamjams, and it will automatically configure everything for you.
Jamjams Quick Start
详细使用教程此处
Below is the Jamjams menu bar, you can
-
Show Jamjams main panel
Here you can add your subscription link, and manage your servers.
-
If you don’t have any subscription yet, you will be able to add one here.
-
If you have already added a subscription before, click the existing subscription, a list of server will show up. Click the + sign to add your new subscription(s).
-
-
Connect / disconnect the proxy
This turn on/off the proxy.
Note that quiting Jamjams will not turn off the proxy. You need to manually disconnect the proxy before quiting Jamjams.
-
Open Jamjams Preferences (⌘,)
You can go to the
Subscriptionstab to add your subscription link here too. -
Check your server info
Here will show a list of your servers. You can quickly switch between servers by clicking on the server name.
-
Check for app updates
Set up your Ubuntu
Install Vim
sudo apt install vim -y
Verify the installation
vim --version
FAQ
Q: What is an IP address?
A: An IP address is a string of numbers separated by periods. IP addresses are expressed as a set of four numbers — an example address might be 192.158.1.38. Each number in the set can range from 0 to 255. So, the full IP addressing range goes from 0.0.0.0 to 255.255.255.255.
Q: How to exit SSH connection?
A: type exit and hit Enter.
Q: How to set up IOS (i.e., iPhone and iPad) for Shadowsocks?
A: What you need is a VPN Internet network proxy manager, act as VPN proxy client (客户端的代理设置). A proxy client set up proxy for you, it is different from a proxy service provider. You need to have your own server information, and then set up proxy using the client.
Free options: iPhone can be set by V2BOX – V2ray Client. iPad can be set by Jamjams.
Charged options: Shadowrocket for iPhone (40 kr).
Q: Proxy Client 的参数
A: Which proxy protocols it supports, such as Shadowsocks, V2ray, Vmess, Trojan, SSH, Socks. Which encryption protocol it supports, such as AES-128(192 OR 256)-GCM, Chacha20-IETF, Chacha20-ietf-poly1305, xchacha20 ietf -- poly1305.
Q: 如果某天你的 ss 突然无法使用了,很可能就是端口被封了。
A: 这时你可以直接在这里,将端口修改为 1-65535 间任意其他数字。
Q: How to install the Shadowsocks Command Line Client on Linux?
A: On Ubuntu
apt-get install python-pip
pip install shadowsocks
The command of installing shadowsocks client is the same to the command of installing shadowsocks server, because the above command will install both the client and the server.
Downloading/unpacking shadowsocks
Downloading shadowsocks-2.8.2.tar.gz
Running setup.py (path:/tmp/pip-build-PQIgUg/shadowsocks/setup.py) egg_info for package shadowsocksInstalling collected packages: shadowsocks
Running setup.py install for shadowsocksInstalling sslocal script to /usr/local/bin
Installing ssserver script to /usr/local/bin Successfully installed shadowsocks Cleaning up…
sslocal is the client software and ssserver is the server software.
Your can use whereis command to find where the shadowsocks client is installed.
$ whereis sslocal
sslocal: /Users/menghan/anaconda3/bin/sslocal
Q: What are the differences between Shadowsocks and VPN?
A: VPN (Virtual Private Network) is used to bypass firewall and protect your anonymity on the web. When you are using VPN, all your Internet traffic is routed through VPN. Because VPN servers are usually located outside your country, this can slow down your Internet speed especially when you are visiting websites inside your country.
Shadowsocks comes to the rescue! Besides a global proxy setting, shadowsocks can also be setup in a way that some of your applications go through shadowsocks and other applications go through normal traffic. For example, you can use Google Chrome to bypass firewall, visit Google, Facebook, YouTube and use Firefox to visit sites that isn’t blocked in your area.
Q: Why can I not use Google Scholar?
403. That’s an error.
Your client does not have permission to get URL / from this server. (Client IP address: 185.xxx.yy.zzz)
Please see Google's Terms of Service posted at https://policies.google.com/terms
A: Your server IP is blacklisted by Google Scholar. If Google finds your IP abusive, you have to switch to another IP to try or change your host provider. Use ipv6 instead of ipv4 to visit google Scholar by changing the hosts file may work.
Q: IP 被封怎么办?
A: 表现是IP Ping不通。解决方式: 换机房 (Migrate to another datacenter)。
Q: 如何查看自己的IP是否被封?
A: 前往下面网址: port.ping.pe. 然后输入你的 IP:端口 (如 97.64.81.187:22),开始测试,如下图所示。

**结果一: **如果出现下面这样的,境外的显示绿色的 successful,大陆的显示红色的 failed,那么你的 IP 或者端口就是被封了。先换个端口试一下,如果换了端口还是这样就是 IP 被封了。
**结果二: **大陆、境外都是 successful,那么你的端口没有任何问题。
**结果三: **大陆、境外都是 failed,那么你的端口没有开放,检查一下你的 VPS 的设置吧。
Troubleshoot
Q: Google Chrome is on and off constantly.
A: Check proxy settings. Turn off Proxy SwitchyOmega if you are using it. If this does not help, re-install Chrome. Re-installing Chrome won’t affect your extensions, settings, and bookmarks data.
换机房
Migrate to another datacenter
This feature allows you to “teleport” your VM to a different datacenter with zero data loss and minimal downtime – just a few seconds to a few minutes.
Q: Will my IP address change?
A: IPv4 address will be changed. If you host websites or services that rely on DNS, be sure to update the DNS records accordingly. Additionally, if any of your services bind to a static IPv4 (rather than 0.0.0.0 or localhost 127.0.0.1), you’ll need to update their configuration files to reflect the new IP.
IPv6 subnet, if enabled, will stay the same.*We will transparently forward all traffic to/from the new location, so you can continue using the existing IPv6 address. This may increase IPv6 latency.
The entire migration process may take anywhere from a minute to a few hours, depending on the number of files in this VM and their size. However, this VM will be operational while migration is performed. It will be shut down for a few seconds to few minutes during the last stage of the process.
Issue: Migration backend is currently not available for this VPS. Please try again in 10-15 minutes.
25/02/01 等了一整天,仍然不可以换机房。
Request IP change
References: https://bandwagonhost.com/ipchange.php
https://www.bandwagonhost.net/1925.html
The cost of IP change submitted via this form is $7.39. After payment is received we will perform the following:
- We will assign a new (random) IPv4 address from the available pool
- We will verify that it is accessible from all continents
- After that we will delete your old IP address.
Refund
We have 30-day money back guarantee, subject to our Terms of Services. Please submit a request for full refund by navigating to:
https://bandwagonhost.com/refund.php
The system will enter a request to our billing department on your behalf.
Some service does not provide automatic refund. $\rightarrow$ Need to submit a support request for manual processing.
Submitted request 2025-02-02.
多用户使用
Configure Multiple Users
有时候需要多个人使用一台服务器,因此我们需要增加端口。
如果只是个人使用,那么一个端口可以登陆多台设备,不需要配置多个端口。
-
If you need multiple users and ports, please install the
-Python,-R,-Go, or-Rustversion of Shadowsocks. -
The only way you can support multiple ports with
Shadowsocks-libevis to create multiple instances of Shadowsocks.shadowsocks-libev不支持通过简单的修改配置文件来实现。开发者单独开发了一个ss-manager来管理和开启多端口。
References:
https://blog.zzhou612.com/2019/02/15/configure-multiple-users-for-shadowsocks-libev/
秋水逸冰: https://teddysun.com/532.html/comment-page-1
Q: 如何增加端口?
A: 修改 Shadowsocks 配置文件 (不同版本的路径不一样),修改成如下形式 (“端口”:“密码”)。The idea set multiple ports and assign passwords correspondingly. Can be the same password, can be different.
以 Python 版本为例:
The original Python release of shadowsocks supports multiple users through configuration, by assigning different passwords on multiple ports.
vim /etc/shadowsocks.json
{
    "server":""0.0.0.0"",
    "port_password":{
       "9000":"12345",
       "9001":"12345",
       "9002":"12345",
       "9003":"12345",
       "9004":"12345"
    },
    "local_address":"127.0.0.1",
    "local_port":1080,
    "timeout":300,
    "method":"aes-256-cfb",
    "fast_open": false
}
重点在于 port_password 字段的修改。
区别是
- 删除了
"server_port":8888和"password":"ACRrobo9ymXb"并 - 添加了一组
"port_password": {"9000":"12345", "9001":"12345", "9002":"12345", "9003":"12345", "9004":"12345"}.
9000–9004 是自己配置的端口,可以自己随便换,但是范围要在 1024-65535,1024 以下的默认是给系统用的,但是也最好别和这些相同 。
- 注意最后一个
“端口”:“密码”没有逗号。 - 如果只有一个端口,那么就只保留
"9000":"12345",并且删除逗号。
配置了多端口,相当于一个主IP (Main IP) 下,有不同的子 IP。比如你的主 IP 为 43.45.43.21, 经过如上配置,你就会获得 43.45.43.21:9000, 43.45.43.21:9001 … 等五组子 IP。配置后访问方式为主IP:端口,同一个主 IP,不同的端口,对应不同的子IP。
默认情况下,Shadowsocks (SS) 的单个端口,可以在64台不同的设备上同时登陆,即一个账号对应64个连接。
端口是账号的概念。端口/账号 和 连接设备 是不同的概念,一个端口可以连接多个设备。
如何管理端口,防止被滥用,速度降低:
-
限制某个端口的设备连接数,防止有人恶意分享账号。
比如设置同时连接数量为6,那么这个账号只能同时登陆6个人。
-
限制每个连接的速度
Reference: https://ssr.tools/258
Q: 什么情况下我们需要多端口?
A: 一般情况下是一个人用的,所以默认的一个端口就够了。但还有一些朋友可能有多用户的需求,那这种情况就需要对 SS 服务器端做额外的设置了。
使用 SS 的时候只需要输入服务器IP、端口和密码等信息,并不需要单独的用户名。所以针对多用户的需求,我们并不是真的创建很多用户,而是为 SS 服务器开放多个端口,每个端口对应不同的密码就可以了。总结一名话就是,SS 多用户在本质上就是 SS 多端口。
Reference: https://ssr.tools/194
Q: 如何使用ss-manager?
A: 其工作原理大致如下: 调用 ss-server 并根据配置文件里的多个端口号,在当前用户目录下生成隐藏文件夹 .shadowsocks 以及拆分配置文件为 .shadowsocks_端口号.conf,并以此创建新的进程,再生成 .shadowsocks_端口号.pid 来保存进程的 pid 信息。
最终,创建出来的 ss-server 进程数和配置文件里的端口数相同。也就是说,每个端口需要开启一个 ss-server 进程。
There is a Github gist discussion about multi-port config of Shadowsocks-libre.
https://github.com/shadowsocks/shadowsocks-libev/issues/5
http://www.linuxmysql.com/16/2023/1241.htm
https://blog.phpgao.com/shadowsocks_on_linux.html
https://gfw.report/blog/ss_tutorial/zh/
https://xtrojan.org/client/ss-client/error-resolution-of-shadowlocks-port-occupied.html
A workaround is to use multiple service instances instead of multi port configuration.
The idea is to isolate each user in different processes and reconfigure each user’s port/password/encyption/timeout without reload/restart the whole service.
This kind of multi processes should only introduce slight overhead and even works well for low end boxes.
Shadowsocks-libre 配置多端口
-
Create multiple users 新增用户
useradd user1 # 新增用户 user1 手动指定uid: [root@211500 ~]# useradd -u 9116 user9116 [root@211500 ~]# id user9116 uid=9116(user9116) gid=9116(user9116) groups=9116(user9116) useradd user2 # 新增用户 user2 -
复制和修改配置文件
Shadowsocks-libev 版的配置文件是
/etc/shadowsocks-libev/config1.json,默认里面的内容如下:{ "server":"0.0.0.0", "server_port":8989, "local_address":"127.0.0.1", "local_port":1080, "password":"teddysun.com", "timeout":600, "method":"aes-256-cfb" }保存完毕即可立即运行
/usr/local/bin/ss-server -c /etc/shadowsocks-libev/config1.json -f /tmp/ss1.pid因为是要运行 2 个Shadowsocks-libev 版服务端进程,所以这里复制一份配置文件。
cp /etc/shadowsocks-libev/config1.json /etc/shadowsocks-libev/config2.json修改
/etc/shadowsocks-libev/config2.json里的 server_port 为 9000 (数值不和/etc/shadowsocks-libev/config.json里的不一样即可) 内容如下:{ "server":"0.0.0.0", "server_port":9000, "local_address":"127.0.0.1", "local_port":1080, "password":"teddysun.com", "timeout":600, "method":"aes-256-cfb" } -
修改 iptables 规则 (Not sure if this is necessary. There are tutorials that do not include this step)
/sbin/iptables -I INPUT -m state --state NEW -m tcp -p tcp --dport 8989 -j ACCEPT


/sbin/iptables -I INPUT -m state --state NEW -m tcp -p tcp --dport 9000 -j ACCEPT


/sbin/iptables -t mangle -A OUTPUT -m owner --uid-owner 501 -j MARK --set-mark 501


/sbin/iptables -t mangle -A OUTPUT -m owner --uid-owner 502 -j MARK --set-mark 502


/sbin/iptables -t nat -A POSTROUTING -m mark --mark 501 -j SNAT --to-source IP1


/sbin/iptables -t nat -A POSTROUTING -m mark --mark 502 -j SNAT --to-source IP2
保存 iptables 配置:
/etc/init.d/iptables save -
Use the following codes to create instances for each user:
启动 Shadowsocks-libev 版服务端
需要注意的是,多个配置文件一定要注意的是,配置的端口和
pid文件一定是不同的!而密码及加密方式,甚至服务器IP都没有限制。假设是以 root 用户登录的,那么需要分别以 user1 和 user2 运行 Shadowsocks-libev 版服务端。多实例运行. 命令如下:
ss-server -c /etc/shadowsocks-libev/config1.json -f /tmp/pid1
ss-server -c /etc/shadowsocks-libev/config2.json -f /tmp/pid2
查看进程
ps -ef|grep ss-server


xxx      1344     1  0 20:12 ?        00:00:00 ss-server -c /etc/shadowsocks-libev/config1.json -f /tmp/1.pid
xxx      1491     1  0 20:24 ?        00:00:00 ss-server -c /etc/shadowsocks-libev/config2.json -f /tmp/2.pid
至此,设置完成。 端口 8989 对应 IP1,端口 9000 对应 IP2。
VPN Provider
References
Bandwagon Documentation
Posts from LinuxBabe
Latest post in 2024, set up Shadowsocks-libre: https://www.linuxbabe.com/ubuntu/shadowsocks-libev-proxy-server-ubuntu-24-04
Earlier posts
- 2018: Set up Shadowsocks Server
- 2016: Shadowsocks Command Line Client 客户端也可以用 Command Line 安装。
Shadowsocks
-
官网 (包括使用文档): https://shadowsocks.org/doc/what-is-shadowsocks.html
-
Shadowsocks Wiki, https://github.com/shadowsocks/shadowsocks/wiki
-
一键安装:
Other useful tutorials (其他参考教程)