Python Config
Install packages
Use which -a python python3 to see all python executables.
$which -a python python3

~/anaconda3/bin/python
/usr/local/bin/python3
/usr/local/bin/python3
/usr/bin/python3
~/anaconda3/bin/python3
Conda Commands
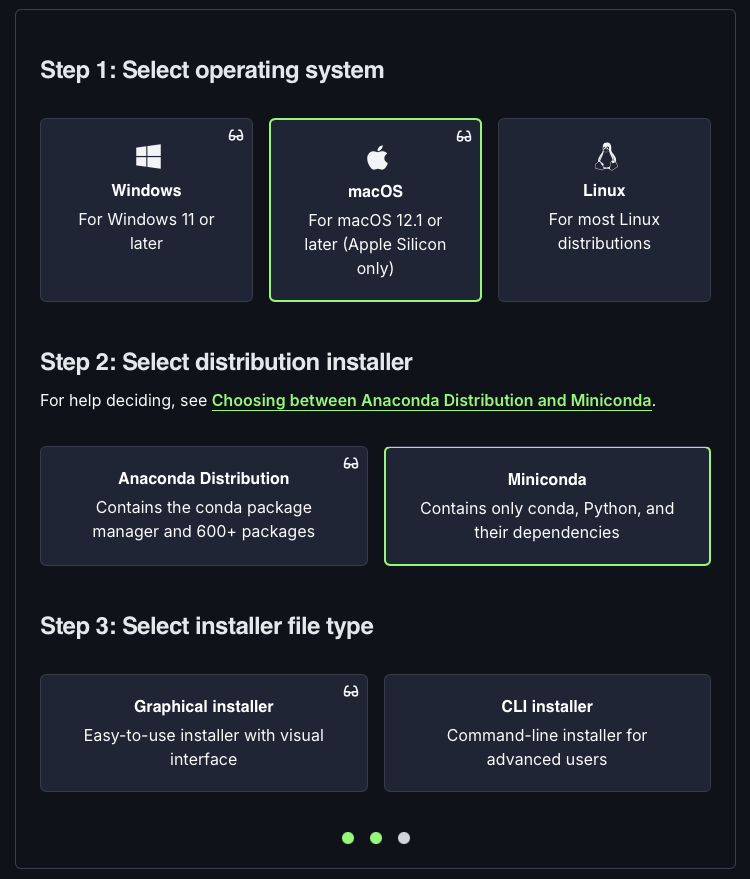
Anaconda vs Miniconda:
-
Anaconda: Contains the conda package manager and 600+ packages → taking up too much space (~9.7 GB)
-
Miniconda: Contains only conda, Python, and their dependencies → sufficient to use ✅
| Feature | Anaconda Distribution | Miniconda |
|---|---|---|
| Created and published by Anaconda | Yes | Yes |
| Has conda | Yes | Yes |
| Has Anaconda Navigator | Yes | No |
| Packages included | 600+ | 130+ |
| Install space required | ~9.7 GB | ~900 MB |
Initialize conda for shell interaction
Initialization is the first thing to do after installing conda.
conda init will add your conda executable file in your $PATH variable.
conda init [SHELLS] Available shells: [‘bash’, ‘fish’, ‘powershell’, ‘tcsh’, ‘xonsh’, ‘zsh’]. One or more shells to be initialized. If not given, the default value is ‘bash’ on unix and ‘cmd.exe’ & ‘powershell’ on Windows.
zsh is the default shell on recent macOS versions.
Run conda init zsh to initialize conda for zsh shell. It will add the following code to your ~/.zshrc file:
# >>> conda initialize >>>
# !! Contents within this block are managed by 'conda init' !!
__conda_setup="$('/Users/menghan/anaconda3/bin/conda' 'shell.bash' 'hook' 2> /dev/null)"
if [ $? -eq 0 ]; then
    eval "$__conda_setup"
else
    if [ -f "/Users/menghan/anaconda3/etc/profile.d/conda.sh" ]; then
        . "/Users/menghan/anaconda3/etc/profile.d/conda.sh"
    else
        export PATH="/Users/menghan/anaconda3/bin:$PATH"
    fi
fi
unset __conda_setup
# <<< conda initialize <<<
After initialization, you can run conda commands directly in your shell without needing to specify the full path to the conda executable.
Verify conda is initialized correctly
$which conda
conda () {
  \local cmd="${1-__missing__}"
  case "$cmd" in
    (activate | deactivate) __conda_activate "$@" ;;
    (install | update | upgrade | remove | uninstall) __conda_exe "$@" || \return
            __conda_reactivate ;;
    (*) __conda_exe "$@" ;;
  esac
}

$type -a conda
conda is a shell function from /Users/menghan/.zshrc
conda is /Users/menghan/anaconda3/bin/conda
conda is /Users/menghan/anaconda3/condabin/conda

$conda --version
conda 23.7.4
Troubleshooting
Issue: The result of default conda init is that the environment variable is inserted in .bash_profile even if zsh is your default shell.
Fix: You need to specify explicitly the shell to be zsh. Run conda init zsh will add the same code to .zshrc.
conda info display info about current conda install.
List all conda environments:
conda env listconda info --envsorconda info -e(shorthand)
$conda info --envs

# equivalently
$conda info -e

# conda environments:
#
                 /Users/menghan/Library/r-miniconda
                 /Users/menghan/Library/r-miniconda/envs/r-reticulate
base          *  /Users/menghan/anaconda3
r-reticulate     /Users/menghan/anaconda3/envs/r-reticulate
base *is the default environment.*indicates the current active environment.
Terminal prompt
Q: My terminal prints the full path of the virtual environment instead of just the name. How to shorten it?
A: Set env_prompt by running
conda config --set env_prompt '({name}) '
conda config --set changeps1 false
This will add the following line to your ~/.condarc file:
env_prompt: '({name}) '
changeps1: false
Restart the terminal and you will see the virtual environment name in parentheses instead of the full path.
ps1 is primary prompt string, ps2 is the continuation prompt string.
By setting changeps1: false, env_prompt will only be applied to ps2 and leave ps1 untouched.
Expected behavior:
/Users/menghan/anaconda3                 ->  (base)
/Users/menghan/anaconda3/envs/pdf2text   ->  (pdf2text)
.../FIN5005/.conda                       ->  (FIN5005/.conda)
.../Econ-Study/.conda                    ->  (Econ-Study/.conda)
(no env active)                          ->  (nothing)
Q: Why I have two envs names in the prompt, e.g., (.venv) (anaconda3)?
A: There are two virtual environments activated.
-
(anaconda3)is the base env, this is controlled byauto_activate_base: True. Meaning it will automatically activate thebaseenv when you open a new terminal.You can disable auto-activating by running
conda config --set auto_activate_base false -
(.venv)is the plain virtual environment created bypython -m venv .venv.
‼️ Having two active envs is dangerous. .venv/bin sits first on PATH, but anything the venv doesn’t contain silently falls through to conda base.
So pip install foo puts foo in .venv, then ipython or jupyter starts the anaconda3 interpreter and import foo fails. That class of “but I just installed it” confusion is exactly what a half-shadowed PATH produces.
Change Conda configuration settings
conda config --set KEY VALUE change a Conda configuration setting.
For instance conda config --set auto_activate_base false will add the following line to your ~/.condarc file:
auto_activate_base: false
Determine your current env
By default, the active environment—the one you are currently using—is shown in parentheses (…) or brackets […] at the beginning of your command prompt:
(myenv) $
If you do not see this, run:
conda info --envs # list all envs, the active one is prefixed w/ *
In the environments list that displays, your current environment is highlighted with an asterisk (*).
To activate an environment, use the conda activate command. For example, to activate the myenv environment, run:
conda activate myenv
If the environment does not have a name, you can activate it by specifying the full path to the environment’s location.
conda activate /path/to/myenv
To deactivate an env, run
conda deactivate myenv
To delete an env, run
# if myenv is currently active, first deactivate it
conda deactivate myenv

# delete named env: myenv
conda remove --name myenv

# delete path-based env: /path/to/myenv
conda remove --prefix /path/to/myenv
You can delete a package from an environment by running:
conda remove --name myenv package_name

# remove numpy from myenv
conda remove --name myenv numpy
To see if a specific package is installed in an environment:
conda list --name myenv scipy # full flag
conda list -n myenv scipy # same cmd but in shorthand
conda list scipy # check in the current-active env

conda list # print all installed packages
conda list -n myenv # print all installed packages in myenv
Prevent Python env in OneDrive
Issue: VS Code automatically creates a virtual environment in the project folder ../.conda/, which is synced to OneDrive.
Virtual environments contain tens of thousands of files, which can be a problem if you are using OneDrive.
Prevent VS Code from creating workspace-local envs.
The principle is to use named conda envs, rather than path-based ones that are duplicated in each project folder.
On Nord16
$conda info -e
# conda environments:
#
                  /Users/menghan/Library/CloudStorage/OneDrive-Norduniversitet/FIN5005/.conda
                  /Users/menghan/Library/r-miniconda
                  /Users/menghan/Library/r-miniconda/envs/r-reticulate
base           *  /Users/menghan/anaconda3
interest_rate     /Users/menghan/anaconda3/envs/interest_rate
pdf2text          /Users/menghan/anaconda3/envs/pdf2text
r-reticulate      /Users/menghan/anaconda3/envs/r-reticulate
My conda envs structure is as follows:
/Users/menghan/anaconda3/
├── bin/
├── ...
└── envs/
    ├── interest_rate/
    ├── pdf2text/
    └── r-reticulate/
Conda’s default environment directory is /Users/menghan/anaconda3/envs/, which Conda uses to store all of my named environments.
The conda named environments are created by
conda create --name interest_rate python=3.11
See HERE for details of conda create command.
conda create --prefix /Users/.../FIN5005/.conda python to create a virtual environment in the project folder. This will create a path-based environment.
‼️ Culprit: Python Environments extension (ms-python.vscode-python-envs v1.8.0) automatically insert the following code in .vscode/settings.json:
{
  // python-envs auto-written → Remove these three lines to stop auto-creation of .conda envs in the workspace
  "python-envs.defaultEnvManager": "ms-python.python:conda",
  "python-envs.defaultPackageManager": "ms-python.python:conda",
  "python-envs.pythonProjects": [],
}
Q: Not sure if the three lines above will come back again.
| Setting | Description |
|---|---|
python-envs.defaultEnvManager |
The default environment manager used for creating and managing environments. |
python-envs.defaultPackageManager |
The default package manager used for installing packages. |
python-envs use ./.conda as the default location for conda environments.
Reading: Python environments in VS Code
Q: Where does the python-envs extension come from?
A: It was installed as a part of the Python extension pack.
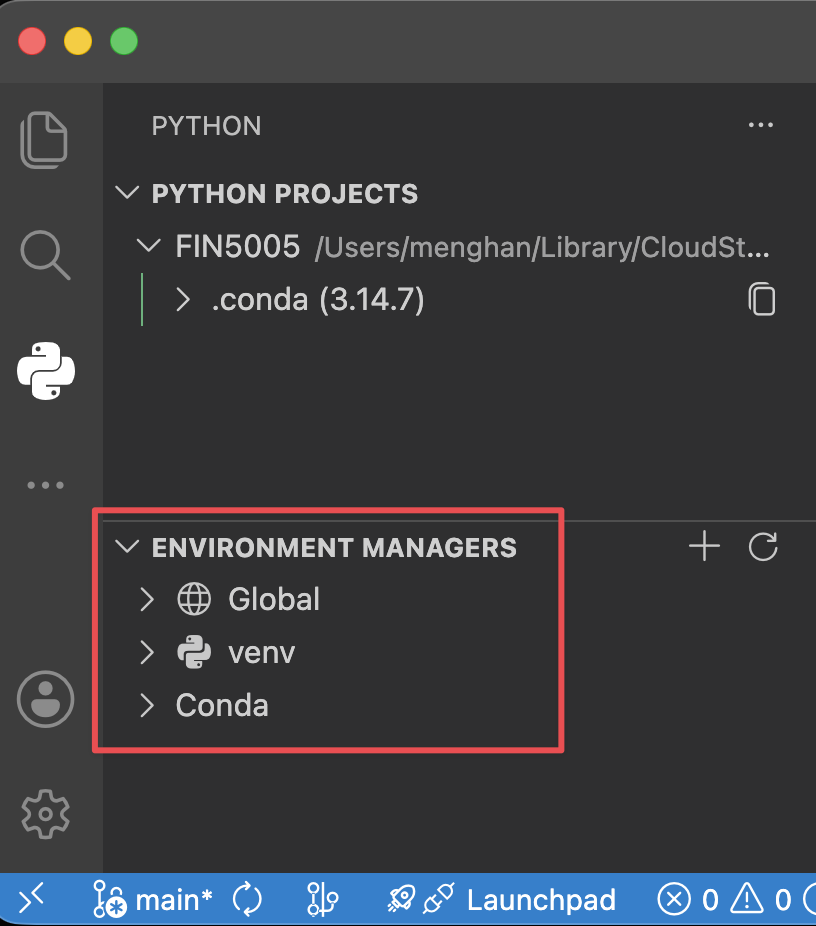
python-envs extension features:
- Create: Ability to create new environments interactively.
- Quick Create: Ability to create environments with minimal user input.
- Find Environments: Ability to discover and list existing environments.
Fix: There is no setting to disable project path env creation.
A workaround is to specify a Python environment for the workspace so that nothing ever prompts to create one. In user-level settings (~/Library/Application Support/Code/User/settings.json), add the following:
{
  // Point at the global anaconda interpreter (same one QUARTO_PYTHON uses) so the
  // Python Environments extension never prompts to create a workspace-local .conda.
  // For a real env here, use: conda create -n <name>  (lands in ~/anaconda3/envs)
  "python.defaultInterpreterPath": "/Users/menghan/anaconda3/bin/python",

  // Machine Specific settings (won't be synced across devices)
  "settingsSync.ignoredSettings": [
    // machine-specific: Nord16 (Intel)
    "python.defaultInterpreterPath",
  ],
}
MBP14 M-Series
Open user settings and add the following:
{
  "python.defaultInterpreterPath": "/opt/miniconda3/bin/python",

  // Machine Specific settings (won't be synced across devices)
  "settingsSync.ignoredSettings": [
    // machine-specific: MBP14 (M-series)
    "python.defaultInterpreterPath",
  ],
}
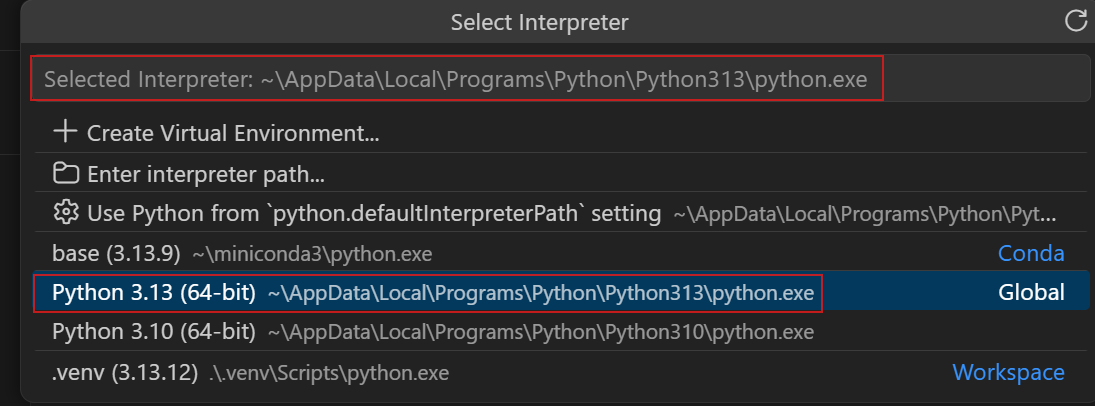
Select an env using python-env extension:
Command Palette → Python: Select Interpreter → Choose from the list.
The selected environment is used for running code, debugging, and language features like IntelliSense.
conda install
arguments:
-n, --namespecify name of environment-p, --prefixfull path to environment location-c, --channelAdditional channel to search for packages.- a list of packages can be installed at once. Jist append pkgs together and separate by space.
Examples:
- Install the package ‘scipy’ into the currently-active environment:
conda install scipy - Install a list of packages into an environment,
myenv:conda install -n myenv scipy curl wheel - Install a specific version of ‘python’ into an environment,
myenv:conda install -p path/to/myenv python=3.11
conda search Search packages in the default channel_alias https://conda.anaconda.org/. Can specify additional channel using conda search conda-forge::[some package name].
- search for a specific package named ‘scikit-learn’:
conda search scikit-learn - Search for packages containing ‘scikit’ in the package name:
conda search *scikit* # [✘]- Note that your shell may expand ‘*’ before handing the command over to conda. Therefore, it is sometimes necessary to use single or double quotes around the query:
conda search '*scikit' # [✔]
conda search "*scikit*" # [✔]
- Note that your shell may expand ‘*’ before handing the command over to conda. Therefore, it is sometimes necessary to use single or double quotes around the query:
- Search for a specific version of a package:
conda search 'numpy>=1.12' - Search for a package on a specific channel
conda-forge:conda search conda-forge::numpy conda search 'numpy[channel=conda-forge, subdir=osx-64]'
Install packages from Anaconda.org
- In a browser, go to http://anaconda.org.
- To find the package named PyPortfolioOpt, type
PyPortfolioOptin the top-left box named Search Packages. - Follow the instructions in the detailed page.
Using pip
conda install -n myenv pip
conda activate myenv
pip <pip_subcommand>
Note: Issues may arise when using pip and conda together.
- When combining
condaandpip, it is best to use an isolated conda environment. - Only after
condahas been used to install as many packages as possible, shouldpipbe used to install any remaining software.
python -m pip executes pip using the Python interpreter you specified as python.
-
So
/usr/bin/python3.7 -m pipmeans you are executing pip for your interpreter located at/usr/bin/python3.7.python -m pip install SomePackage # latest version, installed in the correct location for the python version you are using python -m pip install SomePackage==1.0.4 # specific version python -m pip install 'SomePackage>=1.0.4' # minimum versionpython -m module-namethe given module is located on the Python module path and executed as a script.
Update Python
-
Using a different version of Python
conda activate myenv # activate myenv conda update python # update Python to the latest version in the current env conda install python=3.10 # update to a specific version of Python -
Create a new environment for the new Python
conda create -n py39 python=3.9  # create a new env called py39
conda activate py39              # activate py39
python --version                 # print Python version
Viewing a list of available Python versions
-
To list the versions of Python that are available to install, in your terminal window, run:
conda search python # This lists all packages whose names contain the text `python`. -
To list only the packages whose full name is exactly
python, add the--full-nameoption.conda search --full-name python
Install R in VirtualEnv
You can also install R in a virtual environment.
# Create a new environment with R
conda create -n r_env r-essentials -y
This will create a new environment named r_env with R and the essential R packages installed (r-essentials).
You can activate this environment and use R within it.
# Activate the R environment
conda activate r_env
Check the installed R version:
R --version
Install additional R packages:
conda install -n r_env r-tidyverse
This will install tidyverse and its dependencies in the r_env environment.
Note the package names are different in Conda and R.
Conda-forge uses the prefix r- for R packages.
For example, tidyverse in R is r-tidyverse in Conda.