VS Code Extension – LaTeX Workshop
LaTeX Workshop is a popular LaTeX extension for Visual Studio Code, providing a comprehensive set of features for LaTeX editing, compiling, and previewing. In the following, I summarize some useful settings and tips for using LaTeX Workshop effectively.
Highlight features:
- Writing assistance
-
AI prompts from GitHub Copilot
This is the most important reason I use VS Code for LaTeX editing, rather than Overleaf (online LaTeX editor) or TexShop. It is also what distinguishes VS Code from the other LaTeX editors.
With an university email, you can get GitHub Copilot Pro for free. It is a powerful tool to help me to write academic papers, create reports, and prepare teaching materials. ✅
See HERE for more details about GitHub Copilot Education benefits.
-
- Editing
- Intellisense for code autocompletion
- Snippets for quickly insert commonly used commands and environments
Useful resources:
- Latex-Workshop GitHub Wiki page: https://github.com/James-Yu/LaTeX-Workshop/wiki/Install#usage
- Configure LateX Workshop by Paul Wintz: https://paulwintz.com/latex-in-vscode/ 👍
- Integrating Overleaf with VS Code: https://www.youtube.com/watch?v=SaMRCYbsAek
- Snippets: https://github.com/James-Yu/LaTeX-Workshop/wiki/Snippets#Handy-mathematical-snippets
- VS Code
Installation
Full installation instructions can be found HERE.
The only requirement is a compatible LaTeX distribution in the system PATH. For example, TeX Live. We strongly recommendTeX Live.
After installing TeX Live, you must add the directory of TeX Live binaries to your PATH environment variable.
If VS Code cannot find executables of TeX, it means that the setting of your system is broken.
💡 Just install the full TeX Live distribution to avoid missing packages. It’ a pain to install missing packages one by one.
- MiKTeX is another lightweight distribution with a convenient automatic on-demand package install. Note, however, that for MiKTeX to work correctly with Latex Workshop, you need to install Perl.
Dark Theme
Aesthetic themes for LaTeX Workshop PDF viewer:
"latex-workshop.view.pdf.color.dark.pageColorsBackground": "#F5F5DC", // The background color of the document
"latex-workshop.view.pdf.color.dark.backgroundColor": "#F5F5DC",      // The background color of the viewer, space btw pages
This sets the background color and the spacing btw pages in the PDF viewer to beige in dark mode, which is easier on the eyes.
❌ A caveat is that this interferes with text color and image color in the document. E.g., If you use colored text \textcolor{red}{...}, the text won’t appear red. The colored images won’t appear in their original colors either.
Update: 26-01-08
Set page background color using LaTeX command instead of LaTeX Workshop settings to avoid the interference with textcolor.\usepackage{graphicx} \pagecolor[HTML]{F5F5DC} % beige background for easier reading on screen, remove for printInsert in the preamble to set the page background color to beige.
This works both in the internal and external PDF viewer.
For printing, just comment out the line.
In the documentation, when you see “Reload vscode to apply the changes”, you can do this quickly by pressing Cmd+Shift+P (Mac) to open the command palette, typing Developer: Reload Window, and pressing Enter.
By default, LaTeX Workshop auto builds the pdf on every save. This can be too frequent and distracting.
I set "files.autoSave": "onFocusChange" so that the pdf only rebuilds when I switch away from the tex file, not on every keystroke.
Snippets
Environment snippets works directly in tex, you type B, a drop-down list will show up for you to choose.
- The prefixes start with
Band are followed by an abbreviation of the environment name. - The unnumbered versions of the environments are prefixed with
BS, e.g.,BSEQforequation*. - In
tex, these cmds work in both math and text environments. - However, it is more restrictive in
markdown, where these cmds work only inside math environments ($...$)
Mathematical symbols
| Prefix | Command |
|---|---|
__ |
_{$1} |
** |
^{$1} |
... |
\dots |
Environments
Commands start with B for inserting LaTeX environments.
| Prefix | Environment name | Note |
|---|---|---|
BEQ |
equation |
|
BSEQ |
equation* |
Starred equation, no numbering |
BAL |
align |
|
BSAL |
align* |
|
BSPL |
split |
Used together with equation to create multilined eqn |
BCAS |
cases |
\(D=\begin{cases}0 & \text{if male} \\ 1 & \text{if female} \end{cases}\) |
BGA |
gather |
|
BSGA |
gather* |
|
BMU |
multline |
|
BSMU |
multline* |
|
BIT |
itemize |
|
BEN |
enumerate |
|
BFR |
frame |
|
BFI |
figure |
|
BTA |
table |
How to surround some selected text with an environment:
- In editing mode, select the text you want to surround.
-
Insert the environment by typing either
-
✅
\<envname>, e.g.,\equation, orThis will surround the selected text with
\begin{envname}and\end{envname}.
-
\beginendThis will surround the selected text with
\begin{}and\end{}, and enter the multi-cursor mode. Type your desired environment name in\begin{}and the same name will be automatically filled in the\end{}.
-
Q: How to select the current environment, e.g., a table environment?
A: Place the cursor inside the environment, then press Cmd+Shift+P (Mac) to open the command palette, type Latex Workshop: Select Current Environment, and press Enter. This will select the entire environment, including the \begin{} and \end{} lines.
LaTeX Workshop: Select the current environment contentonly selects the content inside the environment, excluding the\begin{}and\end{}lines.LaTeX Workshop: Navigate to matching begin/endmoves the cursor to the matching\begin{}or\end{}of the current environment.-
Changing from one environment to another. ↩︎
- Place the cursor inside the environment you want to change.
LaTeX Workshop: Select the current environment nameto select the environment name.LaTeX Workshop: Add a multi-cursor to the current environment nameto add a multi-cursor to both the\begin{}and\end{}lines.- Type the new environment name to replace the old one.
@ Suggestsions
LaTeX-Workshop provides an independent intellisense mechanism triggered by @. For example, you can type @a for \alpha. It works for most Greeks and have some useful mathematical helpers.
Mathmetical helpers:
| Prefix | Command |
|---|---|
@( |
\left( $1 \right) |
@{ |
\left\{ $1 \right\} |
@[ |
\left[ $1 \right] |
@^ |
\Hat{$1} |
@_ |
\bar{$1} |
Inserting Greek letters:
| Prefix | Command |
|---|---|
@a |
\alpha |
@b |
\beta |
@g |
\gamma |
@d |
\delta |
@D |
\Delta |
@e |
\epsilon |
Font cmds
Select the text you want to change the font of, then type the prefixes listed below.
| Prefix | Command | Font face |
|---|---|---|
FBF |
\textbf{ $1 } |
Bold face |
FIT |
\textit{ $1 } |
Italic face |
FTT |
\texttt{ $1 } |
Typewriter face |
More font cmds can be found HERE.
Math
Latex Workshop provides hover live preview for math equations by default.
Change math preview on hover by setting
"latex-workshop.hover.preview.enabled": true,
When you move the mouse cursor over inline math, \[, $$, \begin{align}, and \begin{...}of other math environments, math preview on hover is rendered. When you move the mouse cursor over \ref, and other reference commands referring math equations, math preview on hover is also rendered.

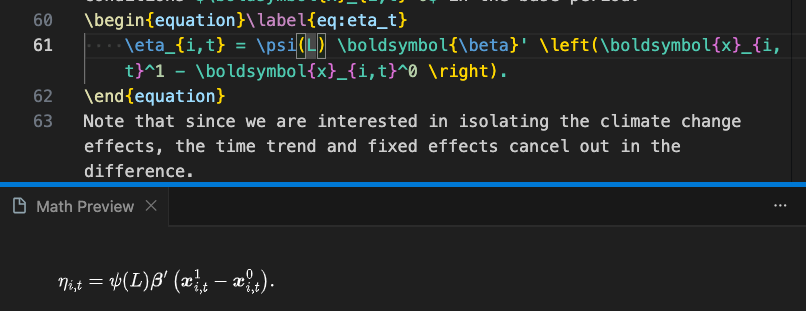
Alternatively, you can have a separate math preview panel that shows the rendered math content of the current line.
Set the localtion of the math preview panel to be below the editor:
"latex-workshop.mathpreviewpanel.editorGroup": "below",
Command palette (⇧⌘P): LaTeX Workshop: Toggle math preview panel to toggle the math preview panel on and off.
Output Directory
By default, LaTeX builds with LaTeX Workshop puts output files in the directory containing your .tex file. This quickly creates a cluttered mess, due to the numerous auxiliary files generated by the LaTeX build process. To avoid clutter and allow for build files to be quickly deleted, change the out directory. I use the following setting:
"latex-workshop.latex.outDir": "%DIR%/out_dir",
After changing "latex-workshop.latex.outDir", LaTeX Workshop’s "Clean up auxiliary files" command no longer deletes auxiliary files unless you also change this setting:
"latex-workshop.latex.clean.subfolder.enabled": true,
(Note: The “Clean up auxiliary files” command misses some file types, so for a full clean you should just delete all of the files in the folder manually.)
Build the document
LaTeX recipes
LaTeX recipes are toolchains (a sequence of commands) that define the sequence of commands to be executed for building a LaTeX document.
You can define several compiling toolchains to build LaTeX projects using latex-workshop.latex.recipes and then call the command (⇧⌘P) ”LaTeX Workshop: Build with recipe“ to choose the appropriate toolchain for actually building the project.
Alternatively, you can click the TeX badge and select directly the appropriate recipe there.
Below are some commonly used recipes:
// Sequence of tools to run for building
"latex-workshop.latex.recipes": [
  {
    "name": "latexmk 🔃",
    "tools": [
      "latexmk"
    ]
  },
  {
    "name": "pdflatex ➞ bibtex ➞ pdflatex*2",
    "tools": [
      "pdflatex",
      "bibtex",
      "pdflatex",
      "pdflatex"
    ]
  },
  {
    "name": "pdflatex ➞ pdflatex",
    "tools": [
      "pdflatex",
      "pdflatex"
    ]
  },
  {
    "name": "xelatex ➞ bibtex ➞ xelatex*2",
    "tools": [
      "xelatex",
      "bibtex",
      "xelatex",
      "xelatex"
    ]
  }
],
Each recipe is an object in the configuration list, consisting of a name field and a list of tools to be invoked in the recipe. Tools are defined separately in latex-workshop.latex.tools (see below).
-
The first one simply relies on the
latexmkcommand. ✅latexmkis a Perl script that automates the process of building LaTeX documents. It automatically determines the sequence of commands needed to build the document, including handling bibliography and cross-references.It is intelligent. It determines the minimum necessary compilations based on the changes made to the document. This recipe is fast and efficient for most use cases. 👍
This is the default recipe to use when building a project for the first time.
If you want a different default recipe, put it as the first element of the
latex-workshop.latex.recipesarray. -
The second one run the following sequence of commands
pdflatex→bibtex→pdflatex→pdflatex.This is a full-fledged build process that handles bibliography and cross-references properly. It is suitable for final compilation before sharing or printing the document.
Use scenario:
- First time building a new document
- When you have added new citations or references
- Changed bibliography style of the
.bibfile
-
The third one runs
pdflatextwice, meaning two passes. The first pass generates the auxiliary files, and the second pass uses those files to resolve references to tables and figures.This is useful when you want to run a fast build without bibliography. E.g., when you are just editing regular text and do not need to update citations or references.
-
Many of my projects use
xelatexinstead ofpdflatexto support Unicode characters and OpenType fonts.This recipe is similar to the second one, but it uses
xelatexinstead ofpdflatex. -
If you want efficiency in compilation, you should never clean auxiliary files after each build. This way, you can take advantage of the incremental compilation feature of
latexmkand avoid unnecessary recompilations. Clean them manually when necessary.Recommended practice: When you have
"latex-workshop.latex.autoClean.run": "never", you can run one-passxelatexorpdflatexfor a fast build, and run the full-fledged recipe withbibtexwhen you need to update citations or references.
pdflatex vs. xelatex/lualatex:
It is important to choose the right LaTeX compiler for your project. Wrong choice will lead to compilation errors.
-
pdflatexis the traditional LaTeX compiler.Common pdflatex font packages:
times(Times Roman),mathptm(free Times-based math fonts),mathtime(commercial Times-based math fonts)If you see
\usepackage[T1]{fontenc}
\usepackage[utf8]{inputenc}
in the preamble, it means that the document is using
pdflatexas the compiler.\usepackage[T1]{fontenc}provides support for accented characters (ä, ö, é, etc.)\usepackage[utf8]{inputenc}allows you to use UTF-8 encoded characters directly in your LaTeX source file. Required if you have Chinese characters in your document. -
xelatexandlualatexare modern LaTeX compilers that support Unicode characters and OpenType fonts. They are more suitable for documents with non-Latin scripts or complex typography.If you use
fontspecorunicode-mathpackage to load system fonts, you need to usexelatexorlualatexto compile the document.xelatexandlualatexuses UTF-8 encoding by default, so you do NOT need to include\usepackage[utf8]{inputenc}in the preamble when using these compilers.
Set the default recipe to use
You can change the default recipe by setting the latex-workshop.latex.recipe.default. Recipes are referred to by their names as defined in latex-workshop.latex.recipes.
For example, if you want to set the default recipe to the one that uses latexmk with lualatex, you can set it as follows:
"latex-workshop.latex.recipe.default": "latexmk (lualatex)",

"latex-workshop.latex.recipes": [
    {
        "name": "latexmk (lualatex)",
        "tools": [
            "lualatexmk"
        ]
    }
]
Note there are two special values:
-
"first": Use the first recipe defined inlatex-workshop.latex.recipes.This is the default value.
I put the
latexmkrecipe as the first one in my configuration, so that I can use it as the default recipe for most of my projects. It is fast and efficient for most use cases. 👍 -
"lastUsed": Use the last used recipe by the command *LaTeX Workshop:Build with recipe*. This is useful when you have multiple recipes defined and you want to use the last one you used without having to select it again.
// Set the default recipe to the last used one
"latex-workshop.latex.recipe.default": "lastUsed"
LaTeX tools
Each tool appearing in the tools field of recipes above is defined latex-workshop.latex.tools. To include a tool in a recipe, the tool’s name should be included in the recipe’s tools list.
Check default tools HERE.
Here is taken from my settings.json as an example:
// Tools available for building
"latex-workshop.latex.tools": [
  {
    "name": "latexmk",
    "command": "latexmk",
    "args": [
      "-synctex=1",
      "-interaction=nonstopmode",
      "-file-line-error",
      "-xelatex",
      "-outdir=%OUTDIR%",
      "%DOC%"
    ],
    "env": {}
  },
  {
    "name": "pdflatex",
    "command": "pdflatex",
    "args": [
      "-synctex=1",
      "-interaction=nonstopmode",
      "-file-line-error",
      "-output-directory=%DIR%/out_dir", // don't change to %OUTDIR%
      // If you really want to use %OUTDIR%, you need to set "openout_any = a" in the texmf.cnf file of your TeX distribution to allow bibtex to read files from the output directory. See below for details.
      // The same applies to bibtex tool below.
      "%DOC%"
    ],
    "env": {}
  },
  {
    "name": "xelatex",
    "command": "xelatex",
    "args": [
      "-synctex=1",
      "-interaction=nonstopmode",
      "-file-line-error",
      "-output-directory=%OUTDIR%",
      "%DOC%"
    ],
    "env": {}
  },
  {
    "name": "bibtex",
    "command": "bibtex",
    "args": [
      "out_dir/%DOCFILE%" // don't change to %OUTDIR%.
    ],
    "env": {
      "BIBINPUTS": "%DIR%:",
      "BSTINPUTS": "%DIR%:"
    }
  },
  {
    "name": "biber",
    "command": "biber",
    "args": [
      "%OUTDIR%/%DOCFILE%"
    ],
    "env": {
      "BIBINPUTS": "%DIR%:",
      "BSTINPUTS": "%DIR%:"
    }
  }
],
Note latexmk is set to use xelatex as the default compiler by including -xelatex in its args. This means that when you use the latexmk recipe, it will use xelatex to compile the document. The default latexmk recipe uses pdflatex instead.
‼️ Do NOT get smart and change the
"args"out of whim. It may break the build process.不要灵机一动乱改
"args",比如-output-directory。代码虽然看着想改,但是改了就不一定能跑得通了。🤪
Each tool is an object consisting of the following properties:
name: The name of the tool, which is used to refer to the tool in recipes.command: The command to be spawned. This should be the name of the executable.-
args: Arguments to be passed to the command. This is an array of strings.Placeholders can be used in the arguments, which will be replaced with their corresponding values when the command is executed.
Need to escape some special characters such as
"should be escaped with a backslash, e.g.,\". -
env: Theenventry is a dictionary. It sets specific environment variables passed to the command.Imagine you want to use a
texmfsubdirectory local to your home project, just write"env": { "TEXMFHOME": "%DIR%/texmf" }This will set the
TEXMFHOMEenvironment variable to thetexmfsubdirectory of the root file directory when the tool is spawned.Another example:
{ "name": "biber", "command": "biber", "args": [ "%OUTDIR%/%DOCFILE%" ], "env": { "BIBINPUTS": "%DIR%:", "BSTINPUTS": "%DIR%:" } }envsets environment variables passed to thebibtex/biberprocess when it runs. These two specifically:BIBINPUTS: tells BibTeX where to search for.bibbibliography filesBSTINPUTS: tells BibTeX where to search for.bstbibliography style files
The value
%DIR%:means “look in%DIR%(the directory of your root.texfile) first, then fall back to the default search paths” (the trailing:appends the default paths).Without these, BibTeX might not find your
.bibor.bstfiles when the aux files are in a different%OUTDIR%.
Q: What does “spawn” mean?
A: In computing, to “spawn” a process means to create a new process that runs concurrently with the parent process.
Symbols surrounded by % are placeholders, which are replaced with its representing string on-the-fly.
You can also override the PATH environment variable. Notice that, in the property, only placeholders, e.g., %DIR%, take effect, and other variables, e.g., $PATH, are not expanded.
See HERE for a full list of supported placeholders.
Commonly used placeholders:
| Placeholder | Description |
|---|---|
%DIR% |
The root file directory |
%DOC% |
The root file full path without the extension |
%DOCFILE% |
The root file name without the extension |
%DOC_EXT% |
The root file full path with the extension |
%OUTDIR% |
The output directory specified by latex-workshop.latex.outDir |
AUXDIR |
The auxiliary files directory latex-workshop.latex.auxDir |
bibtex and biber are two popular bibliography tools. They are used to process bibliography files and generate the bibliography section of a LaTeX document.
-
bibtexis a traditional tool that works withnatbibpackage.In order to use placeholder
%OUTDIR%in theargsofbibtex, need to allowbibtexto read files from the output directory by adding the following line to thetexmf.cnffile of your TeX distribution.echo "openout_any = a" | sudo tee -a /usr/local/texlive/2023/texmf.cnfThe default value of
openout_anyisp, which means that TeX can only write files in the current directory and its subdirectories. Setting it toaallows TeX to write files in any directory, which is necessary forbibtexto write the.bblfile in the output directory specified by%OUTDIR%.Now you can use
%OUTDIR%in the definition ofpdflatexandbibtextools in yoursettings.json:"latex-workshop.latex.tools": [ { "name": "pdflatex", "command": "pdflatex", "args": [ "-synctex=1", "-interaction=nonstopmode", "-file-line-error", "-output-directory=%OUTDIR%", "%DOC%" ], "env": {} }, { "name": "bibtex", "command": "bibtex", "args": [ "%OUTDIR%/%DOCFILE%" ], "env": { "BIBINPUTS": "%DIR%:", "BSTINPUTS": "%DIR%:" } }, ] -
biberis a more modern tool that works withbiblatexpackage. It provides more features and better Unicode support thanbibtex.
Q: LaTeX builds automatically on every save. It can be too frequent and distracting.
A; Add "files.autoSave": "onFocusChange" to your workspace settings.json so that the pdf only rebuilds when you switch away from the tex file, not on every keystroke.
Generally you still want your files to save automatically, hence in user settings.json, I have:
"files.autoSave": "afterDelay"
26-05-12 Error: Cannot find executable latexmk, xelatex, etc., all of a sudden.
Cause: VS Code does not inherit the full PATH environment variable of the system. It loaded only a limited PATH when it was launched, which does NOT include the path to the TeX distribution’s executable tools.
Fix: Specify full path in the command field and add /Library/TeX/texbin (where the executable tools are located) to the PATH environment variable in the env field of the tool definition.
For example, for latexmk:
"latex-workshop.latex.tools": [
  {
    "name": "latexmk",
    "command": "/Library/TeX/texbin/latexmk",
    "args": [
      "-synctex=1",
      "-interaction=nonstopmode",
      "-file-line-error",
      "-xelatex",
      "-outdir=%OUTDIR%",
      "%DOC%"
    ],
    "env": {
      "PATH": "/Library/TeX/texbin:${env:PATH}"
    }
  }
]
env Provides the PATH environment to the running process, so when latexmk internally calls other tools (pdflatex, bibtex, etc.), those tools can be found.
The full path in command is optional when you have added the TeX distribution’s texbin directory to env. However, using full paths in “command” is more explicit and reliable, especially if VS Code itself doesn’t inherit the environment properly.
Auxiliary files
LaTeX compilation typically generates several auxiliary files. They can be removed by calling Clean up auxiliary files from the Command Palette or from the TeX badge .
"latex-workshop.latex.autoClean.run": "never",
"latex-workshop.latex.autoBuild.cleanAndRetry.enabled": false,
By default, LaTeX Workshop does not clean auxiliary files automatically after building the document.
You can change this behavior by setting latex-workshop.latex.autoClean.run to one of the following values:
"never": Disable the auto cleaning feature. This is the default value."onBuilt": Clean auxiliary files automatically after building the document, regardless whether it is successful or not."onFailed": Clean the project upon failed compilation.
What are the pros and cons of auto-cleaning?
-
Pros: Keeps the project directory clean and organized by removing unnecessary files.
-
Cons: Takes extra time after each build, which may slow down the workflow, especially for large projects.
A more severe drawback is that when you clean auxiliary files, you lose the benefits of incremental compilation. This means that the next time you have a small change in your text, when you build the document, it will have to recompile everything from scratch, which can be time-consuming.
✅ Suggested practice: never auto-clean auxiliary files. Manually clean them when necessary.
latex-workshop.latex.autoBuild.cleanAndRetry.enabled Enable cleaning and building once more after errors in the build toolchain.
latex-workshop.latex.clean.subfolder.enabled Delete LaTeX auxiliary files recursively in sub-folders of latex-workshop.latex.outDir.
latex-workshop.latex.clean.fileTypes Array of file types to be deleted when cleaning. File globs such as *.removeme, something?.aux can be used.
ref:
SyncTeX
SyncTeX allows you to jump between the source .tex file and the compiled PDF file. This helps you to quickly locate the relevant part of the document when editing or reviewing.
First, enable SyncTeX in the settings.json:
// enable
"latex-workshop.synctex.afterBuild.enabled": true
This setting syncs PDF with cursor position after compiling, which defaults to false.
SyncTeX works through a .synctex.gz file generated during the LaTeX compilation process. Make sure your LaTeX compiler is configured to generate this file. Most compilers, including pdflatex and xelatex, generate SyncTeX files by default when using the appropriate command-line options (e.g., -synctex=1).
Sometimes compilers clean up auxiliary files after compilation, which may include the SyncTeX file. To prevent this, ensure that your build process does NOT delete the *.synctex.gz file.
-
Forward/Direct synctex (source to pdf) can either be activated by selecting “ Navigate, select, and edit” > “ SyncTeX from cursor” in the side bar .
Alternatively, use the shortcut
cmd+option+j(on Mac). ✅ -
Backward/Reverse synctex (pdf to source) is activated by pointing at the relevant element of the pdf preview.
When using the internal viewer, the default keybinding to point at an element in the pdf preview is
cmd+click.It can be changed to
double-clickusing the settinglatex-workshop.view.pdf.internal.synctex.keybinding."latex-workshop.view.pdf.internal.synctex.keybinding": "double-click"
Troubleshooting
Q: SyncTeX is not working.
A: Check if you have *.synctex.gz file in the output directory after building the document. The SyncTeX depends on this file to map positions between the source and the PDF. If this file is missing, SyncTeX will not work.
Bib Manager
Zotero Cite is a useful extension to insert reference from Zotero library and add them to your bib file automatically.
-
Specify in the workspace
settings.jsonthe path to your bib file:"zotero-cite.defaultBibName": "bibli.bib",Defaults to
ref.bib.
Commonly used features:
-
Command Palette:
Zotero Cite: Cite and Create Bibliography for Pandoc/LaTeX(ctrl+cmd+r)A graphical interface pops up, you can search and select references from your Zotero library. You can select multiple references to cite at once.
When you have selected all references you need, hit Enter. The selected citations will be inserted at the cursor position in your document, and the corresponding entries will be added to your bib file automatically.
Issues:
- Will always add the bib entries to the end of the bib file, and genearte a new cite key. It does not check if the entry already exists in the bib file.
- After picking a reference, the Zotero app steals focus.
Overleaf Integration
Overleaf Workshop Extension:
-
Find user guide at GitHub Wiki.
Overleaf is nice for collaboration, but you will loss the LaTeX Workshop features. E.g., snippets, better synctex (with highlighter of precise location), etc.
| Keyboard Shortcut | Action |
|---|---|
Opt + Cmd + B |
Compile on Overleaf server |
Cmd + S |
After enable compileOnSave, save to compile automatically |
Opt + Cmd + J |
SyncTeX: Go to PDF from source (forward) |
| Double click (in PDF) | SyncTeX: Go to source from PDF (backward) |
Tex is compiled automatically when focus changes from the tex file, or you can manually trigger compiling by Cmd + Opt + B (or Command Palette: Overleaf Workshop: Compile Project). The PDF output will be in the /.output/ folder in your project.
Highlight features
Highlight features of the Overleaf Workshop extension:
-
You can use the AI writing assistance
-
On-the-fly Compiling and Previewing
Real-time PDF preview as you type.
-
Cmd + Option + B (on macOS) to compile, and
The Overleaf server is faster to compile than my local LaTeX Workshop. 🔥
I am not sure why it’s like this. Probably my local compile recipes are not efficient? 🤔
-
Auto compile on save
You can manually compile using
Cmd+Option+B. But to make life easier, you can enable auto compile on save by addting the following setting to yoursettings.json:"files.autoSave": "onFocusChange", "overleaf-workshop.compileOnSave.enabled": true,This way, when you save the tex file or change focus away from the tex file, the document will be compiled automatically on Overleaf server.
-
Cmd + Option + V to preview
The compiling is done on Overleaf servers. The pdf output together with all auxiliary files will be in a folder named
/.output/in your project.Your local latex compiler, such as Latex Workshop, won’t work here.
-
-
Nice PDF viewer that supports light and dark themes.
By default, Overleaf PDF viewer uses the
defaulttheme (white background).I really like the
lighttheme, which has a beige background color which is easier on the eyes. See Here for more details. -
You can keep the project up to date with your collaborators in real-time as everyone is editing on Overleaf Cloud (if they use the online portal).
This avoids conflicts between collaborators. ✅
User cursor indicator will show your position.
When there are other collaborators (or your other login sessions) online, the colored cursors of the collaborators will be displayed in the document editor.

The item icon shows the number of online collaborators, and the color represents the latest active collaborator.
Note that you need to manage your local repo to keep it in sync with Overleaf Cloud.
Remember to pull changes to your local repository regularly to avoid conflicts. -
Chat with Collaborators (copy line reference)
Caveats
-
Do NOT use the Overleaf Workshop “Open Projects Locally” feature.
‼️ Using a local version leads to major issues, including edit conflicts and data loss. See this GitHub issue.
-
Always requires internet connection to work.
🎯 How to choose between Overleaf Cloud and LaTeX workshop local?
I think a nice strategy is to use local repo for writing the first draft, then push to Overleaf for collaboration and finalizing.
The principle is to avoid jumping back and forth between Overleaf and local repo too often, which may lead to conflicts and data loss.
For each phase of writing, stick to either local repo or Overleaf Cloud, and manually push and pull to keep the local and cloud versions in sync.
For me, I use local repo at the beginning of writing, then push to Overleaf when I need to collaborate with co-authors at a later stage.
A workaround is to use GitHub integration to sync Overleaf projects to your computer. Using Git incurs some overhead with pushing, pushing, and (possibly) merging, but it may be worth the upsides of editing Overleaf documents with the exact same tools as any of your local LaTeX documents.
Log in with Cookies
-
Find Overleaf cookies:
Go to Overleaf homepage in Chrome > Open the browser developer tools (F12), go to “Network” tab > In the Filter field, type “project” > Click the project under “Name” column > Go to “Headers” tab > Scroll down to “Request Headers” section > Copy the value of “Cookie”.
-
In VS code:
Go to the Overleaf Workshop extension, click “log in with cookies”, paste the cookies you copied from the browser, and click “Log in”.
When the login is successful, you will see your Overleaf projects listed in the extension sidebar. And you will see the server status at the bottom left corner of VS Code.
You can also see the LaTeX compiler (pdfLaTeX) and the language locale (EN_US) at the status bar.
- But I am not sure who uses the langauge locale specification. The value was taken from
cspell.jsonin the workspace. However, cSpell checker does not recognize it. - cSpell uses VS Code settings (either workspace of user
settings.json) for language spell check.
Overleaf pdf viewer supports three themes:
default(white),light(warm yellow, easy on eyes 👍), anddark.
You can change the theme via clicking the theme button (the square) on the title bar in the Overleaf PDF viewer.
P.S. If you cannot see the theme button, please make sure the PDF viewer tab is wide enough. It the tab is too narrow, the theme button will be hidden.
You can customize the theme in the settings.json:
"overleaf-workshop.pdfViewer.themes": {
  "default": {"fontColor":"#000000", "bgColor":"#FFFFFF"},
  "light":   {"fontColor":"#000000", "bgColor":"#F5F5DC"},
  "dark":    {"fontColor":"#FBF0D9", "bgColor":"#4B4B4B"}
}
If you use LaTeX Workshop local, you need to specify the background color manually using latex command. See HERE.
SyncTeX and Reverse SyncTeX
The SyncTeX and Reverse SyncTeX are supported in the Overleaf PDF viewer.
-
SyncTeX, Jump to PDF: Also called forward sync.
Put your cursor in the expected position in the document editor, then press
Cmd+Option+J(Mac) to jump to the corresponding position in the PDF.At first the keybinding did not work for me. To fix it, I need to change the
whencondition of the commandoverleaf-workshop.compileManager.syncCode.Open Keyboard Shortcuts (
⌘+K,⌘+S), search foroverleaf-workshop.compileManager.syncCode. Right click the command, selectChange When Expression, and change it to: “editorTextFocus && resourceScheme == ‘overleaf-workshop’”.The final keybinding looks like this:
{ "key": "alt+cmd+j", "command": "overleaf-workshop.compileManager.syncCode", "when": "editorTextFocus && resourceScheme == 'overleaf-workshop'" } -
Reverse SyncTeX, Jump to Code: backward sync.
Double click on the text on PDF to jump to the corresponding position in the editor.
Q: Editor stops responding when compiling tex for preview.
A: Disable auto build on save. This way, you can have a smooth editing experience and only compile when you need to preview. Use ⌥+⌘+B to compile when needed.
"overleaf-workshop.compileOnSave.enabled": false
Compiler Diagnostics
When the compile fails or succeeds with warnings, the compiler diagnostics will be displayed in the editor with colored squiggles. You can hover on the squiggles to see the detailed information.
The full compiler diagnostics are displayed in the “Problems” panel, which is located at the bottom of the VS Code window.
Q: How to suppress Compile Checker Warnings in Problems Pane? Theses warnings will add a yellow/blue squiggly line under the text in the editor and highlight your file in yellow in the file explorer, which I find distracting and annoying.
A: The silence package lets you filter or ignore specific warnings.
In your tex preamble, add the following lines:
\usepackage{silence} % to filter warnings

% Ignore all warnings from `latex`
\WarningsOff*

% Ignore all warnings from package `hyperref`
\WarningFilter{hyperref}{Token not allowed in PDF string}

\vbadness=10000 % suppress underfull `vbox` warnings
\hbadness=10000 % suppress overfull/underfull `hbox` warnings
\hfuzz=10pt % ignore overfull hbox warnings under 10pt
Change the Compiler
The default compiler is pdflatex, which can be changed via clicking the compiler name in the status bar and select “Setting: Compiler” to alter the compiler.

ref
GitHub Integration
Left side bar > Integrations > GitHub
This will create a GitHub repository and link it to your Overleaf project. You can then clone the repository to your local machine and use Git to sync changes between your local machine and Overleaf.
Cloning the repository to your computer
- On GitHub, navigate to the main page of the repository.
- Click the green Code button > Copy the URL for the repository.
-
Open Terminal > Go to your local folder where you want to clone the repository, then run:
git clone <repository URL>
Synchronizing changes
Edit your local repository files using your preferred LaTeX editor (e.g., LaTeX Workshop in VS Code). After making changes, you can push them to GitHub and then pull them into Overleaf.
Synchronization between GitHub and Overleaf does NOT happen automatically. Synchronization options are shown by clicking the GitHub option within Integrations.
- GitHub ahead of Overleaf: Pull changes from GitHub to Overleaf.
- Overleaf ahead of GitHub: Push changes from Overleaf to GitHub.
No matter whether you are working locally or on Overleaf,
- After making changes, commit and push them to GitHub.
- Then pull the changes from GitHub to either Overleaf or your local repository.
GitHub is the intermediate storage that keeps everything in sync.
I cannot figure out how to communite GitHub remote with Overleaf Workshop extension directly. I have to go to Overleaf web portal to do the integration. [26-01]
If you are writing together with collaborators, best practice is to frequently pull changes from GitHub to Overleaf to keep your Overleaf project up to date before you start making changes. This helps to minimize the chances of merge conflicts when you push your changes back to GitHub.
In case you and your collaborator both made changes to the sentence, following the next section on Resolving merge conflicts.
Resolve merge conflicts
Merging conflicts happen when your collaborator changed a line in Overleaf and you changed the same line in the GitHub repository, Overleaf may not be able to choose which version to keep.
Suggested practice: Always pull changes from GitHub to Overleaf before pushing changes from Overleaf to GitHub. This way, you can resolve any conflicts locally on your computer before pushing the changes to GitHub.
Q: Why my VS Code plugin (e.g., latex-workshop, latex-utilities) does not work?
A: Due to the limitation of the virtual workspace, most of the existing VS Code extensions does not work in the virtual workspace. In this case, you can use GitHub as a intermediary and edit on local repo as a workaround. Note that do NOT use the “Open Projects Locally” feature of Overleaf Workshop extension, as it may lead to edit conflicts and data loss.
Q: How to upload files to Overleaf Server from local?
A: You can drag and drop files from your local file explorer to the Overleaf Workshop sidebar in VS Code. This will upload the files to your Overleaf project on the server. ↩
LaTeX Workshop debug log
Problems Pane: Display LaTeX Workshop debug log in output panel. ↩︎
Issue: The LaTeX Workshop output panel often shows an astonishingly large number of amber warnings. Handreds or something. Many of them are NOT essential, e.g., badbox warnings, they do not affect the document compilation, but they clutter the Problems pane and distract from more important messages. I also do NOT like the warning icon next to the file name in the File Explorer panel. It just looks ugly.
To disable these warning messages, add the following settings to your settings.json:
{
    /* Filter out LaTeX warnings from Problems panel */
    // disable badbox warnings
    "latex-workshop.message.badbox.show": "none",
    // disable biber/bibtex log warnings
    "latex-workshop.message.biberlog.exclude": [
        "^no",
        "page numbers missing",
        "(?i)Unknown word"
    ],
    "latex-workshop.message.bibtexlog.exclude": [
        "^no",
        "page numbers missing",
        "(?i)Unknown word"
    ],
    // disable specific latex log warnings
    "latex-workshop.message.latexlog.exclude": [
        "^Package",
        "^LaTeX"
    ],
    // disable cSpell for bibtex files
    "cSpell.enabledFileTypes": [
      "bibtex": false,
    ]
}
My LaTeX Workshop Config
{
  /* LaTeX Workshop settings */
  // "latex-workshop.view.pdf.color.dark.pageColorsBackground": "#F5F5DC",
  // "latex-workshop.view.pdf.color.dark.backgroundColor": "#F5F5DC",
  "latex-workshop.view.pdf.sidebar.view": "outline",
  "latex-workshop.synctex.afterBuild.enabled": true,
  "latex-workshop.view.pdf.internal.synctex.keybinding": "double-click",
  "latex-workshop.latex.recipe.default": "lastUsed",
  "latex-workshop.latex.outDir": "%DIR%/out_dir",

  // Disable warning messages
  "latex-workshop.message.warning.show": false,
  "latex-workshop.message.error.show": true,

  // Disable LaTeX auto-cleaning auxiliary files
  "latex-workshop.latex.clean.subfolder.enabled": false,
  "latex-workshop.latex.autoClean.run": "never",

  // In case auto-cleaning is enabled, you can specify which files to clean.
  // Look for auxiliary files using glob patterns
  "latex-workshop.laterx.clean.method": "glob",
  "latex-workshop.latex.clean.fileTypes": [
    // Auxiliary files to clean
    "*.aux",
    "*.bbl",
    "*.blg",
    "*.idx",
    "*.ind",
    "*.lof",
    "*.lot",
    "*.out",
    "*.toc",
    "*.acn",
    "*.acr",
    "*.alg",
    "*.glg",
    "*.glo",
    "*.gls",
    "*.fls",
    "*.log",
    "*.fdb_latexmk",
    "*.snm",
    // "*.synctex.gz",
    "*.synctex(busy)",
    "*.synctex.gz(busy)",
    "*.nav",
    "*.vrb",
    "out_dir/*.aux",
    "out_dir/*.bbl",
    "out_dir/*.blg",
    "out_dir/*.fls",
    "out_dir/*.log",
    "out_dir/*.fdb_latexmk",
    // "out_dir/*.synctex.gz"
  ],

  // LaTeX build recipes and tools
  "latex-workshop.latex.recipes": [
    {
      "name": "pdflatex ➞ bibtex ➞ pdflatex*2",
      "tools": [
        "pdflatex",
        "bibtex",
        "pdflatex",
        "pdflatex"
      ]
    },
    {
      "name": "latexmk 🔃",
      "tools": [
        "latexmk"
      ]
    },
    {
      "name": "pdflatex ➞ pdflatex",
      "tools": [
        "pdflatex",
        "pdflatex"
      ]
    },
    {
      "name": "xelatex",
      "tools": [
        "xelatex"
      ]
    },
  ],

  "latex-workshop.latex.tools": [
    {
      "name": "latexmk",
      "command": "latexmk",
      "args": [
        "-synctex=1",
        "-interaction=nonstopmode",
        "-file-line-error",
        "-pdf",
        "-outdir=%OUTDIR%",
        "%DOC%"
      ],
      "env": {}
    },
    {
      "name": "pdflatex",
      "command": "pdflatex",
      "args": [
        "-synctex=1",
        "-interaction=nonstopmode",
        "-file-line-error",
        "-output-directory=%DIR%/out_dir",
        "%DOC%"
      ],
      "env": {}
    },
    {
      "name": "bibtex",
      "command": "bibtex",
      "args": [
        "out_dir/%DOCFILE%"
      ],
      "env": {
        "BIBINPUTS": "%DIR%:",
        "BSTINPUTS": "%DIR%:"
      }
    },
    {
      "name": "xelatex",
      "command": "xelatex",
      "args": [
        "-synctex=1",
        "-interaction=nonstopmode",
        "-file-line-error",
        "-output-directory=%OUTDIR%",
        "%DOC%"
      ],
      "env": {}
    }
  ],
}