Mac Tips and Tricks
Font
Q: How to check what font a website uses?
A: Use the Develop > Show Web Inspector (⌥⌘I), and search in the page’s source code, “font-family”.
Tips: you can use cursor to inspect an element.
The source code of the selected element will be highlighted.
- The
font-familyis under theComputedtab. - You can inspect the url or an image using this way.
Download and install a font
-
System fonts you can download show a download button in the font top-right corner in the Font Book app
 . The font itself shows in grey color.
 -
To install, do any of the following
- In the Font Book app, choose File > Add Fonts to Current User. In the window that appears, double-click the font file.
- Drag the font file to the Font Book app icon in the Dock, then click Install in the dialog that appears.
- Double-click the font file in the Finder, then click Install in the dialog that appears.
-
Download the font file.
Note: macOS supports
- TrueType (
.ttf), Variable TrueType (.ttf), TrueType Collection (.ttc), - OpenType and OpenType-SVG (
.otf), and - OpenType Collection (
.ttc) fonts. - Legacy suitcase TrueType fonts and PostScript Type 1 LWFN fonts might work but aren’t recommended.
See the differences in these font files HERE.
Choose where to install fonts (font directories):
- Current User: Fonts are available only to you and are located in the Fonts folder in your home Library (
$HOME/Library/Fonts/). -
All Users: Fonts are available to any user on this Mac and are located in the Fonts folder in the system Library (
/Library/Fonts/). /System/Library/AssetsV2/com_apple_MobileAsset_Font*/is a direcotry that contains downloadable system fonts. Fonts in this directory are restricted for web content in Safari (fingerprinting protection).
If a font is installed, when you select the font, in the information pane, there is one
Locationfield, and if you right-click the font file and chooseShow in Finder, you can see where the font is installed.MS fonts directory:
/Applications/Microsoft Word.app/Contents/Resources/DFonts - TrueType (
-
In the Font Book app , choose File > Add Fonts to Current User. In the window that appears, double-click the font file.
When you’re installing fonts, Font Book lists any problems it finds for you to review. Font Book also checks for duplicate fonts.
When you install a font, there are typeface variations, such as, regular, bold, and italics.
A single font file contains only one font with one style (one of normal/oblique/italic) and one weight (one of normal/bold).
You do NOT need to install them all, only the ones you plan to use.
The full DejaVu fonts family contains following styles:
- Sans: Book, Bold, Oblique, Bold Oblique, Condensed, Condensed Bold, Condensed Oblique and Condensed Bold Oblique, Extralight
- Serif: Book, Bold, Italic, Bold Italic, Condensed, Condensed Bold, Condensed Italic and Condensed Bold Italic
- Mono: Book, Bold, Oblique, Bold Oblique
Source DejaVu
Where you can find Font resources:
- Online Font: https://online-fonts.com/fonts
- File > Resolve Duplicates.
-
Click an option:
- Resolve Automatically: Font Book deactivates duplicates or moves them to the Trash, depending on the option selected in Font Book settings.
- Resolve Manually: Continue to the next step to review and handle duplicates yourself.
- Examine the duplicates and their copies, then select a copy to keep. The copy that Font Book recommends keeping is labeled “Active” and is selected. To review other copies, select one.
- Click Resolve This Duplicate or, if there’s more than one duplicate, Resolve All Duplicates. If you want the inactive copies to go in the Trash, select “Resolve duplicates by moving files to the Trash when possible” in Font Book settings.
Change font name with FontForge
https://themissy.com/2018/font-tutorial-renaming-font-files-for-duplicates-and-organization
https://superuser.com/questions/472102/how-to-change-font-family-and-rename-font
Install the non-free MS Office fonts
It is possible to install the non-free MS Office fonts, which came with Office 2007 and Windows 7. Notably, this collection includes Calibri and Cambria, default fonts used in many MS Office documents.
Here we install the fonts available in the Microsoft PowerPoint Viewer (ppviewerFonts).
-
Download the Microsoft PowerPoint Viewer executable:
 # download with `wget`
 wget https://archive.org/download/PowerPointViewer_201801/PowerPointViewer.exe
 # or with `curl`
 curl -O http://download.microsoft.com/download/f/5/a/f5a3df76-d856-4a61-a6bd-722f52a5be26/PowerPointViewer.exe
Verify that it is the correct file:
sha256sum PowerPointViewer.exeIf the checksum doesn’t match
249473568eba7a1e4f95498acba594e0f42e6581add4dead70c1dfb908a09423, then it’s not the right file. You can also save PowerPointViewer.exe.sha256 in the same directory and verify the checksum automatically with:sha256sum -c PowerPointViewer.exe.sha256which should return
PowerPointViewer.exe: OK. -
Extract the font installer.
You need a tool to extract the files from the executable. It may be possible to use
unrar, butcabextractis a better match for this use-case.Install
cabextractif you don’t have it.brew install cabextractExtract the part of the installer (
ppviewer.cab) that has the fonts:cabextract PowerPointViewer.exe -F ppviewer.cab -
Extract the font files (i.e.,
.ttf,.ttc) into your user’s font directory and install fonts.-
If you just want to install a specific font:
  # create a folder to extract font files
  mkdir -p /Users/menghan/Documents/mac_setup/MS\ fonts/ppviewer
  # `-d` specifies the directory, otherwise will extract to the current folder, which is messy.
  cabextract ppviewer.cab -d /Users/menghan/Documents/mac_setup/MS\ fonts/ppviewer
Consolas is aimed for use in programming environments and other circumstances where a monospaced font is specified. It has four font styles:
File name Styles & Weights CONSOLA.TTFConsolas Regular CONSOLAB.TTFConsolas Bold CONSOLAZ.TTFConsolas Bold Italic CONSOLAI.TTFConsolas Italic Two options you can install the fonts:
-
use
openCLT or# install `consola` font family open CONSOLA*.TTFA dialog shows, press
Intallfont. You will install four font styles (regular, italic, bold, bold italic) at once. -
double-click and install with the Font Book app
The app allows a preview of the font you are installing, and it validate fonts to make sure no errors or no duplicate fonts are installed.
Select multiple files and double-click will open all styles at once. Otherwise, you need to install per style separately.
When you finish installing, the Font Book will show your fonts.
Click the
Detailstab, you can see where the font is installed. For me, it’s/Users/menghan/Library/Fonts/CONSOLA*.TTF. Meaning the font is installed for the current user. -
-
If you want to install all fonts contained in the installer:
Deprecated
~/.fonts:mkdir -p ~/.fonts/ppviewer/ cabextract ppviewer.cab -F '*.TTC' -d ~/.fonts/ppviewer/ cabextract ppviewer.cab -F '*.TTF' -d ~/.fonts/ppviewer/In favor of the XDG Base Directory Specification,
~/.local/share/fonts.Unless you’re using a legacy application that doesn’t recognize the newer XDG spec, it’s recommended to use that instead of
~/.fonts:mkdir -p ~/.local/share/fonts/ppviewer/ cabextract ppviewer.cab -F '*.TTC' -d ~/.local/share/fonts/ppviewer/ cabextract ppviewer.cab -F '*.TTF' -d ~/.local/share/fonts/ppviewer/After this step, you may delete
PowerPointViewer.exeandppviewer.cab.If your font-using application is already open, it’ll probably need to be restarted before it can use the newly-installed fonts.
-
Ref:
- https://wiki.debian.org/ppviewerFonts
- https://ikato.com/blog/how-to-install-consolas-font-on-mac-os-x.html
Q: Why Consolas (code font) looks smaller than Verdana (body text font) even under the same font size? See below. The first line is in Verdana and the second is Consolas. Both 12pt. Consolas is slightly shorter.
A: Consolas has a smaller x-height than Verdana. This is a font design issue.
Tip: The solution is to use matching fonts.
- If you really want to use Verdana for copy text, Lucida Console is probably the best choice for a monospace font.
- If you want to use Consolas as monospace font (fine!), then use another “C font” for copy text, such as Cambria (serif font) or Calibri or Candara (sans-serif fonts).
Q: Fonts are too small on some websites in Safari.
A: Preferences > Advanced > Accessibility, check the box Never use font sizes smaller than, I set it to 14 pt.
MS Word
Q: How to add a font to MS Word?
A: You can install the font using the Font Book app ![]() , restart Word, it will be available then.
, restart Word, it will be available then.
Embed fonts in Word documents
If you choose to embed fonts in your Word, when you share your document with someone else who doesn’t have the same fonts installed that you do, the fonts, layout, and styling of the document won’t change, and special characters won’t turn into meaningless rectangles.
If you do not embed fonts, the resulting document will be readable and editable with substitute fonts that are available to the recipient user.
Some fonts can be downloaded automatically if needed. If you both have active Office 365 subscriptions and you use one of the fonts provided with it, you shouldn’t have to embed it.
However, if you downloaded fonts from sites such as Google Fonts, including free-to-use ones, you’ll probably want to embed.
Preferences > Save > Font Embedding, check the box Embed fonts in the file.
-
When embedding a font:
❌ Avoid using “Embed only the characters used in the document”.
✅ It is better to embed all the characters in a font so that another user can successfully edit the file, if necessary.
Q: Numbers are of different height.
A: Use a font that supports Lining Number Forms. Then
Font → Advanced → Number Forms → Lining.
Q: Preview looks correct, but the text does not change.
A: Restart Word and try again.
FaceTime
Don’t use FaceTime to make FaceTime Audio calls. This ends up using mobile service, which costs you largely. ❌
Instead, use the FaceTime Video to connect and turn off camera to make FaceTime Audio calls. ✅
Notes
Share a Note with a group chat
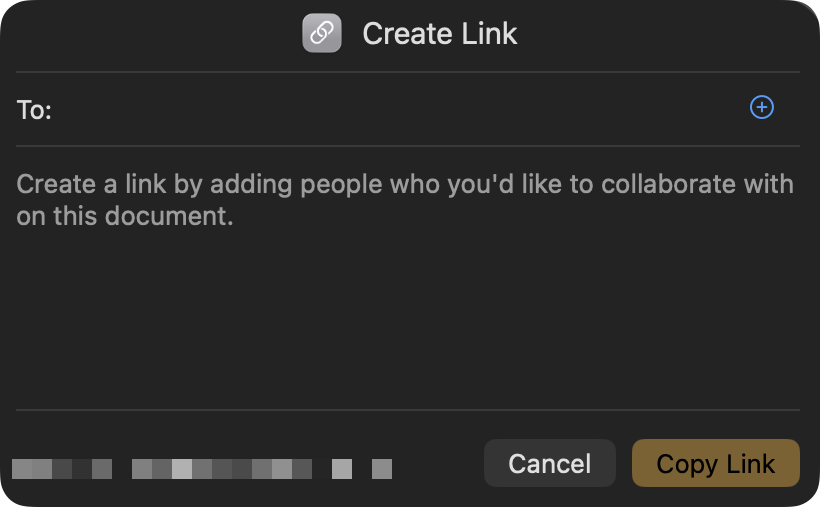
Click the ![]() button, choose “Collaborate” so other people can view and edit the note. Choose “Share with Link”, a window pops up, you have to add the people you want to share with, and then click “Copy Link”. You can share the link in a group chat, and anyone in the group chat can click the link to view and edit the note.
button, choose “Collaborate” so other people can view and edit the note. Choose “Share with Link”, a window pops up, you have to add the people you want to share with, and then click “Copy Link”. You can share the link in a group chat, and anyone in the group chat can click the link to view and edit the note.
Finder
You can customize the view for a folder—for example, how you want to sort your files. Then you can choose to always use the customized view settings for just that specific folder.
- Choose the folder, ⌘+J to open View Options.
-
Customize the view for the selected folder.
For instance, you can set column view as default, group by, sort by.
- To have the current folder always open in this view, enable the “Always open in” checkbox.
- To have subfolders also open in this view, select the “Browse in” checkbox.
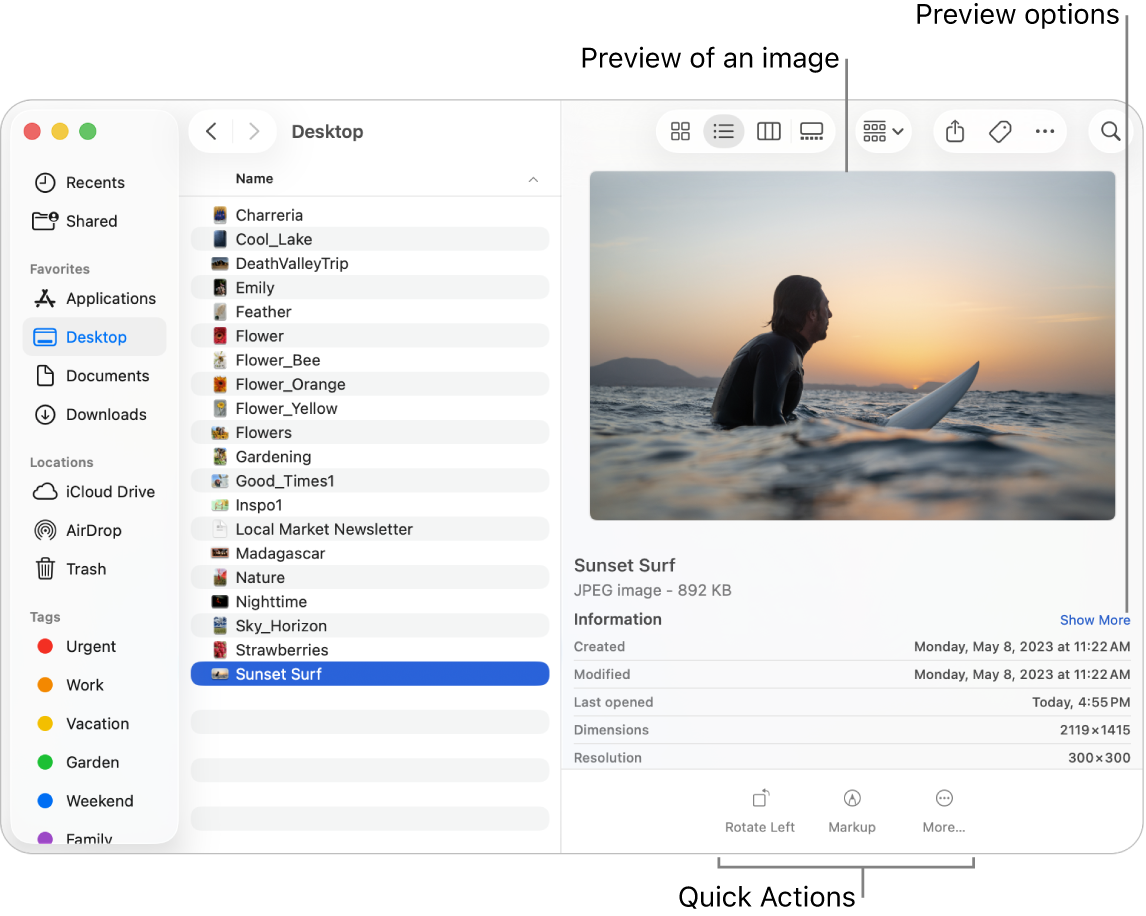
The picture below shows the Preview Pane in Finder. In the Preview pane of a Finder window, you get a small view of what a document contains or an image looks like, and a comprehensive list of all the metadata for the file. Some metadata are hidden by default, you can click “Show More” to see all metadata.
Q: Why the Preview Options I set do NOT apply to other files/folders?
A: The preview options are file type specific. You need to set separately for different file types, e.g., folders, images, PDFs, text files, etc.
Q: How to set Preview Options for a specific file type?
A: In the Preview Pane, right-click and choose Show Preview Options. Or you can right-click the file and choose Show Preview Options. Then under the “Show Info” list, tick the options you want to show in the Preview Pane.
Q: Why comments are empty in the Info window of a file, even if I have filled in the comments field in Finder Comments? ↩
A: The one you use ⌘+I (get Info) and enter comments is referred to as “Finder Comments” or “Spotlight Comments” (support spotlight search), which is different from the “Comments” field in the Info window of a file.
Note that NOT all files support Comment field in the Preview Pane. Files that support it include:
.txt.yaml
Moreover, some folders do not support Comment field, e.g., ~/Library/Rime. Might have some kind of lock due to system integrity protection (SIP)?
When you add or edit your Finder Comment in the Get Info dialog, the Finder saves your text in two different places:
- the primary copy goes into the hidden
.DS_Storefile in the same folder as the document; - a secondary copy is saved in a
xattrof typecom.apple.metadata:kMDItemCommentfor the file.
Finder only knows about the primary copy in the .DS_Store file, while Preview Pane reads the secondary copy from the xattr command.
Q: If I want the Preview Pane to show my comments, where should I enter them?
A: These comments are saved as metadata in a hidden file of proprietary format located in the same folder. You can use xattr command to add comments to a file.
Use Metamer to add Finder comments
Metamer: a free metadata editor. You can use it to add Finder comments to a file, which will be shown in the Preview Pane. This is an easier way than using xattr command.
For Tahoe 26, download the Metamer v1.6.
- Open Metamer
- File > Open > Select your file
test.txt -
A pop up window shows like the following.
-
In the First box, type
com.apple.metadata:kMDItemComment. In the second box, type your comments. Click “Save”. It seems nothing has happened in Metamer, but when you check Finder, the Finder Comment will show in the Preview Pane.Note that you cannot select from the dropdown menu
FinderComment, because it iscom.apple.metadata:kMDItemFinderComment. [as of 2026-01]
Use xattr command to add Finder comments
You first need to create a plist file with your comments, then write it to the file using the xattr command.
-
Create a plist file with your comments.
<?xml version="1.0" encoding="UTF-8"?>
<!DOCTYPE plist PUBLIC "-//Apple//DTD PLIST 1.0//EN" "http://www.apple.com/DTDs/PropertyList-1.0.dtd">
<plist version="1.0">
<string>My Finder comment</string>
</plist>
Save it as
comment.plist. -
Write it to the file using
xattrcommand.xattr -w com.apple.metadata:kMDItemComment "$(cat comment.plist)" "test.txt"Note it is
com.apple.metadata:kMDItemComment, NOTcom.apple.metadata:kMDItemFinderComment. -
Verify the comment is added.
xattr -p com.apple.metadata:kMDItemComment "test.txt"
Links to discussions:
- Editing Finder Comments
-
The Eclectic Light Company: Finder Comments
The Eclectic Light Company is founded by Howard Oakley. His website contains many really handy utilities to improve user experience on Mac. Metamer is one of them, used to edit file metadata.
Adjust column width
Right-click the column separator icon and select from one of the options:
- Right Size This Column (or double-click)
- Right Size All Columns Individually
- Right Size All Columns Equally
Finder Info Window
-
Commentsadd your file description here. It will work for Spotlight searches.Tahoe 26 and later:
Spotlight Search can be evoked using
-
gesture “Four finger pinch” (pinching your thumb and three fingers together on the trackpad opens Launchpad) on the trackpad.
A window pops up and shows the Application search.
-
Hit Esc to search files.
So Spotlight Search can be distinguished from Alfred search (I remapped to ⌃+Space).
Alternatively, click in the menu bar to open Spotlight search.
When to use Spotlight vs. Alfred:
-
Use Spotlight search for system files with Chinese and search by Comments.
-
Use Alfred search for English.
Alfred is still powerful. For instance, your can run queries like
snippet <keyword>to search your snippets.
-
Scroll bars
-
System Settings > Appearance > Show scroll bars, has 3 options
-
Choose
When scrolling. This will hide scroll bars until you start scrolling. This looks minimalistic. 简洁风。AlwaysandAutomatically based ...looks cluttered. Thick heavy scroll bars show in Finder. More importantly, you can’t adjust column width by clicking anywhere on the column separator, you can only click the bottom.
Copy path of a file or folder
-
Right-click the file or folder while holding down the Option (⌥) key.
Or you can first right-click, then hit the ⌥ key to change the context menu.
-
Select
Copy [item name] as Pathnamefrom the context menu. The full path is now copied to your clipboard.
Spotlight Search

Tahoe 26 has greatly improved Spotlight Search. Now it’s much smarter than before.
Pinch thumb and three fingers (four-finger-pinch gesture) together on the trackpad to open Spotlight Search – Application mode.

Hit Esc to switch to File Search mode.

Quick Actions:

Clipboard History:

You can use ⌘+ 1/2/3/4 to quickly select to go to the respective modes.
Useful features:
- Open an item: Double-click it.
- Show in Finder: Select the item and press ⌘+Enter.
-
Browse Clipboard History.
Click
 to the right of the search field, or Press ⌥-4.
ref: Mac User Guide: Search for anything with Spotlight on Mac
TimeMachine
If you have changed names of large files excluded in Time Machine backup, you need to reselect the files to be excluded again in Time Machine Preferences > Options. Otherwise, Time Machine will back up the renamed files unexpectedly, which takes extra space and time.
Q: Can I recover/view settings and specific files from a TimeMachine (TM) backup?
A: If your TM backup is on APFS partitions, you can connect to your TM, browse to the files you need, right click the files you need and select “Copy”, then exit TM and paste the copied files wherever you need.
Q: What type of disk partition should I use for Time Machine?
A:
-
APFS or APFS Encrypted disks are the preferred format for a Time Machine backup disk. If you select a new backup disk that’s not already formatted as an APFS disk, you get the option to erase and reformat it.
-
If the disk is a Mac OS Extended format disk that contains an existing Time Machine backup, you aren’t asked to erase and reformat the disk.
Note this is the case of my Wester Digital (WD) My Passport Drive. → Format to APFS
Mac OS Extended format
The Mac OS Extended (Journaled) format file system is the default file system for macOS 10.12 or earlier. It uses a journaling technique to help protect the integrity of a hierarchical file system and provides an encryption option you can use to protect data on a disk.
In macOS 10.13, it was replaced with Apple File System (APFS), the default file system for Mac computers with solid state drives (SSD).
Ref:
- Types of disks you can use with Time Machine on Mac
- Partition a physical disk in Disk Utility on Mac
Safari
Q: How to get icons in Safari favorites (aka favicons) to display correctly?
A: See post here: https://apple.stackexchange.com/a/294633.
https://discussions.apple.com/thread/251938163?answerId=253905035022&sortBy=rank#253905035022
https://stackoverflow.com/questions/40324199/how-do-i-add-a-safari-icon-to-my-website
Q: Safari does not load some website content properly, e.g., embedded contents supported by third-party cookies. A: Safari default cookies setting does not allow third-party cookies to be saved on your system. Need to enable third-party cookies. Alternative, use Chrome as it allows third-party cookies by default.
To enable third-party cookies:
- From the Safari menu, click Preferences.
- Select the Privacy tab from the top navigation.
-
Deselect Block all cookies and Website tracking: Prevent cross-site tracking.
- You may need to restart Safari for the new settings to take effect.
Tips:
-
You can save the link with selected text. This is useful when you want to highlight some text in a webpage.
Select your text then right-click, choose
Copy Link with Highlight.
Dark Mode
For Chrome, just use Dark Reader. For Safari, I recommend Night Eye.
Dark Reader
![]() Dark Reader is by far the most robust dark mode extension. It has a lot of options to customize the dark mode experience.
Dark Reader is by far the most robust dark mode extension. It has a lot of options to customize the dark mode experience.
Free on Chrome but needs subscription on Safari (60 kr). ↩
Go to ![]() Notes.app to find settings.
Notes.app to find settings.
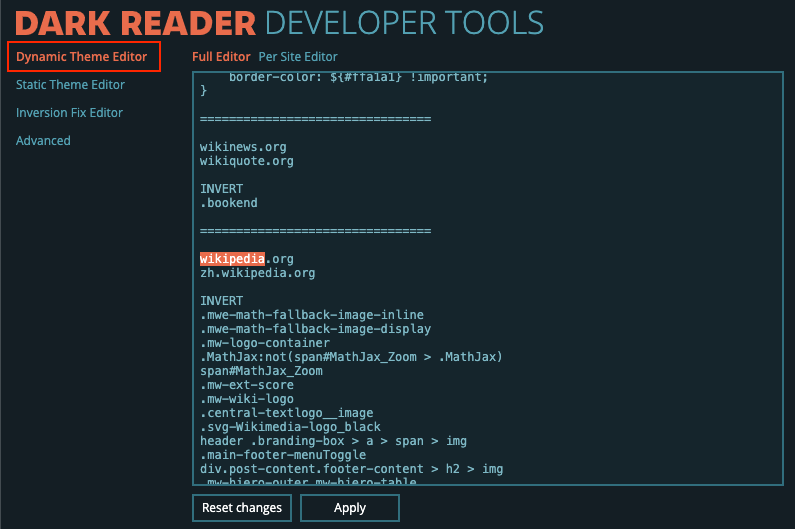
If you want to change settings for a specific website, you can add custom css to fix it. Go to More > All settings > Advanced > ⚒️ Dev tools > Dynamic Theme Editor. Add your css there.
Syntax:
================================

example1.com
example2.com

INVERT
.icon

CSS
.wrong-element-colors {
    background-color: ${white} !important;
    color: ${black} !important;
}

IGNORE INLINE STYLE
.color-picker
-
Website domain
List your websites first, then start adding rules.
The fix starts with the domain name, like
example.com. Thewwwpart should be omitted.Websites accept wildcards, e.g.,
*.wikipedia.orgwill apply to all subdomains of https://wikipedia.org, such asen.wikipedia.org,zh.wikipedia.org, etc. -
INVERTrule inverts specified elements.For Dynamic mode use
INVERTonly for dark images that are invisible on dark backgrounds (icons, diagrams, charts,<img>and<svg>elements). -
CSSrule adds custom CSS to a web page.!importantkeyword should be specified for each CSS property to prevent overrides by other stylesheets.Dynamic mode supports
${COLOR}template, where COLOR is a color value before the inversion (white will become black in dark mode).Instead of using hardcoded colors (like
#fff,#000,blackorwhite), please use CSS variables that are generated based on the user’s settings:dynamic-theme-fixes.config ================================ example.com CSS .logo { background-color: var(--darkreader-neutral-background) !important; } .footer > p { color: var(--darkreader-neutral-text) !important; }--darkreader-neutral-backgroundMostly used for elements that have the wrong background color.--darkreader-neutral-textUsed for elements with the wrong text color.--darkreader-selection-backgroundThe user’s Background Color setting.--darkreader-selection-textThe user’s Text Color setting.
-
IGNORE INLINE STYLErule will not analyze the inline style of matched selector’s. (e.g.--darkreader-inline-bgcolor) This will not be analyzed by dark reader if it has an matched selector. -
NO INVERTrule: If an inverted element contains images or other content that becomes incorrectly displayed, use the NO INVERT rule. -
REMOVE GBrule: removes background image from element and forces black background.
If somehow you can’t git it work, simply use “Filter” or “Filter+” mode. If Dynamic mode shows element wrong, usually Filter mode fixes it. But Filter mode does not look as good as Dynamic.
ref:
Night Eye
Another option is ![]() Night Eye.
Install from App Store.
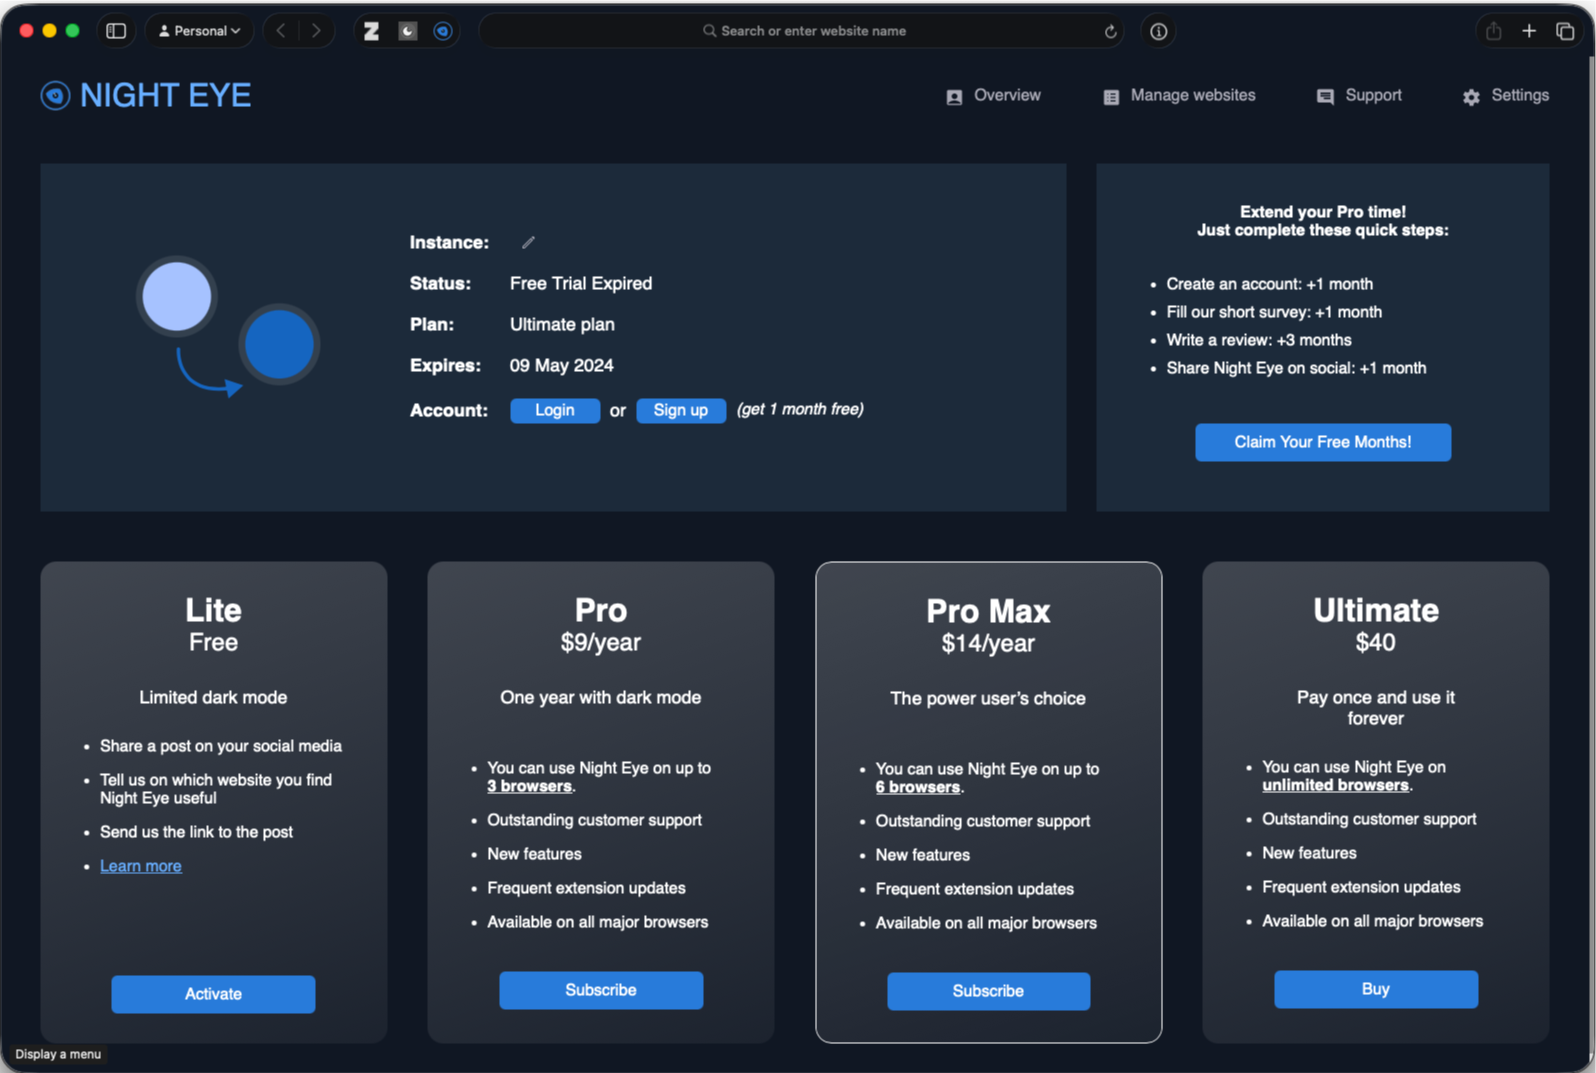
It offers a free plan on Mac called “Night Eye Lite”. You can use dark mode on 5 websites for free. And there won’t be custom websites fixes. 😂
Night Eye.
Install from App Store.
It offers a free plan on Mac called “Night Eye Lite”. You can use dark mode on 5 websites for free. And there won’t be custom websites fixes. 😂
Here is my list of websites that I want to use dark mode on:
ordnett.notranslate.google.com
For now, it is ok. If you want to use dark mode on more websites, you can subscribe to the paid plan, which allows you to use dark mode on unlimited websites and add custom website fixes.
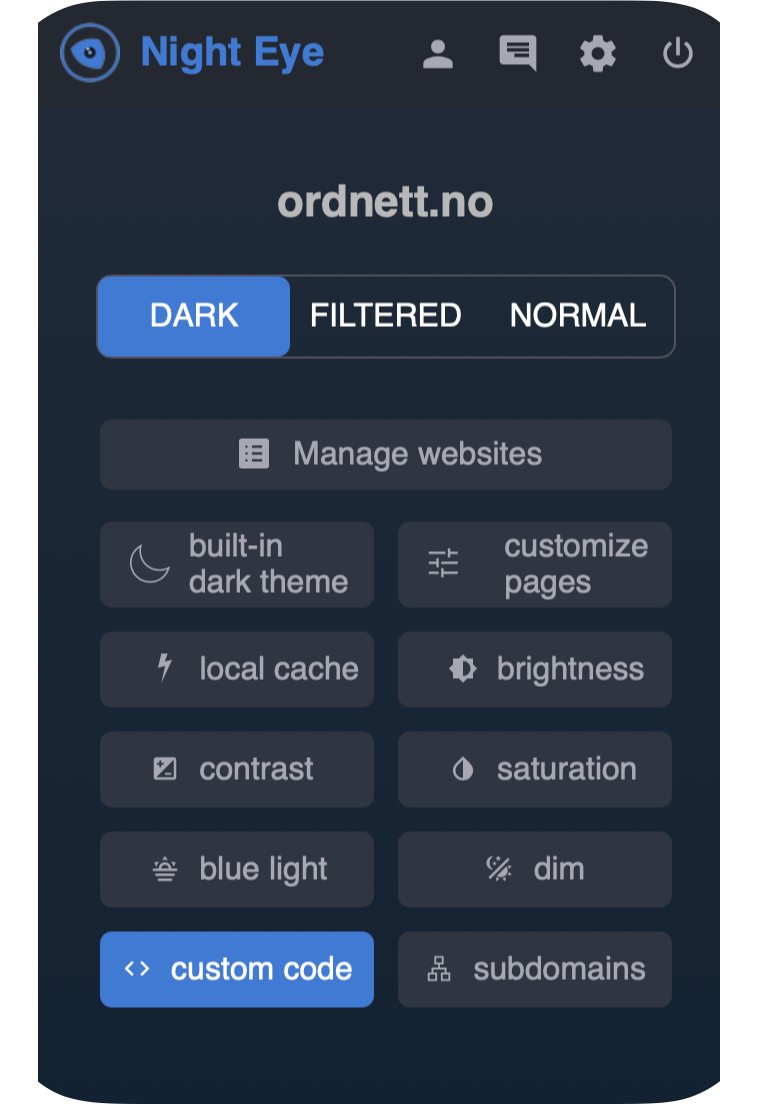
The biggest advantage of Night Eye compared to Darker is that it has a function “custom code”, which allows you to add custom CSS code to a specific website. So it is more flexible than Darker.
For example, I want to change the highlight color in
.highlight {
  color: rgb(197, 195, 192);
  background-color: rgba(255, 0, 0, 0.47);
}
Night Eye provides three modes:
-
Dark
Go into complete dark mode. All colours, small images and icons will be converted to give you the smoothest dark experience possible.
For your css to apply, you need to select “Dark” mode.
-
Filtered
The website’s colour will not be changed, but you can still adjust brightness, contrast, warmth and more.
-
Normal
Do not apply dark mode to the website.
Darker
You can use ![]() Darker Extension to render webpages in dark mode.
Darker Extension to render webpages in dark mode.
It is free on Mac but needs subscription on iPhone and iPad.
You can manage website lists managed by Darker in Safari Preferences > Extensions > Darker.
Under Permissions, you can choose to enable Darker for All Websites, or Only on Specific Websites. You can add or remove websites from the list by clicking Edit Websites....
You can add a keyboard shortcut to enable Darker quickly. For me, I set it to ⇧+⌘+D.
Chrome Extensions
-
Enable Copy
偶尔会遇到一些网站把复制粘贴功能禁掉了,大多数应该是使用 JavaScript 代码实现的。如果确实需要复制网页上的文字,不必手打,可以使用Chrome浏览器的 “Enable Copy” 扩展来解除限制。或者,直接在网页权限里把脚本禁用就可以了。
插件使用方法:需要解除限制时,点击 Enable Copy 图标。当前网页和该网站下的所有网页都被解除限制。此时可以复制网页内容并粘贴到别处。
据说有安全隐患…
Q: 如何在 Chrome 禁用脚本?
A: Open Chrome DevTools (opt+cmd+I or F12) > Open Command Palette (shift+cmd+P) > Type javascript, a dropdown menu show “Disable JavaScript”, press Enter. JavaScript is now disabled.
To remind you that JavaScript is disabled, Chrome shows the corresponding  icon in the address bar and DevTools shows a warning icon next to Sources.
JavaScript will remain disabled in this tab so long as you have DevTools open.
Preview
Q: How to rotate a text box?
A: Select the text box, then hold down Command. With two fingers on the trackpad (forefinger and middle finger), keep one finger stationary (forefinger) and let the second finger rotate the textbox in whichever direction you want.
Q: How to adjust the size of an image?
A: Tools > Adjust Size…
Q: How to crop a file?
A: Tools > Crop. Not all file types support cropping. For instance, you cannot crop a PDF file in Preview. For pdf, save as image file, then crop the image file.
PDF Operation
pdftk server is a free command-line tool for manipulating PDF files. There is a graphical GUI version, PDFtk Free, but it’s only for Windows…
Install on Mac
brew install pdftk-java
Merge PDF files
pdftk file1.pdf file2.pdf file3.pdf cat output newfile.pdf
Extract pages from a PDF file
pdftk input.pdf cat 1 3-5 7 output output.pdf
ref
BBEdit
Preferences
-
Application
Check “Open documents into the front window”: This will open new documents in a new tab, instead of a new window.
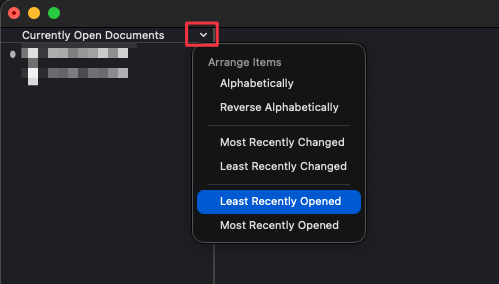
Q: How to change the order of files in the sidebar?
A: Click the ∨ in the “Currently Open Documents” sidebar section header, a pop up menu will show. You can choose to rearrange the items in the list based on name, date, or history order (“Most Recently Opened”/”Least Recently Opened”). This way, your files will list the oldest opened file at the top, and the newest opened file at the bottom.
Editting
Insert a tab character: ⇧+Tab
Q: How to reset the “untitled document” counting number?
A: In Terminal, run the following command:
defaults write com.barebones.bbedit ResetUntitledDocumentsCountAtNextStartup -bool YES
This will take effect the next time you start the application. ↩
Window Management
- You can right-click on the file name and choose “Open in Additional Window” to open the file in a new window.
- Merge windows: View > Merge Windows.
- Show sidebar: View > Window Appearance > Show Sidebar.
微信输入法
在 Shift 切换中英文功能下,无法空格选择候词。
❌ 纯垃圾不能用
✅ 推荐使用 Rime 输入法.
Quick Look of Markdown Files
You can use Quick Look to preview Markdown files without opening them in a text editor.
QLMarkdown is a Quick Look plugin that renders Markdown files as HTML for easy viewing.
The Quick Look extension can also preview rmarkdown files (.rmd, without evaluating r code), MDX files (.mdx, without JSX rendering), Cursor Rulers (.mdc), Quarto files (.qmd), Api Blueprint files (.apib) and textbundle packages.
QLMarkdown will open a pop-up window with the rendered Markdown content when you select a Markdown file and press the spacebar.
Q: How to show file contents in the Preview pane in the Finder?
Settings > General > Login Items & Extensions > Quick Look > Enable QLMarkdown.
Quick Look extensions allow you to click on a file, then press spacebar to preview the file.
系统设置
Q: Add OneDrive to Finder sidebar?
A: Go to ~/Library/CloudStorage/ in Finder, then drag the OneDrive - Your Organization folder to the Finder sidebar.
Q: How to make system notification go away without clicking the “x” button?
A: Next time you get nagged with one, try right-clicking and see if it gives you an option to snooze, turn off or jump into settings and hopefully have options for you to demote it to a banner. But it might not work as Apple’s system alerts are special.
电池设置
睡眠设置
On your Mac, choose Apple menu > System Settings, then click Battery  in the sidebar. > Click Options. (You may need to scroll down.)
- Stop automatic sleeping when the display is off: Turn on “Prevent automatic sleeping on power adapter when the display is off.”
- Your Mac or PC stays fully awake (CPU, apps, network, etc.) even if the screen goes dark.
- Useful if you want background tasks—like downloads, backups, or running servers—to continue without interruption.
- Put hard disks to sleep: Turn on “Put hard disks to sleep when possible.”
- Spins down (pauses) the hard drives after inactivity, while the rest of the system may remain awake.
- Reduces wear and power consumption of mechanical drives. Accessing data on the disk will “wake” the drive again, which can introduce a short delay.
Optimized Battery Charging
During normal use, your Mac learns your daily charging routine and waits to finish charging past 80% until you need to use it on battery. This helps reduce battery aging. This feature is called “Optimized battery charging”. It is enabled by default.
When you are travelling, it is recommended to turn off “Optimized battery charging”, so that your battery can be fully charged to 100% whenever plugged in.
System Settings > Battery > Click the info button ![]() next to Battery Health > Toggle off “Optimized battery charging”.
next to Battery Health > Toggle off “Optimized battery charging”.
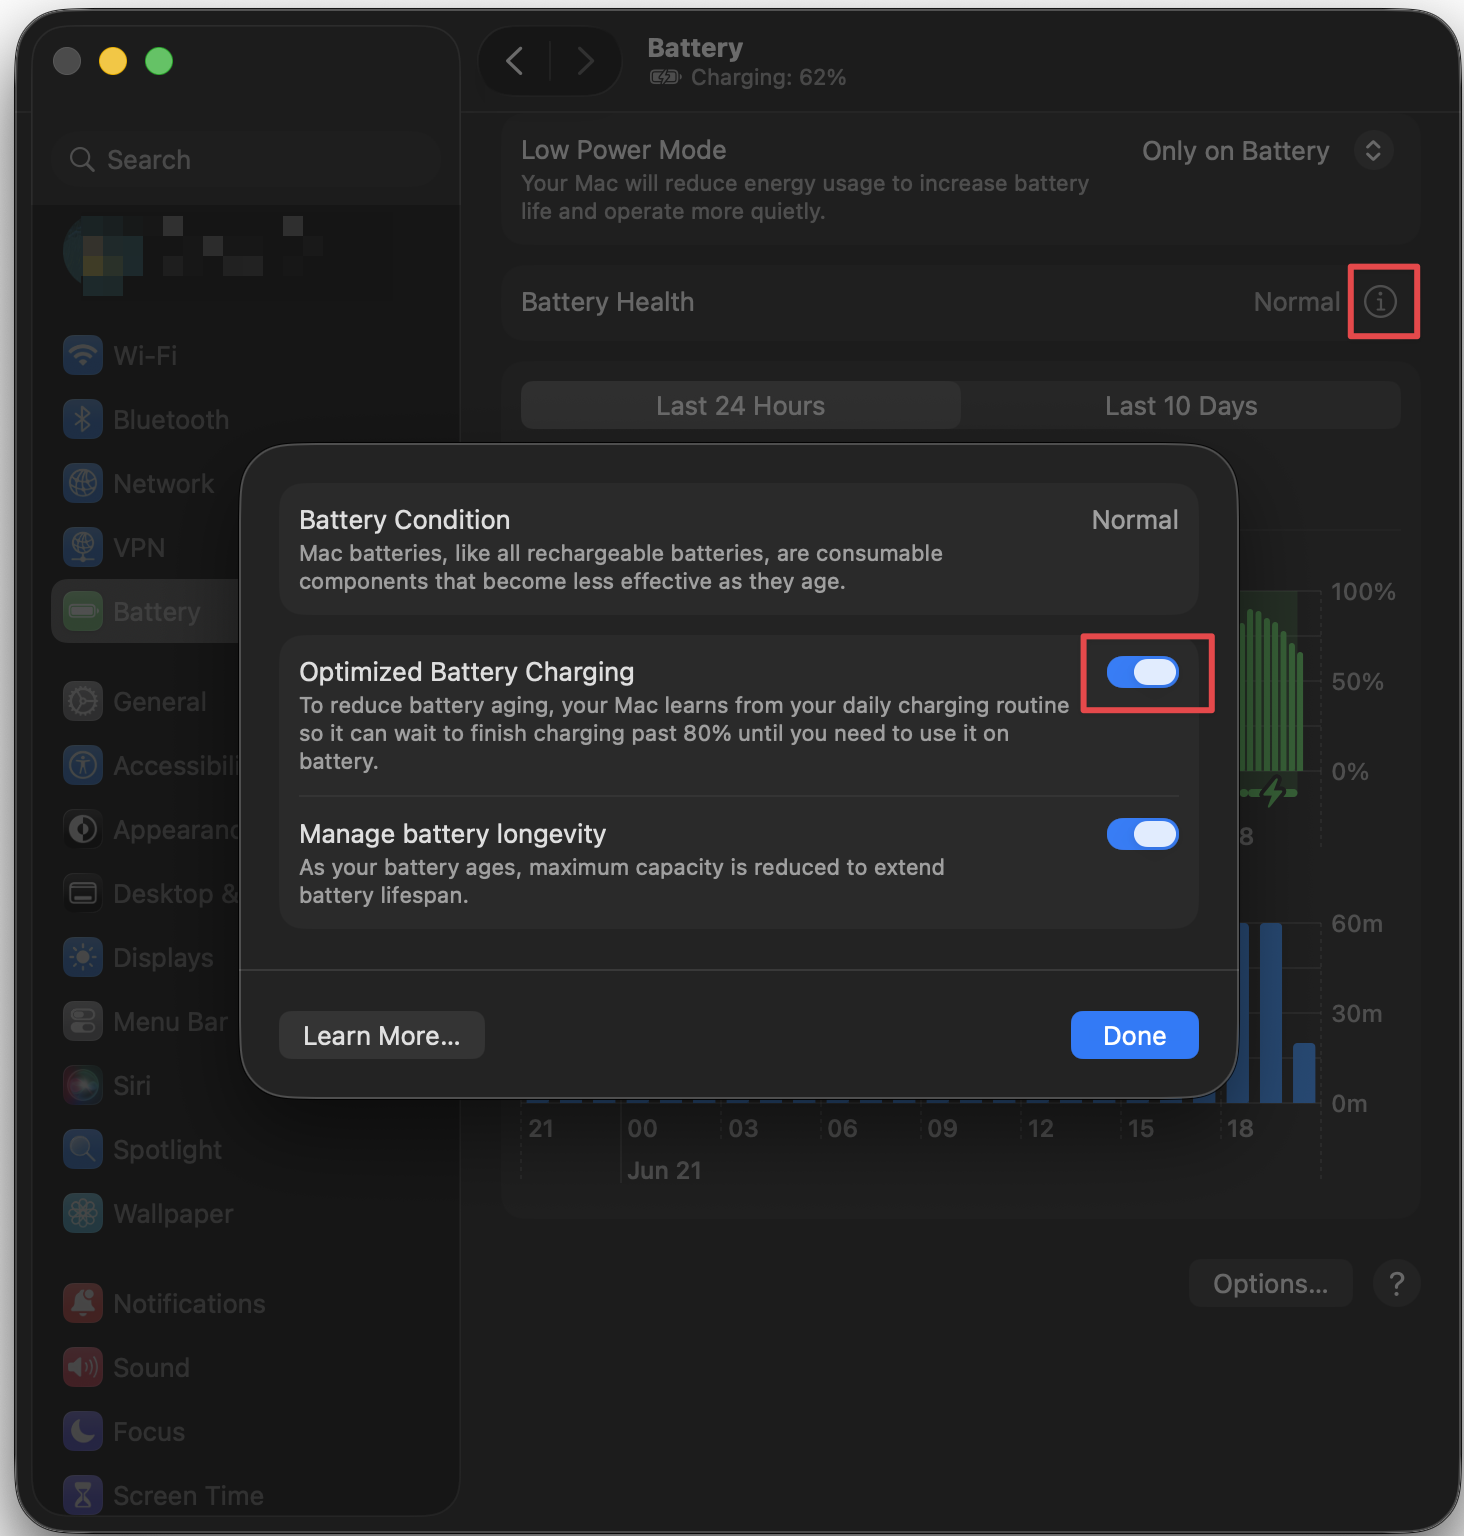
When you are back from travelling, you can turn on “Optimized battery charging” again to protect your battery health.
外接显示器设置
Extend or mirror your Mac desktop across multiple displays
When you connect one or more external displays to your Mac, you can choose what appears on each display.
-
You can use video mirroring to show your entire desktop on each display.
-
You can extend your desktop across two or more displays, and choose which display shows the Finder and application menu.
输入法
- 推荐使用 Rime 输入法。本地app,安全不上传云端;词库强大;自定程高。配置见 Mac 中文输入法 – Rime。
- 关闭
- “Automatically switch to a document’s input source” 不要自动切换输入法。
- “Correct spelling automatically”
- “Capitalize words automatically”
Font Size
You can adjust the font size for system apps.
System Settings > Accessibility > Display > Text Size > Click “Custom”, a window pops up, you can adjust the font size for supported system apps. ↩︎
Shortcuts
You can use Shortcuts to create automations to perform regular tasks.
Macbook
-
Turn on DND (Do Not Disturb) when the current focus is on Teams.
Settings > Focus > Do Not Disturb > Set a Schedule > Add Schedule > App > Choose Microsoft Teams.
Then when Teams is on and while using it, DND will be turned on automatically. This way, you won’t receive notifications while in a meeting. Sometimes you may forgot to turn on DND before a meeting, this feature would be really helpful.
iPhone
- 国内快捷支付
- 允许粘贴
- 专注模式下,静音播放视频
Printer
Change the default paper size you routinely use for printing
System Settings > Printers & Scanners > Choose a paper size from the “Default paper size” pop-up menu on the right.
- Europe: A4
- US: US Letter
Calendar
Q: How to attach an email to a calendar event?
A: Open the email in Mail app, drag the email to the Calendar app on the day you want to create the event. You can change the time, set an alert, add notes, etc.
Hard Drive
Disk Inventory X allows you to visualize the disk usage on your Mac. It shows the sizes of files and folders in a graphical treemap, making it easy to identify large files and folders that may be taking up unnecessary space on your hard drive.
下载磁力链接
可使用 μTorrent 等软件下载磁力链接文件。
Q: What’s the difference between a torrent file and a magnet link?
A: A torrent file is a small file that contains metadata about the files to be shared, and a magnet link is a hyperlink that contains the same metadata as a torrent file, but in a more compact format. You don’t need to download a torrent file to start downloading the files, you can simply click on the magnet link. In other words, a magnet link is a more convenient way to share files using the BitTorrent protocol.
Useful repos:
μTorrent
左侧菜单栏选择 Torrents > 点击左上角的 Add Torrent + 图标 > 粘贴磁力链接 > 点击 OK 即可开始下载。
- 添加下载路径
- 添加磁力链的时候会有预览,磁力链接里包含的文件,可以选择需要下载的文件。
- 添加磁力链接之后,可能需要等几分钟,μTorrent 才会开始下载。
- 如果下载过程卡住不动,可以删除重新添加磁力链接。
-
下载的速度只能说比百度网盘快多了,但是也就那样,速度不稳定,时快时慢。但总算能下载下来。
一开始会非常慢,后面链接稳定后,会逐渐提速。一个优点是电脑休眠不影响下载。
Q: What is the .nfo file that comes with some torrent downloads?
A: An NFO (abbr. for information) file is a plain text file that provides metadata and information about a related file or software, often containing release details, credits, ASCII art, or system information.
无损音乐 flac
To play flac files on Mac Music, convert it to ALAC first using ffmpeg command:
# Convert a single .flac file to .m4a (ALAC format)
ffmpeg -y -i "input.flac" -vn -c:a alac "output.m4a"

# Convert all .flac files in the current directory to .m4a (ALAC format) in batch
for f in *.flac; do ffmpeg -y -i "$f" -vn -c:a alac "${f%.flac}.m4a"; done
歌词
歌曲保存建议保存为 歌手 - 歌曲名.mp3 的文件名
iPhone 上可以显示离线歌词的 app: One Player (89 kr) 还行,支持加载本地 .lrc 歌词文件,wifi 传输歌词文件到手机。缺点是没有自动搜索歌词功能,必须手动下载歌词文件。
下载资源库
-
LyricsX 可搭配 Music.app 显示歌词。
支持在线搜索歌词或者加载本地
.lrc歌词文件。本地.lrc准确率更高。打开 Music.app 播放音乐,打开 LyricsX 显示歌词窗口,拖拽添加
.lrc歌词文件,歌词就会滚动显示出来了。歌词会自动添加到~/Music/LyricsX文件夹。如果自动搜索的歌词不准确,可以选择不同的歌词版本,双击可预览歌词是否与你的歌曲匹配。歌曲播放过后,你选择的歌词会自动保存到
~/Music/LyricsX文件夹,下一次播放同一首歌就会自动加载了。歌词会自动命名为
歌曲名 - 歌手.lrcx。 -
网页端 lrclib
从 https://lrclib.net 复制粘贴歌词到文本文件,保存为
.lrc格式。 -
下载歌词 app
Outlook
Q: Font looks too small in preview when I am compising emails, how to enlarge it?
A: You can set the zoom level for reading messages in the Reading Pane. Following the steps:
- Place the cursor in the body of the email message you’re composing.
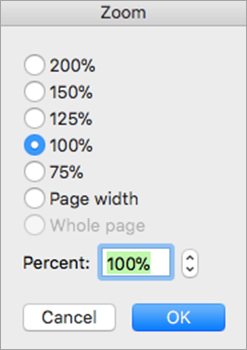
- Select Format > Zoom.
-
Select a zoom percentage or enter a custom percent.
Note that this only changes the font size for your preview; it does NOT change the actual font size of the email when it’s sent. The recipient will see the email in the default font size settings.
ref: Change font size in a new email
Tahoe 26
Q: Tahoe 26 removed Launchpad. How to restore launchpad?
A: Use Launch OS app. It can import your previous Launchpad layout and mimic it on your new macOS version. Use ⌥+Space to launch it.
截屏
如果是多语言混合的截图,比如挪威语和英语,建议分别识别,准确率会更高。
FAQ
Q: 键帽打油怎么办?
A: 「油光」主要是磨损的原因,并不是主要是手油的原因。可以注意到用的多的特别油,比较少用的亚光材质还有一点。只能更换键帽。
Q: How to check when I installed my current OS?
A: Hold down ⌥ key and click the Apple menu > System Information > Software > Installations. Sort by “Install Date” column to see when the OS was installed.
Q: How to preview SVG files?
A: You can use Spacebar to quick view SVG files in Finder. One issue with Spacebar quick look is that when you use dark mode, the svg might be invisible. In this case, you can use Gapplin.