Python Scripts in VS Code
This post introduces how to run Python Scripts (.py files) in VS Code.
When I use ⇧Enter to run python code in selection, it evokes the python version different than the one I specified in the terminal.
The reason is that VS Code configures independently from the terminal. You can check your VS Code Python interpreter by looking at the bottom-right corner of VS Code. You will see sth like Python 3.14.2. Click on it, and you can select the Python interpreter (e.g., anaconda python) you want to use for your VS Code environment.
Run selected code in Python terminal:
- Select the code you want to run.
- Press ⇧⌘P to open the command palette, type “Run Selection in Python Terminal”, and hit Enter. Or use keyboard shortcut ⇧Enter.
If the code is sent directly to the terminal without using the Python interpreter, you need to change terminal.integrated.inheritEnv in your workspace VS Code settings (settings.json):
"terminal.integrated.inheritEnv": false,
This setting ensures that the terminal does not inherit the environment variables from VS Code, allowing it to use the correct Python interpreter specified in your terminal.
After adding this setting, reload the window and try running your code again. It should now use the correct Python version as specified in your terminal. You must see >>> in the terminal before sending code.
‼️ You cannot specify "terminal.integrated.inheritEnv": false, in the user settings, it has to be in the workspace settings. Otherwise, it will cause issues with other projects that rely on the terminal environment variables.
Missing PATH Information: The R executable (especially if installed via Conda for r-reticulate, or Homebrew) lives in a specific directory (like bin). If the terminal doesn’t inherit the parent’s environment, it starts with a stripped-down PATH and literally cannot find the R command to launch it.
Here is my workspace settings.json:
{
  // Activate virtual environment automatically
  "python-envs.defaultEnvManager": "ms-python.python:conda",
  // Set the default interpreter path to the specific conda environment
  "python.defaultInterpreterPath": "~/anaconda3/envs/interest_rate/bin/python",

  "terminal.integrated.inheritEnv": false,
}
"python-envs.defaultEnvManager" set which environment manager to use for automatically activating virtual environments. It affects:
- Environment auto-activation when opening a terminal
- Commands like “Python: Select Interpreter” and “Python: Create Environment” in the command palette.
ms-python.python identifies the Python extension by Microsoft, you can choose venv to use Python built-in virtual environment manager instead of Conda.
"python-envs.defaultEnvManager": "ms-python.python:conda" has some side effects. When you start a new R terminal, it will run conda activate <env-name> too, leading to an error message.
conda activate interest_rate
R version 4.5.1 (2025-06-13) -- "Great Square Root"
Platform: x86_64-apple-darwin20 (64-bit)

[ins] r$> conda activate interest_rate
Error: unexpected symbol in "conda activate"
Run Python in Interactive Window
In Visual Studio Code, you can use cell markers to create interactive code cells within a standard Python (.py) file, mimicking the functionality of a Jupyter Notebook.
You can use # %% (cell markers) to create code cells in your Python file. The space between # and %% is optional, but it is recommended to add a space for better readability.
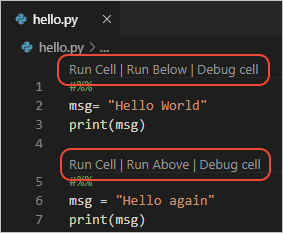
This is a nice way to group your code into sections and run them separately. It resembles Jupyter Notebook style, but you can still keep the .py file format. It has a nice balance btw the flexibility of .py files and the interactivity of notebooks.
- You can add comments after
# %%to give a title to the cell, e.g.# %% Data Loading. - You don’t have to use cells in order to run code in the interactive window. You can select any code snippet and run it in the interactive window by using the command palette and type “Jupyter: Run Selection/Line in Interactive Window” or use the keyboard shortcut ⇧Enter.
VS Code outline view will show functions, classes, methods for .py scripts, but there is native code-section syntax like # --- in .R like follows.
A workaround is to use Bookmarks extension to create bookmarks in your code. The extension will have a badge in the left gutter of the editor, and you can click on it to navigate to a bookmark.
Q: The blue counter shows the number of bookmarks from all files. How to disable the counter?
A: Add the following setting in your settings.json:
"bookmarks.sideBar.countBadge": "off",
Other useful settings for Bookmarks extension:
"bookmarks.saveBookmarksInProject": true,Save bookmarks in the project folder. Will create a.vscode/bookmarks.jsonfile to store the bookmarks. This allows you to add it to Git/SVN repo and have it in all your machines.
Run R in Interactive Window
In .R scripts: you can use # Section --- to create sections in your R script.
You can add comments after # %% to give a title to the cell, e.g. # %% Data Loading ---. The titile will show up in the outline view. The three dashes --- are mandatory for the title to show up in the outline view.
You can use more hash symbols to create higher level cells, e.g., # %% for top-level cells, ## %% for second-level cells, etc. This allow the TOC in the outline view to be more organized and easier to navigate.
I notice that in VS Code, the hierarchy can only be up to 2 levels. If you have for instance a level 3 cell ### %%, it will be treated as a level 1 heading in the outline view.
Keyboard Shortcuts
I changed the keyboard shortcuts for run selection in interactive window. It essentially uses a Jupyter kernel.
{
  // run selection or current line
  "key": "shift+enter",
  "command": "jupyter.execSelectionInteractive",
  "when": "editorTextFocus && editorLangId == 'python'"
},
{
  // run current cell
  "key": "shift+cmd+enter",
  "command": "jupyter.runcurrentcell",
  "when": "editorTextFocus && editorLangId == 'python'"
},
{
  "key": "shift+enter",
  "command": "-jupyter.runcurrentcell"
}
| Keyboard Shortcut | Action |
|---|---|
| ⇧ Enter 1 | Run selection in interactive window and move cursor to next line |
| ⇧ ⌘ Enter or ⌃Enter | Run current cell in interactive window |
| ⌥ Enter | Run current cell and insert new cell below |
1 If your code spans multiple lines, ⇧ Enter will only run the first line if you have not selected the entire code block. This is not very intelligent.
One benefit of using interactive window is that it allows you to inspect variables and outputs in a more organized way. You can open the variable explorer in the buttom terminal and the output will be displayed in the interactive window.
Also you can type directly in the interactive window to inspect variables. Just type your code snippet in the interactive window cell and hit Enter to run it.
Toolbar Interactive Window
-
“ Clear All”: clear only the output; will NOT clear the variables in the session.
-
“ Restart”: clear the variables; will NOT clear the output.
-
: More actions.
- Save (as .ipynb), Export (as .py, .html, .pdf), Expand (cells), Collapse, etc.
- Jupyter Variables: Open the variable explorer in the bottom terminal.
In a code cell, if you don’t explicitly print the output, it will only show the last line of the cell.
If you want to see the output of multiple lines, you need to use print() function.
# This will only show the output of the last line
a = 10
b = 20
a + b  # Only this output will be shown

# This will show the output of all lines
a = 10
b = 20
print(a)  # Output: 10
print(b)  # Output: 20
print(a + b)  # Output: 30
You can use cat, message as well to print output in R.
message will add \n at the end of the output, and will be shown in a different color than print. If you want to make output more distinguishable, use message.