Visual Studio Code
VS code is an open source AI code editor developed by Microsoft. Being open source, everyone can be a developer to the app. Hence comes what I like about it: VS code has extensive extension support, making it suitable for a wide range of programming languages and development tasks. It is highly customizable. The AI integration is done through GitHub Copilot, which is powerful and provides seamless AI assistance while coding/writing.
Useful resources:
Layout
-
Activity Bar is the vertical bar on the far left side of the window. It contains extensions that can contribute to View Containers.
- Drag and drop icons to reorder them.
- Right-click on an icon to hide it from the Activity Bar.
-
Secondary Side Bar is located to the left of the editor region. It can be useful to see two views open at the same time. It is often used by the Copilot Chat.
-
Editor Groups
By default, each opened editor goes into the same editor group and open new file as a tab to the right.
You can create new editor groups in order to group similar or related files, or to allow side by side editing of the same file.
Create a new editor group by dragging an editor to the side, or using one of the Split commands in the context menu to duplicate the current editor into a new editor group to the left, right, above, or below.
-
Output Panel (cmd + J to toggle the panel if it is not loaded automatically) - An additional space for views below the editor region. ↩︎
By default, it contains output, debug information, errors and warnings, and an integrated terminal.
You can drag a terminal from the panel to the editor area to have it side by side with your code. Or right-click the terminal name in the right panel, select “Move terminal into Editor Area.” This is useful when your screen is wide.
Right-click the terminal tab, choose “Mover Terminal into Panel” to move it back to the panel.
refs:
-
- Refer to the webpage to learn how to reorganize the default layout.
Q: How to change Panel position?
A: Right-click on the Panel title bar > Panel Position > choose from Left | Right | Bottom | Top, default is Bottom. Or choose “View: Toggle Panel Position” from the Command Palette.
Explorer View
The Explorer view is used to browse, open, and manage the files and folders in your project.
- Type cmd + P (Quick Open) to quickly search and open a file by its name.
Keyboard shortcuts
Command Palette > “Preferences: Open Keyboard Shortcuts” to open the Keyboard Shortcuts editor.
Click to open the keybindings.json file to customize your own shortcuts.
| Shortcut | Function |
|---|---|
| VS Code General: | |
cmd + J |
Toggle Output Panel |
cmd + P |
Search file names in the current workspace or project. |
shift + cmd + P |
Bring up the Command Palette |
ctrl + ` |
ctrl + backticks; User modified: toggle btw editor and terminal |
cmd + 1/2 |
Toggle between editors |
cmd + M |
Minimize current active window |
opt + cmd + P |
Toggle Side Bar |
shift + cmd + E |
Focus on Explorer View |
shift + cmd + U |
Focus on Output Panel |
opt + Click |
Normal / Edit mode: Multiple cursor at any position |
cmd + opt + ↑/↓ |
Normal Mode: Multiple cursor at consecutive lines |
| Md Editing: | |
cmd + opt + V |
Markdown Paste: convert rick text to Markdown, such as bold face. |
ctrl + D |
Delete lines, originally ⇧⌘K, conflicting with Render qmd/rmd preview |
⌃V > Tab |
Insert a tab character |
⌘ + ↑/↓ |
Move line up/down |
⇧ + ⌘ + ↑/↓ |
Copy line up/down |
| GitHub Copilot: | |
ctrl + I |
Github CoPilot: Start inline chat (default shortcut cmd-I collapses with italic style) |
ctrl + cmd + I |
Toggle GitHub Copilot chat |
opt + cmd + B |
Close GitHub Copilot chat in the Secondary Side Bar |
opt + cmd + P |
Toggle Primary Side Bar visibility |
Default shortcut for toggling the Primary Side Bar visibility is cmd + B, but it conflicts with my custom shortcut for bold face in Markdown, so I unbound it and set opt + cmd + P to toggle the Primary Side Bar visibility. Add the following to keybindings.json:
{
  "key": "alt+cmd+p",
  "command": "workbench.action.toggleSidebarVisibility"
},
{
  "key": "cmd+b",
  "command": "-workbench.action.toggleSidebarVisibility"
}
Note that -<command-id> unbinds one shortcut from the command.
Insert at multiple cursors: (Note that I am using Vim)
- Enter normal mode with esc.
- Use opt + click to place multiple cursors at arbitrary positions, or use cmd + opt + ↑/↓ to place multiple cursors at consecutive lines.
- Make sure you are under English input method, then type
ito enter insert mode, and start typing. The text will be inserted at all cursor positions simultaneously.
Useful Extensions:
- Markdown:
Markdown Preview Enhanced,Markdown+Math,Markdown All in One - TeX:
LaTeX-Workshop(this installsintellisenseautomatically) - Spell check, autocomplete:
Code Spell Checker,intellisense -
HTML preview
VS code has a built-in Integrated Browser.
Other useful extensions for HTML preview:
- Live Preview: Right-click to open html file in browser.
- Live Server: Previewing html files in the browser, with live reload on save.
- Simple Browser Multi
Extensions view filters
Filters start with @ and followed by a filter name. For example, @installed shows all installed extensions; @recommended shows all recommended extensions; @category:linters shows all extensions in the “Linters” category; @tag:python shows all extensions tagged with “python”.
HERE is a list of available extension view filters.
Basic Editing
Conversion btw Tabs and Spaces
Command Palette (⇧⌘P) → “Convert Indentation to Spaces” or “Convert Indentation to Tabs”
-
“Convert Indentation to Spaces”: Convert all tabs in the current file to spaces based on your current tab size setting.
You can change Tab size in Settings or the status bar at the bottom right of the window. The default is 4 spaces.
-
“Convert Indentation to Tabs”: Convert leading spaces in the current file to tabs.
Q: How to insert a tab character?
A: By setting a keyboard shortcut, I set it to the same as Vim’s tab key: ctrl+V > Tab. Add the following to keybindings.json:
{
    "key": "ctrl+v tab",
    "command": "type",
    "args": { "text": "\t" },
    "when": "editorTextFocus"
}
Better Editor
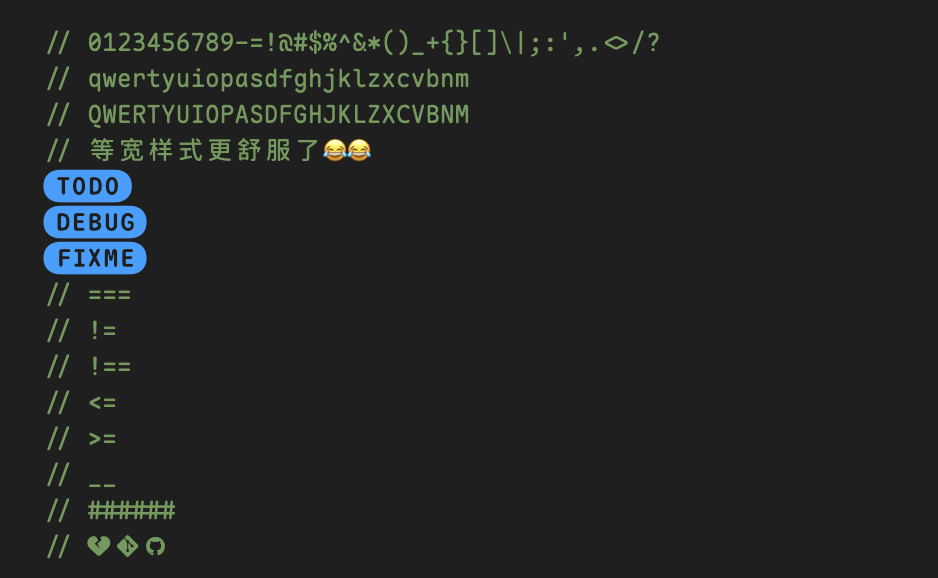
Better Comments: Provides more visual cues for comments in your code. It colors comments based on their type, making it easier to identify important information, warnings, or TODOs at a glance.
TODOTasks to-do in orange!Alerts in red?Questions in blue*Highlights of info in green//Strikethrough in gray

Bookmarks extension allows you to add bookmarks by clicking in the gutter next to the line numbers. Your bookmarks in your current project will show in the activity bar. You don’t need to open the file where bookmarks are located. You can click the bookmark to jump to the corresponding location in the file.
Outline View
For symbols to be displayed, the Outline view relies on information computed by your installed extensions for different file types. For example, the built-in Markdown support returns the Markdown header hierarchy for a Markdown file’s symbols.
Tips:
-
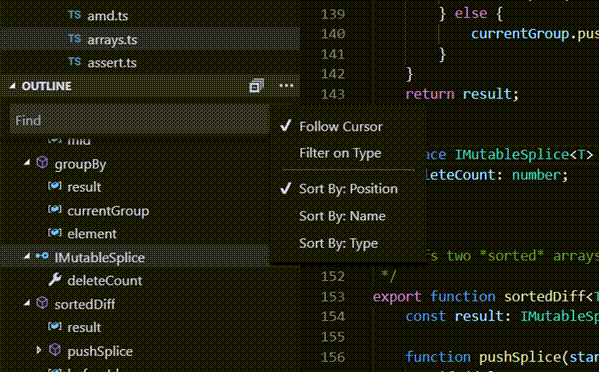
Enable “Follow Cursor”: When enabled, the Outline view will automatically scroll to and highlight the symbol corresponding to the current cursor position in the editor.
To enable, click the
...menu icon in the Outline view and select “Follow Cursor”. This setting is project specific. No global setting for it.
Boost Your File Tree Visibility
Make your file explorer folder tree (OUTLINE view) more readable and organized.
Q: How to make the folder tree has larger indentation?
A: By default, VS Code uses 8 pixels for each indentation level in the Explorer view. To increase the indentation size, you can add the following setting to your settings.json file:
// Increase folder tree indentation size to 15 pixels
"workbench.tree.indent": 15,

// Optional:
// Always show the indentation guides
"workbench.tree.renderIndentGuides": "always",
// Change the line color of the indentation guides
"workbench.colorCustomizations": {
  "tree.indentGuidesStroke": "#05ef3c" // fluorescence green color for indentation guides
}
Make tabs more visible
"workbench.colorCustomizations": {
  // the active tab in the focused group, show a bottom border to make it more visible
  "tab.activeBorder": "#cc7832",
  // in split view, the active tab in the unfocused group
  "tab.unfocusedActiveBorder": "#000000",

  // active tab background (both focused and unfocused groups)
  "tab.activeBackground": "#26549e",

  // tab border in general
  "tab.border": "#404040",

  // make editor background darker
  "editor.background": "#181818",
}
It will look like this:

You can visit the Theme Color VS Code web page to get more information on styling your theme.
VS Code has several built-in themes, I simply use the default dark theme Dark (Visual Studio) as I think it has best compatibility with all functions. Custom themes tend to have some issues with small features styling.
Extensions that improve the appearance of the file explorer:
-
This extension provides good looking file and folder icons in the Explorer view. It helps you to identify different file types and folders quickly.
-
Add emoji to the end of your file names in File Explorer and tab. Equivalent to file tags.
Some examples:
- ⚡️ High Value - Key files for the project
- ⭐ Important - High-priority files
- 🔥 Urgent/Critical - Files requiring immediate attention
If you rename a file with an emoji, the emoji might be lost. You need to add the emoji again.
ref: 让 VS Code更好用的几个小技巧, @白玩在路上
User defined section headers identifiers
Q: How to make code markers (# %%) title show in the outline view?
✅ Option 1: RegExp Outline extension → Most versatile and customizable, supports user defined section header identifiers for different file types. It uses the built-in Outline view.
Open command palette: set “Regexp Outline: Header Rules Each Ext” to
[ {"ext": ".py", "rules": [{"level": 1, "format": "^# %%(.+)$", "nameIdx": 1, "detail": "H1"}]} ]
Syntax:
rules / format: A regular expression pattern to match the section header.rules / nameIdx: The number of the group to be displayed as the heading string. Defaults to 1. If 0 is given, the whole matched string will be used as the heading string.rules / detail: The string to be displayed as details in the heading. Default is an empty string.
Note:
-
It is NOT recommended to set directly in
settings.jsonas you need to escape special characters in JSON.E.g, the above setting in
settings.jsonshould be set as:"regexpOutline.headerRulesEachExt": "[ {\"ext\": \".py\", \"rules\": [ {\"level\": 1, \"format\": \"^# %%(.+)$\", \"nameIdx\": 1, \"detail\": \"H1\"} ] } ]"which is NOT very readable.
After setting # %% as the section header identifier for Python files, the outline view will show the section headers as follows:
The advantage of RegExp compared to Better Outline is that it integrates to the built-in outline view.
You can specify heading rules for each file extension:
-
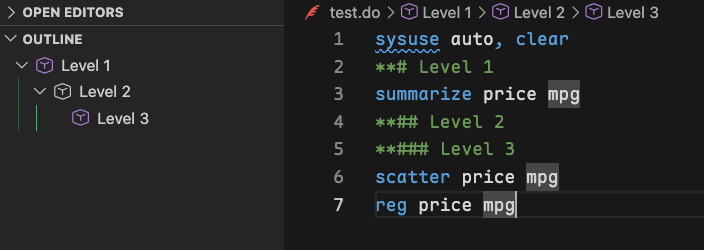
Stata outline
.do:**# Level 1 Header,**## Level 2 Header, etc.[ {"ext": ".do", "rules": [{"level": 1, "format": "^**# (.+)$", "nameIdx": 1, "detail": "H1"}]} ]Do NOT need to specify level 2 and higher, as they will be automatically assigned based on the order of the rules.
ref: Python: get code cells to show in the Outline view
Option 2: Better Outline extension.
It will create a seprate tab in the Explorer called “BETTER OUTLINE”, which lists all the section headers in the current file. It supports # %% as section header.
One caveat is that it does not integrate to the built-in outline view, so the aesthetic settings for the built-in outline view do not apply to the Better Outline view.
Drawback: Does not support custom section header keywords, such as **# for Stata .do files
Add-on feature: Nice keyboard shortcuts regardless if you use its outline view:
- ⌥ + D: insert a section divider, one
# ===...80 characters long - ⌥ + ⇧ + D: bigger comment divider, two lines of
# ===...80 characters long, with a blank line starting with#for header.
Option 3: Marks to Outline extension
Add MARK: - or your custom keyword to one line comment. It will add a section called MARKS at the top section in the built-in Outline view, and all the comments with MARK: - will be listed as section headers under that section.
// MARK: - section header1
// MARK: - section header2
The space after - is optional.
Comment: NOT elegant. I don’t like that it shows up as a separate section at the top regardless of where the comment is in the file.
One benefit is that it integrates to the built-in outline view, so the appearance you configured for the outline view applies to the MARKS section as well.
Useful user case scanario: You have a long toc, you want to have a separate section for important section headers, so you add MARK: - to those important section headers. Be aware that if the section is in the MARKS section, it will not be in the regular TOC section.
中英等宽字体
VS Code 默认字体中英混排时,很多中文并非严格占用两个英文字符的宽度,导致中英文对齐不美观。解决方法是使用提供中英文对齐的等宽字体。本人试验多个字体后,推荐
-
Ubuntu Mono+ 16 px (Ubuntu Mono 看起来比其他字体小)可读性OK,但是英比较小。
-
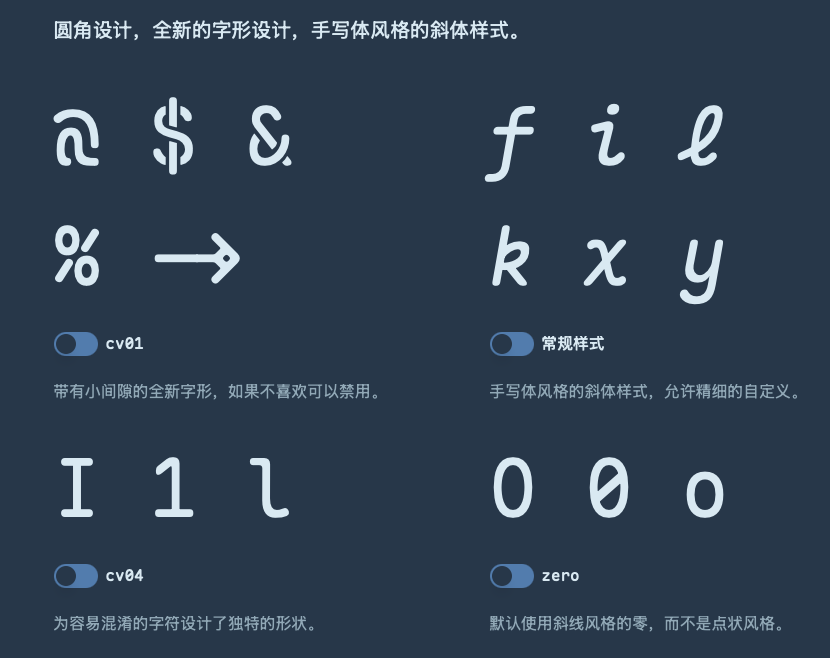
Maple Mono NF CN+ 15 px手写体风格的斜体很优雅 (see
f i j k l x y),支持连字,标签功能方便识别 [FIXME] [TODO],可用于日志显示和任务提醒。🎨 支持 Nerd-Font 图标。
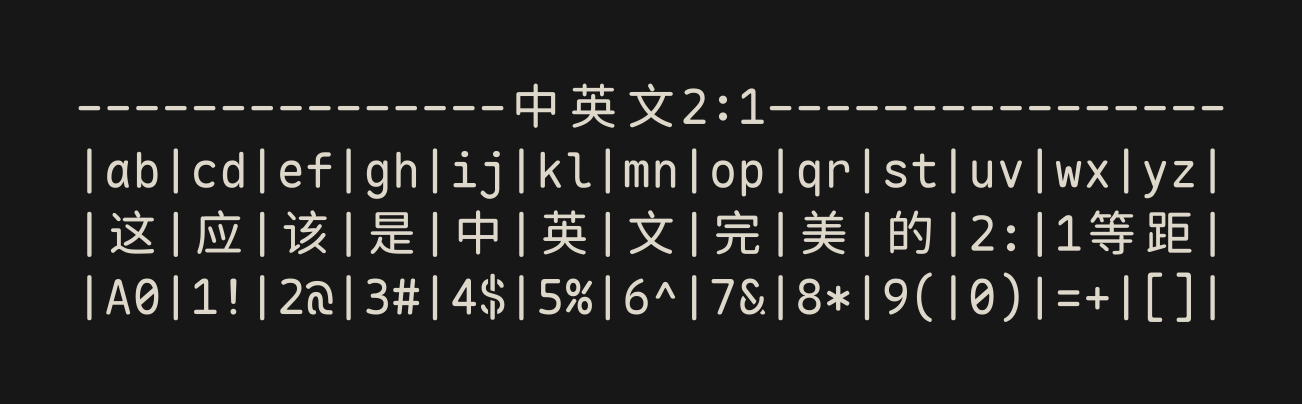
Q: Chinese and English characters are not aligned properly. I want Chinese characters are strictly twice the width of English characters. How to fix?
A: Use a proper monospaced font that provide alignment of Chinese and English characters. For example, Sarasa Gothic (更纱黑体) 或者 Source Han Mono (思源等宽)。
❗这两种字体本质上通过压缩英文字距来达到中英文对齐的效果。原本两个中文字符对应三个英文字符,现在强制对应为四个。缺点是英文看起来很挤, 英文字体很小很细,但是中文字体贼大。
有点儿类似牺牲英文的可读性来提升中英文混排的美观性。个人感觉很别扭。
等宽但个人觉得英文太细窄的字体: 谷歌字体 Noto Sans Mono CJK SC,更纱黑体
可以接受的中英等宽字体: Maple Mono, Ubuntu Mono, Inconsolata
推荐用 Google Fonts 预览功能 (View selected families 可以多个字体同页面展示,方便对比) 来查看字体效果,选择适合自己的字体。
更纱黑体可直接通过 Homebrew 安装.

安装 Source Han Mono (思源等宽):
-
Install
Source Han Mono.下载字体文件并构建字体。
-
下载字体文件并解压。
字体文件大约 3.25 GB,包含 7 种字重 (“ExtraLight” “Light” “Normal” “Regular” “Medium” “Bold” “Heavy”),5 种语言 (SC, TC, Hong Kong, Japanese, Korean) 和 2 种风格 (Upright and Italic)。
-
安装 AFDKO(Adobe Font Development Kit for OpenType)工具包。
python -m venv afdko_env
source afdko_env/bin/activate
python -m pip install afdko
创建一个虚拟环境
afdko_env并安装afdko工具包。 -
参照
COMMANDS.txt中的说明,build Source Han Mono 字体。The building will take a while.
-
构建完成后,你将得到 14个 (7 weights × 2 styles )
otf文件.你可以使用字体管理工具(如 Font Book)安装这个字体文件。双击
otf文件即可安装对应字体。
-
-
In
settings.json, set the following:"editor.fontFamily": "'Source Han Mono SC', Menlo, Monaco, 'Courier New', monospace",
settings.json 中关于字体设置的完整选项:
"editor.fontFamily": "'Maple Mono NF CN', 'Ubuntu Mono', 'Inconsolata', 'Sarasa Mono SC Nerd Font', 'Source Han Mono SC', Menlo, Monaco, 'Courier New', monospace",
"editor.fontSize": 15,        // 调大字体
"editor.fontLigatures": true, // Enable font ligatures 连字
"editor.renderControlCharacters": true,
"editor.renderWhitespace": "all",
"terminal.integrated.fontSize": 15,
VSCode 允许同时设置多个字体,不同字体间用 , 分隔,VSCode 则会按照给出的字体顺序选择。当第一个字体能够在系统上找到,则使用第一个字体;否则判断第二个字体,依次类推。
字体大小设置为 15 px,想要再大一点,可以设置为 16 px。字体大小的设置取决于字体的选择和屏幕分辨率。
editor.fontLigatures 设置为 true 可以启用字体连字功能,某些字体(如 Fira Code)提供了编程连字,可以将常见的编程符号组合成更易读的符号。例如,!= 可以显示为 ≠,=> 可以显示为 ⇒。

不支持连字: Ubuntu Mono
支持连字: Maple Mono
Maple Mono
[TODO], [FIXME], [DEBUG] 等标签在 Maple Mono 字体中会显示为特殊符号,方便在代码中快速识别这些标签。See HERE for a complete list of Ligatures.
等宽预览
连字和特殊标签预览
中文自动换行问题
在 VS Code 中浏览中文文字居多的文件会出现自动换行的问题超出窗口范围的问题。↩
Fix: set the following in settings.json:
"editor.wrappingStrategy": "advanced"
ref:
Extension Reload
Sometimes you need to reload an extension to apply changes.
Command Palette → “Developer: Reload Window”
- This is equivalent to restarting VS Code, but it only reloads the current window and does not close the entire application.
- A quick reload ensures that your environment is up-to-date and functioning as intended, preventing potential disruptions in your workflow.
- Generally, changes in settings apply immediately, but some settings require a reload to take effect.
Find and Replace in Selection
- cmd + F to open Find/Replace
- Select your line of text
- Click the “Find in Selection” icon to the right (or using keyboard shortcut opt + cmd + L)
- Enter your find and replace characters in their inputs
- Click the “Replace All” icon
Close Find/Replace with esc.
You can use Regex in Find/Replace by clicking the .* icon.
Replace ::: with two ::: on separate lines
- Find:
^(\s*):::\s*$ -
Replace:
$1:::
$1:::
Replace :::{.blue} with :::{.content-visible when-meta="params.solution"} followed by ::: {.blue} on the next line
- Find:
^(\s*)(:::\{\.blue\})$ -
Replace:
$1::: {.content-visible when-meta="params.solution"}
$1::: {.blue}
Search Across Files
Press shift + cmd + F and enter your search term. VS Code will search over all files in the currently opened folder.
Command Palette approach: enter the Search: Quick Search command.
Search results are grouped into files containing the search term, with an indication of the hits in each file and its location. Expand a file to see a preview of all of the hits within that file. Then single-click on one of the hits to view it in the editor.
Language Identifiers
In Visual Studio Code, each language mode has a unique specific language identifier. That identifier is rarely seen by the user except in the settings, for example, when associating file extensions to a language:
"files.associations": {
    "*.myphp": "php"
}
Note that casing matters for exact identifier matching (‘Markdown’ != ‘markdown’)
Every language defines its id through the languages configuration point in the extension’s package.json file:
"languages": [{
    "id": "java",
    "extensions": [ ".java", ".jav" ],
    "aliases": [ "Java", "java" ]
}]
You can find a list of known identifiers in the language identifier reference.
| Language | Identifier |
|---|---|
| LaTeX | latex |
| Markdown | markdown |
| R | r |
| R Markdown | rmd |
| Quarto | quarto |
- Note that all identifiers are in lower cases.
Version Control
Visual Studio Code has integrated source control management (SCM) and includes Git support out-of-the-box.
Use the Source Control icon in the activity bar to access the Source Control view.
Error: No source control providers registered.
Cause: Git built-in extension was disabled.
Fix: Go to Extensions, type: @builtin git, then Enable Git from the Git extension settings.
The Source Control view shows the details of your current repository changes: CHANGES, STAGED CHANGES and MERGE CHANGES.
When you select a file in the Source Control view, you will see the changes that you have made to that file in a diff editor.
File version control status
- U - Untracked file
- A - Added file
- M - Modified file
Code Actions
Code Actions can provide both refactorings and Quick Fixes for detected issues (highlighted with red squiggles). When the cursor is on a squiggle or on a selected text region, VS Code shows a light bulb icon 💡 in the editor to indicate that a Code Action is available. If you select the Code Action light bulb or use the Quick Fix command ⌘., the Quick Fixes and refactorings control is presented.
If you have enabled GitHub Copilot, you can choose to fix with Copilot. This is a very convenient way to debug your code.
Q: What is refactoring?
A: Visual Studio Code supports refactoring operations (refactorings) such as Extract Method and Extract Variable to improve your codebase from within the editor. For example, a common refactoring used to avoid duplicating code (a maintenance headache) is the Extract Method refactoring, where you select source code and pull it out into its own shared method, so that can reuse the code elsewhere.
Code Snippets
Snippets files are written in JSON, support C-style comments (//), and can define an unlimited number of snippets. Snippets support most TextMate syntax for dynamic behavior, intelligently format whitespace based on the insertion context, and allow easy multiline editing.
-
a language snippet file
Single-language user-defined snippets are defined in a specific language’s snippet file (for example
javascript.json), which you can access by language identifier through Snippets: Configure Snippets.A snippet is only accessible when editing the language for which it is defined.
-
a global snippet file
Multi-language and global user-defined snippets are all defined in “global” snippet files (JSON with the file suffix
.code-snippets), which is also accessible through Snippets: Configure Snippets.File path:
$HOME/Library/Application Support/Code/User/snippets
Create your own snippets: Code > Settings > Configure Snippets
Syntax
// in file 'Code/User/snippets/javascript.json'
{
  "For Loop": {
    "prefix": ["for", "for-const"],
    "body": ["for (const ${2:element} of ${1:array}) {", "\t$0", "}"],
    "description": "A for loop."
  }
}
-
“For Loop” is the snippet name.
prefixdefines one or more trigger words that display the snippet in IntelliSense. Substring matching is performed on prefixes, so in this case, “fc” could match “for-const”.bodyis one or more lines of content, which will be joined as multiple lines upon insertion. Newlines and embedded tabs will be formatted according to the context in which the snippet is inserted.descriptionis an optional description of the snippet displayed by IntelliSense.scopeoptional property that takes one or more language identifiers, which makes the snippet available only for those specified languages. If noscopeproperty is given, then the global snippet is available in all languages.
Rules for Body:
-
Enclosed in an array of strings. Each entry in the array represents one line of the inserted snippet.
-
Use
$1,$2to specify cursor locations. The number is the order in which tabstops will be visited, whereas$0denotes the final cursor position.The
bodyof the example above has three placeholders (listed in order of traversal):${1:array},${2:element}, and$0. You can quickly jump to the next placeholder with Tab.$0is an optional special case that always comes last. -
Placeholders are tabstops with values, like
${1:foo}. The placeholder text will be inserted and selected such that it can be easily changed. Placeholders can be nested, like${1:another ${2:placeholder}}.The string after the colon
:(if any) is the default text. -
Variables: With
$nameor${name:default}, you can insert the value of a variable.TM_SELECTED_TEXTThe currently selected text or the empty string.
-
Escape specail characters.
With
\(backslash), you can escape$,},\, and". -
Multilined
body: simply wrap each line with double quotes.
Q: When using $TM_SELECTED_TEXT, if you type the prefix, the selected text will be overwritten. What to do with it?
A: VS code remembers the text. When you finish typing the prefix, the formatted text will show up accordingly.
// customer defined snippets
{
  "Colored Span Green": {
      "prefix": "cs-green",
      "body": [
        "<span style=\"color: #008B45;\">$TM_SELECTED_TEXT</span>$0"
      ],
      "description": "Insert a green colored span"
  },
  "Math Helper Parentheses": {
      "scope": "markdown, latex",
      "prefix": "\\(",
      "body": [
        "\\left($1\\right)$0"
      ],
      "description": "Insert parentheses with LaTeX math formatting"
  },
  "Math Helper Brackets": {
      "scope": "markdown, latex",
      "prefix": "\\[",
      "body": [
        "\\left[$1\\right]$0"
      ],
      "description": "Insert brackets with LaTeX math formatting"
  },
  "Separator":{
      "scope": "markdown, latex, quarto",
      "prefix": ["---", "dash"],
      "body": [
        "--------------------------------------------------------------------------------",
        "$0"
      ],
      "description": "Insert a horizontal separator line"
  },
  "Insert codicon": {
      "scope": "markdown, quarto",
      "prefix": "codicon",
      "body": [
        "<i class=\"codicon codicon-$1\" aria-hidden=\"true\" style=\"vertical-align: middle;\"></i>$0"
      ],
      "description": "Insert a VS Code codicon"
  },
  "Set working directory in R": {
      "scope": "r",
      "prefix": ["swd", "set-work-dir"],
      "body": [
        "setwd(dirname(rstudioapi::getSourceEditorContext()\\$path))$0"
      ],
      "description": "Set working directory in R"
  },
}
-
"scope": "markdown, latex"setscopeto"markdown, latex"such that\(works inside dollar signs. - To escape double backslashes, you have to use
\\\\\\\\(8 backslashes).- In TextMate you can but must not escape a backslash with a backslash, so to insert 1 backslash have either
\or\\ - In JSON you must escape a backslash with another backslash, so to insert 1 backslash have either
\\or\\\\, to insert 2\\\\\\\\
- In TextMate you can but must not escape a backslash with a backslash, so to insert 1 backslash have either
- Other characters that need to escape in snippet body:
- double quotes
\" - dollar sign
\\$
- double quotes
List of User Defined Snippets
| prefix | command |
|---|---|
cs-green / cs-red/ cs-blue |
colored html span |
\( |
\left(\right) |
\[ |
\left[\right] |
vec |
row vector |
cvec |
column vector |
mat-diag or var-mat |
variance matrix |
pmat or pmatrix |
empty parenthesis matrix |
bmat or bmatrix |
empty bracket matrix |
--- or dash |
insert separator horizontal line Note that in Rmd and qmd, since --- clashes with yaml, use dash instead. |
codicon |
insert a VS Code codicon <i class="codicon codicon-<>" style="..."></i> |
xref |
insert cross-reference <a href=”{{site.baseurl}}/yyyy/mm/dd/file-name.html”> Linked Text </a> |
swd or set-work-dir |
set working directory in R using current script location |
Q: Is it possible to set max lines of a table printed in notebook?
A: The simple answer is NO. Seetings → Features → Notebook only limits the cell size of a pure text based output. It does NOT apply to outputs such as matrices, dataframes or other spreadsheet-like outputs (e.g. from the View() function in R.)
Configuration
-
Menu bar: Code → Settings (keyboard shortcut: cmd + ,)
A useful feature is to copy the json for the settings of interest in the UI.
When you hover over the title of the setting, a gear icon will appear, choose “Copy Setting as JSON” to copy the setting in json format.
-
Configuration file: change directly in the user settings file (
settings.json)
Setting file locations:
-
macOS User Settings: Global settings that apply to all VS Code workspaces and projects
Located in the user’s home directory in the VS Code application data folder:
~/Library/Application\ Support/Code/User/settings.jsonExamples: Theme, font size, editor preferences, extensions settings, etc.
Lower priority (can be overridden by workspace settings)
-
Workspace Settings: Project-specific settings that apply only to the current workspace/project.
Located in
.vscode/settings.jsoninside the project folder.Examples: Project-specific linting rules, build configurations, language settings for this project
Priority: Higher priority (overrides user settings)
❗VS Code use the root project folder to determine the workspace settings.
If you have a nested project structure, i.e., a
.vscode/settings.jsonfiles in a subfolder, VS Code will NOT recognize it unless you open that subfolder as the root folder in VS Code. -
MCP settings:
- Global:
~/Library/Application Support/Code/User/mcp.json - Workspace:
.vscode/mcp.json
- Global:
You can toggle between User and Workspace Settings by choosing the tab in the UI or if you are using the json file, you can determine which settings you are working on by looking at the file path.
Run Open Config Script to open config.js (a JavaScript configuration file):
- define TeX macros
KatexConfig,mathjaxConfig…
Q: What is the difference between .json and .js?
A: .json is a subset of .js, which stands for JavaScript.
-
If you store only data, use
.json;You can think of
.jsonas a YAML frontmatter in markdown. -
if you have some sort of logic (functions, conditions, loops …), use
.js.
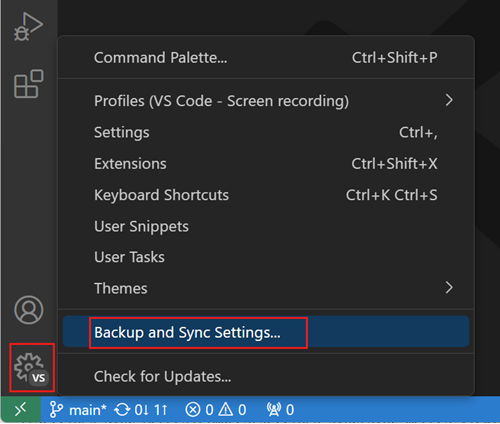
Q: How to sync settings across devices?
A: Turn on Setttings Sync.
To use Sync settings, you need to sign in (GitHub or Microsoft account) and select which settings you want to sync. Currently, the Settings Sync supports the following settings:
- Settings
- Keyboard shortcuts
- User snippets
- User tasks
- UI State
- Extensions
- Profiles
Q: How to view historical settings data?
A: Type Settings Sync: Show Synced Data in the Command Palette. ↩︎
Share configurations
You can share your settings, keybindings, extensions, snippets, and UI state with others by exporting a profile.
Q: What is a profile?
A: A profile is a collection of settings, extensions, and configurations that define your VS Code environment. Profiles allow you to switch between different setups easily, depending on your workflow or project requirements.
VS Code treats your current configuration as the Default Profile. As you modify settings, install extensions, or change UI layout by moving views, these customizations are tracked in the Default Profile.
Q: Why use profiles?
A: You can share your VS Code configuration with others or across different machines. A common user case is that you can share with students to quickly set up their VS Code environment. For example, educators can create a profile with a specific set of extensions and settings needed for a computer science class and then share that profile with students. ↩
Q: How to create a profile?
A: To create a profile, follow these steps:
- Click the gear icon in the lower-left corner of the VS Code window to open the Settings menu.
-
Click on Profiles, this will open the Profiles editor.
-
Click on the New Profile button.
This opens the New Profile form, where you can enter a profile name, choose an icon, and configure the contents that are included in the new profile.
Export
You can export a profile for saving it or sharing it with others by using the Export… button in the overflow actions of the profile you want to export.
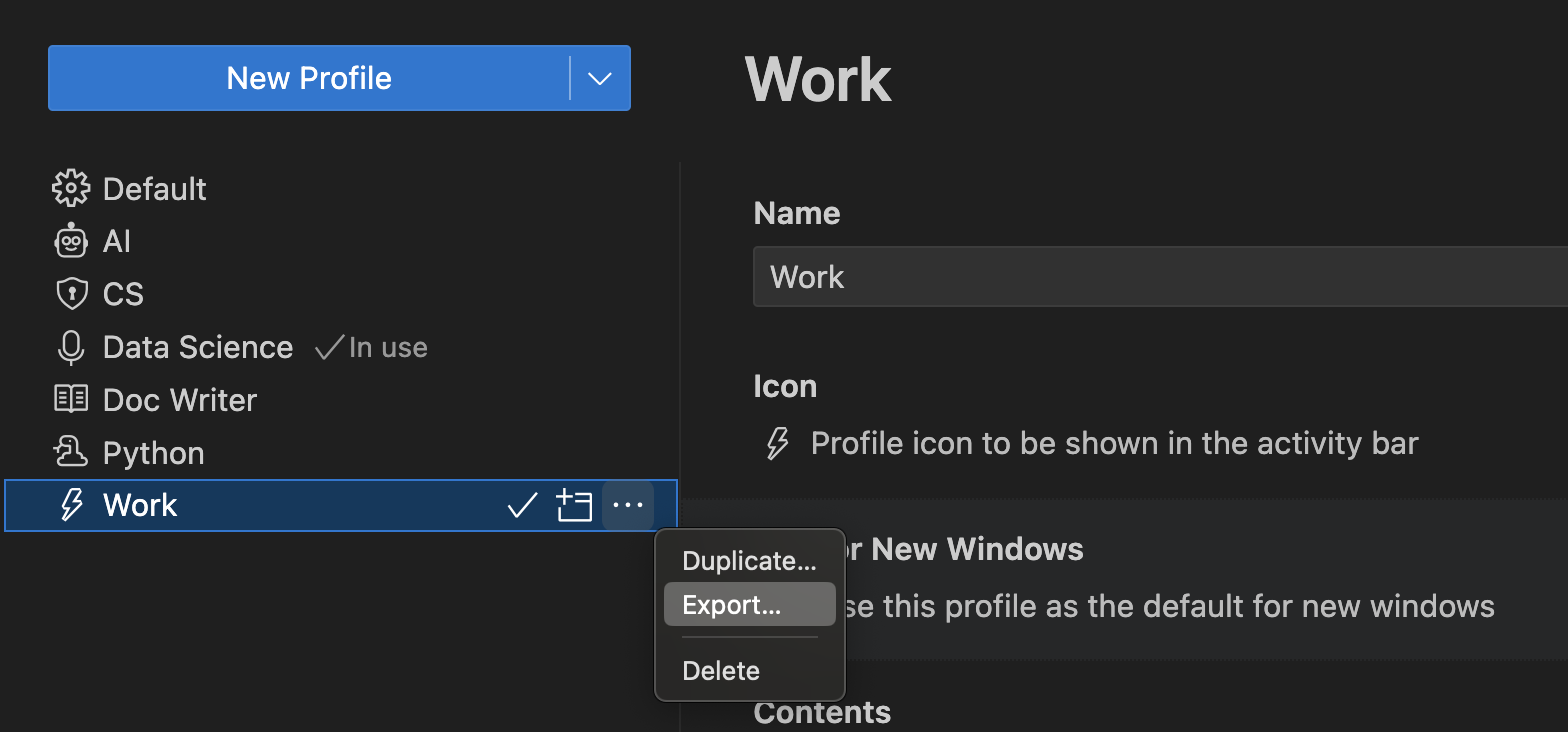
When you select Export…, you are prompted for the profile name and whether you want to export to either a GitHub gist or to your local file system.
Import
You can import an existing profile from the Profiles editor by selecting the Import Profile…button in the dropdown actions of the New Profile button.
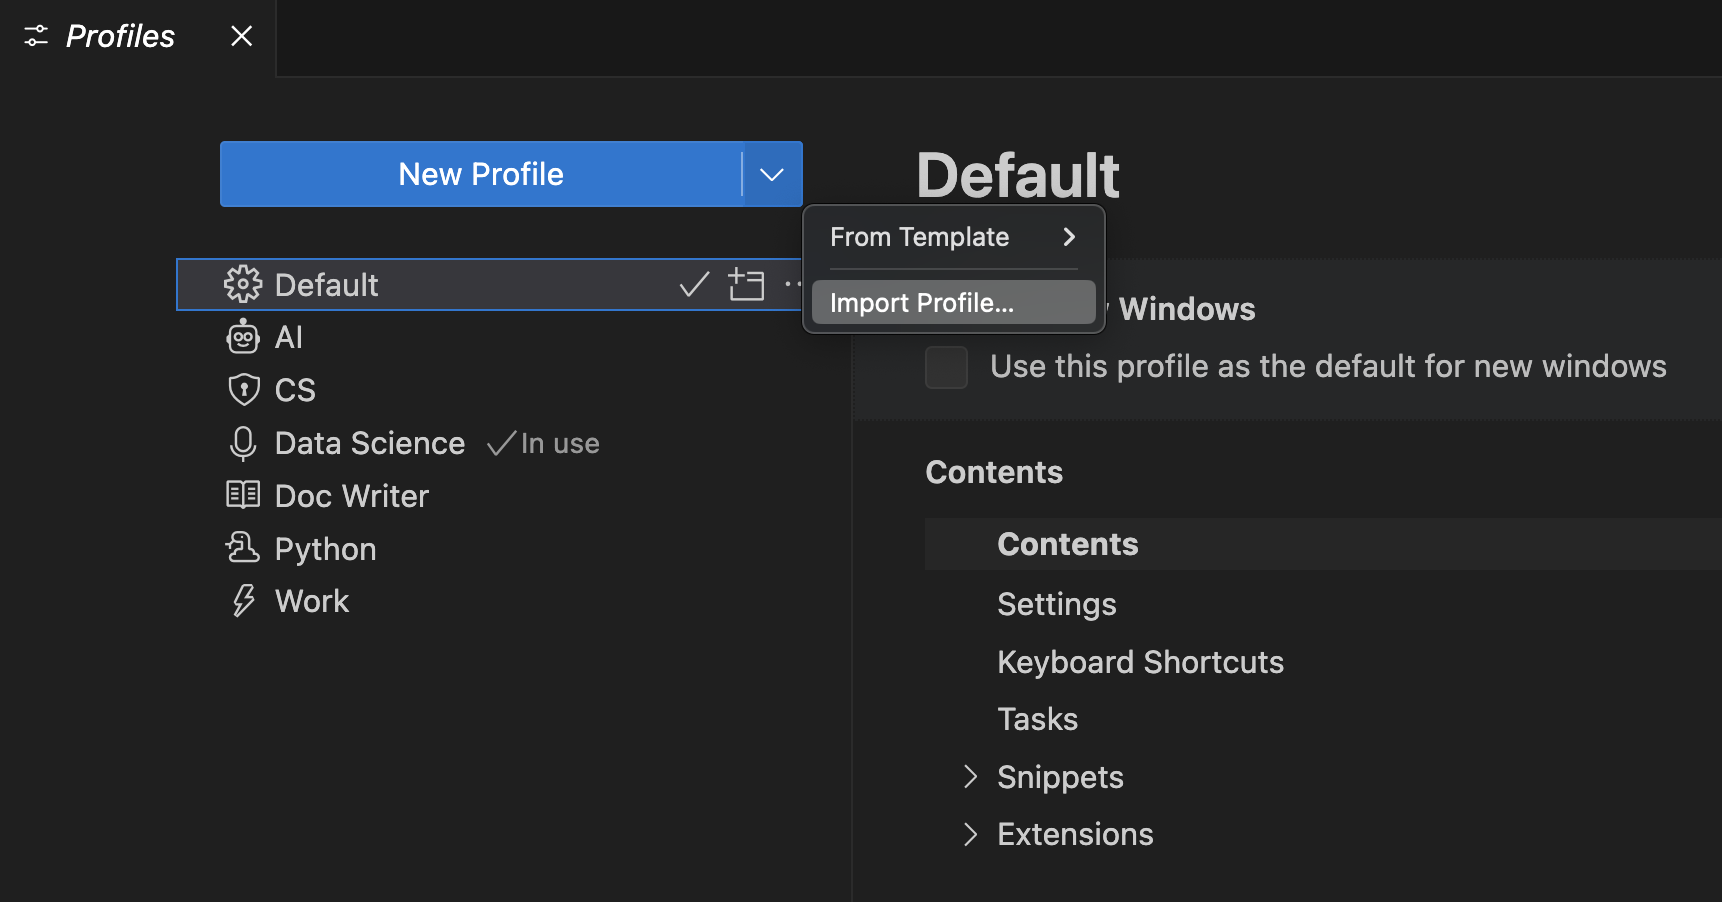
When you select Import Profile…, you are prompted for the URL of a GitHub gist or the file location of a profile via an Import Profile dialog. Once you have selected the profile, the Profile creation form opens with the profile to import pre-selected. You can continue to modify the profile and select Create to import the profile.
ref: Share your VS Code configuration via Profiles
Q: How to customize language-specific setttings?
A: Open User Settings → Type @lang:markdown into the search widget. This will show configurable settings for that specific language. Alternatively, you can change directly in the settings JSON file.
"[markdown]": {
    "editor.formatOnSave": true,
    "editor.wordWrap": "on",
    "editor.renderWhitespace": "all",
    "editor.acceptSuggestionOnEnter": "off"
  }
Q: How to preview a markdown file?
A: Two options:
- Open Preview (⇧⌘V)
- Open Preview to the Side (⌘K V)
Use either the keyboard shortcuts or click the Preview button.
- Double clicking an element in the Markdown preview will automatically open the editor for the file and scroll to the line nearest the clicked element.
To set html preview using external browser, you need to change setting for the two extensions:
- Quarto Preview: personally I prefer to use the build-in preview as it basically provides a live preview just like Markdown Preview Enhanced.
- Live Preview: set to external browser, as Live Preview is more often used to preview the whole website.
Q: How to open the User settings json file settings.json?
A: Follow the following steps:
- Open the Command Palette (either with F1 or Cmd+Shift+P)
- Type “open settings”
- You are presented with a few options, choose Open User Settings (JSON)
You can change setting using the UI or there is a settings.json file which saves all configurations.
VS Code includes a button, , in the Settings UI gutter which can be used to switch between JSON and graphical view. See the image below:
A faster way is to use the command:
- User preferences: Command Palette → “Preferences: Open User Settings (JSON)”
- Workspace preferences: Command Palette → “Preferences: Open Workspace Settings (JSON)”
- Keyboard shortcuts: Command Palette → “Preferences: Open Keyboard Shortcuts (JSON)”
Q: How to spell check code and document?
A: Use the extension Code Spell Checker. Put your cursor in the word, use Cmd+. to show suggestions and select.
Q: How to ignore unknown words?
A: Go to Settings (⌘,) → cSpell.diagnosticLevel → Choose Hint from the drop down menu.
Q: How to show my installed extensions?
A: By default, the Extensions view will show the extensions you currently have installed, and all extensions that are recommended for you. You can use the Extensions: Focus on Installed View command, to show the installed ones.
Q: Disable Enter to accept suggestions as this confuses inserting a new line.
A: Set Editor: Accept Suggestion On Enter to off.
Markdown
Markdown Preview Settings: https://code.visualstudio.com/docs/languages/markdown#_markdown-preview
Q: How to get a preview of Rmarkdown?
A: Open settings.json, add the following code inside the braces.
/* this adds additional file extensions to markdown */
"files.associations": {
    "*.Rmd": "markdown",
    "*.qmd": "markdown",
},
A drawback of this setting is that you cannot run codes inside the markdown files.
Q: How to get autocomplete, syntax highlighting in Markdown?
A: Install Latex Workshop by James Yu → Switch Language Mode from Markdown to markdown_latex_combined.
This will disable markdown preview! Therefore, not recommended. ❌
Use Markdown All in One extension instead. ✅
Markdown All in One
Markdown All in One provides many useful shortcuts for editing markdown files.
| Shortcut | Function |
|---|---|
cmd + B |
Toggle bold |
cmd + I |
Toggle italic |
Select text and cmd + V |
Insert link to selected text |
Q: How to change the language for the selected file?
A: In the status bar, click the language indicator. This will bring up the Select Language Mode dropdown where you can select another language for the current file.
Q: How to change Markdown preview security?
A: You can change what content is allowed in the Markdown preview by clicking on the popup or running the Markdown: Change preview security settings command in any Markdown file.
Visual Mode and Source Mode
Visual Mode has inline preview of eqns, and in time preview of your markdown, like in Typora.
Side-to-side preview can be slow and the previewer can crash for a large file. That’s where Visual Mode comes in handy.
I prefer Source Mode as I get full control of the markdown file.
Markdown Preview Enhanced
Q: How to define MathJax macros?
A: You can configure MathJax by running command Markdown Preview Enhanced: Open MathJax Config.
Q: How to set Math Rendering Engine?
A: Run command Markdown Preview Enhanced: Math Rendering Option.
References:
Q: How to enable automatic numbering for MathJax?
A: Run Open Config Script (will open config.js, a JavaScript configuration file), and add
mathjaxConfig: {
  tex: {
    tags: 'ams',
    "macros": {
        bold: ["{\\boldsymbol #1}", 1], // use \bold as a shorthand
        indep: "{\\perp \\!\\!\\! \\perp}",
        // bold face capital letter
        bA: "\\boldsymbol{A}",
    }
  }
};
to tell the TeX input processor to use the AMS numbering rules (where only certain environments produce numbered equations, as they would be in LaTeX, e.g., \begin{equation}).
You can use \notag or \nonumber to prevent individual equations from being numbered, and \tag{} can be used to override the usual equation number with your own symbol instead (or to add an equation tag even when automatic numbering is off).
You can also define your TeX macros in config.js.
File path: /Users/menghan/.local/state/crossnote/config.js
Q: How to use dark theme for Markdown Preview Enhanced (MPE)?
A: Run command Markdown Preview Enhanced: Preview Theme, choose github-dark.css.
Q: How to get separate preview for individual files?
A: MPE has one preview tab for all files by default. You can change this by going to preferences > Markdown Preview Enhanced > Preview Mode > Set to Multiple Previews. Restart VS Code to activate the setting.
Q: How to achieve markdown_in_html_blocks (pandoc extension) effects, i.e., markdown syntax is also rendered in html blocks?
A: MPE does not support markdown_in_html_blocks effects. A workaround is to put html tags inner and markdown syntax outside, for example:
**<span style='color:#00CC66'>html innter and markdown outer</span>**
will be rendered as
html innter and markdown outer
But the following will NOT work:
<span style='color:#00CC66'>**markdown innter and html outer**</span>
Only the markdown syntax will be rendered in this case.
Customize CSS
Q: How to add a custom CSS to MPE?
A: To customize CSS for your markdown file preview in VS Code, press cmd-shift-p and then run the Markdown Preview Enhanced: Customize CSS (Global) or Markdown Preview Enhanced: Customize CSS (Workspace) command.
The ~/.local/state/crossnote/style.less file will open, and you can override existing style like this:
.markdown-preview.markdown-preview {
  // please write your custom style here
  // eg:
  //  color: blue;          // change font color
  //  font-size: 14px;      // change font size

  // custom pdf output style
  @media print {
  }

  // custom prince pdf export style
  &.prince {
  }

  // custom presentation style
  .reveal .slides {
    // modify all slides
  }

  .slides > section:nth-child(1) {
    // this will modify `the first slide`
  }
}

.md-sidebar-toc.md-sidebar-toc {
  // sidebar TOC style
}
For custom defined CSS classes, you can add them here so that they can be applied in both preview and exported PDF.
When you have a new custom class, you need to add the style in the following places:
assets/css/style.scssfor the jekyll web support-
~/.local/state/crossnote/style.lessfor the Markdown Preview in VS Code and PDF export using MPE’s internal export menu.This will help MPE to render the custom class in the preview and exported PDF.
Outside of the
&.prince { ... }section, the style will be applied to the preview.In the
&.prince { ... }section, the style will be applied to the PDF exported using MPE’s internal export menu (which uses Prince as the PDF rendering engine). -
assets/css/markdown-pdf.scssfor PDF export using themarkdown-pdfextension.This will help the
markdown-pdfextension to render the custom class in the exported PDF. -
Optionally, you can also add the style in
assets/css/prince.cssfor PDF export using Prince CLI. ↩This will help the Prince CLI to render the custom class in the exported PDF.
Issue: When I export PDF using Prince, my Chinese punctuations are corrupted. They float on the top right corner of the line.
Fix: Use a font that supports both English and Chinese characters. For example, font-family: 'Noto Sans CJK SC'. See below for details.
-
Import KaTeX CSS for math rendering in Prince PDF export.
Prince does not support MathJax (javascript). Therefore, we need to use KaTeX CSS for math rendering in Prince PDF export.
-
Define custom classes
The colors are defined to have best effects in dark mode.
-
Use
&.prince { ... }section for Prince PDF export using MPE’s internal export menu.-
set
font-familyto support Chinese characters and punctuations.You have to use a font that supports both English and Chinese characters. Otherwise, Chinese punctuations will be corrupted (floating on the top right corner of the line) in the exported PDF.
-
set a darker color for the custom classes for better printing, i.e., white background.
Using the default green (set for dark mode) would be too light to read on paper.
-
/* Please visit the URL below for more information: */
/*   https://shd101wyy.github.io/markdown-preview-enhanced/#/customize-css */

/* Import KaTeX CSS for math rendering in Prince PDF */
@import url('https://cdn.jsdelivr.net/npm/katex@0.16.9/dist/katex.min.css');

.markdown-preview.markdown-preview {
  // modify your style here
  // eg: background-color: blue;

  // custom defined classes
  .env-green,
  .env-green>code,
  .env-green code {
    color: #C3E88D !important;
  }

  .env-orange,
  .env-orange>code,
  .env-orange code {
    color: #FF9900 !important;
  }

  /* Custom prince pdf export style */
  &.prince {
    // don't put font-family in any element, just define it explicitly here
    // 不要灵机一动改代码 😂
    font-family:
      // CJK fonts
      'PingFang SC',            // 标点都是对的
      // 以下字体 ok, 但是英文单引号好宽
      'Noto Sans CJK SC',       // 比较好看
      'WenQuanYi Micro Hei',    // 字体很窄
      'Microsoft YaHei',        // 微软雅黑
      sans-serif !important;

    .env-green,
    .env-green>code,
    .env-green code {
      // a darker green for Prince PDF
      color: #008B45 !important;
    }

    // Hide print-note class
    .print-note {
      display: none;
    }

    // hide top-link arrow
    .top-link.hide {
      display: none;
    }
  }
}
经试验,PingFang SC (苹果默认字体) 效果最好。可以永远相信苹果的审美。微软审美是垃圾,谷歌 just so so, 可以用。
Update (2026-02): Fix curly quotes being too wide issue.
This can be fixed by specifying a font that supports western curly quotes, such as Helvetica.
Here is the fix:
/* In style.less */
/* Fix wide curly quotes - use Western font for quote characters */
@font-face {
  font-family: "Quote Fix";
  src: local("Helvetica"), local("Arial"), local("sans-serif");
  unicode-range: U+2018-2019, U+201C-201D; /* ' ' " " */
}

.markdown-preview.markdown-preview {
  &.prince {
    // set font family to support Chinese and English characters
    body, p, div, span, li, td, th, h1, h2, h3, h4, h5, h6 {
      font-family:
      "Quote Fix",   // Apply fonts with Quote Fix for proper curly quote spacing
      'Noto Sans CJK SC',
      'PingFang SC',
      'WenQuanYi Micro Hei',
      'Microsoft YaHei',
      sans-serif !important;
    }
  }
}
ref: MPE Customize CSS
Math Macro Configuration
There is a global ~/.local/state/crossnote/config.js script that could be used to configure the Markdown Preview Enhanced extension.
config.js is mainly used to configure math rendering engines such as KaTeX and MathJax. You can define custom LaTeX macros and commands, set rendering options, and more.
It is in contrast to the style.less file, which is mainly used to customize the appearance (CSS) of the markdown preview and exported documents.
Open command palette (⇧⌘P), then run Markdown Preview Enhanced: Open Config Script (Global) command to open it.
- You can add your custom macros.
- You can add more configurations to this script. A list of available configurations can be found here.
Below is an example of the config.js script:
({
  katexConfig: {
    macros: {},
  },

  mathjaxConfig: {
    tex: {},
    options: {},
    loader: {},
  },

  mermaidConfig: {
    startOnLoad: false,
  },
});
Export as PDF
For E-reader
With MPE’s internal export feature, you can export your markdown file as PDF.
-
Need to install Prince XML first.
brew install --cask prince -
Open preview of your markdown file, hover over the bottom right corner, click the menu button.
Alternatively, right-click anywhere in the preview window to open the context menu.
-
Export > PDF (Prince)
To customize css, you can add your custom CSS in style.less under the &.prince { ... } section, which is specifically for Prince PDF export.
Refer to Customize CSS for more details.
Pros: This approach is fast. With TOC. ✅
Cons: 中文标点很奇怪。需要配置 MPE prince output, 用支持中英文的字体,比如 ‘Noto Sans CJK SC’。见上文。
Direct Export Using prince
Workflow:
-
Use MPE’s menu to generate an HTML file, e.g.,
input.html.Right-click in the preview window → Export → HTML (offline)
-
Use
princecommand in terminal to export PDF using your custom CSS. See below.
You can create a separate CSS file, e.g., assets/css/prince.css, and use it when exporting PDF using the prince command in terminal.
This approach does NOT reply on MPE’s internal PDF export menu, therefore you have full control of the output and can re-use it for other projects.
In terminal, navigate to the folder containing your markdown file, then run
prince input.html -o output.pdf \
  --style https://cdn.jsdelivr.net/npm/katex@0.16.9/dist/katex.min.css \
  --style ../assets/css/prince.css
It will look for input.html in the current folder, and generate output.pdf using the KaTex css (for math display) and your custom prince.css using a relative path.
The LONG command above can be wrapped into a shell script for easy re-use. For example, you can create a shell script, e.g., export-prince.sh, then in terminal, run
./export-prince.sh path/to/input.html
It will generate input.pdf in the same folder as the html file.
For printing
For best paper quality, you can use Markdown PDF (by yzane) extension to export PDF.
Open the .md file, go to command palette (⇧⌘P), type Markdown PDF: Export (pdf). Hit Enter.
It generates a PDF with support of more content format, e.g., block quotes, auto-inserting headers (title) and footers (page number), table typesetting, and contents more compact, but it is significantly slower. It has no TOC.
Pros: It is more compact then MPE + Prince.
Cons: Slow, does NOT support TOC, no native math support.
MPE + Prince is sufficient for most use cases. ✅
Equations in Markdown
If you have math in your markdown file, you need to add the following script in the markdown file to render math using MathJax.
<script type="text/javascript" src="http://cdn.mathjax.org/mathjax/latest/MathJax.js?config=TeX-AMS-MML_HTMLorMML"></script>
<script type="text/x-mathjax-config">
  MathJax.Hub.Config({ tex2jax: {inlineMath: [['$', '$']]}, messageStyle: "none" });
</script>
This is NOT elegent but it is a workaround if you want to print with the Markdown PDF extension.
One drawback is that you need Internet connection to make the mathjax configuration work.
You can change the CSS for the PDF output by adding a custom CSS file, e.g., markdown-pdf.css.
In the settings.json, add the following lines:
"markdown-pdf.stylesRelativePathFile": true,
"markdown-pdf.styles": [
    "../assets/css/markdown-pdf.css"
],
In the markdown-pdf.css file, you can add your custom classes, e.g., env-green and env-orange.
If you want a full control of the PDF output, you can use Quarto to render the markdown file to PDF.
Markdown+Math
https://marketplace.visualstudio.com/items?itemName=goessner.mdmath
Use KaTeX, which is supposedly a fast math renderer.
Function: Simplify the process of authoring and live previewing markdown documents containing math formulas.
Use: Typeset in your markdown source window and see the preview window live updating.
Define macros for mdmath
Option 1: use user settings
opt+, open preferences, add your macros directly there.
"mdmath.macros": {
        "\\indep": "{\\perp \\!\\!\\! \\perp}",
        "\\E": "\\mathbb{E}",
},
Option 2: save macros in a file and add the file path. The file take priority. That means the defined macros in option 1 will be ignored if a definition file exists.
Issue: This does not work somehow.
"mdmath.macroFile": "/Users/menghan/Documents/mac_setup/config_files/mdmath_macros.json",
After adding the macros in preferences, need to restart VS Code to enable them.
Quarto
You can install the Quarto extension from the VS Code Extension Marketplace.
But if you have associated .qmd with Markdown previewer as follows
"files.associations": {
   "*.Rmd": "markdown",
   "*.qmd": "markdown",
}
then it won’t be recognized by the Quarto extension and will be processed as a regular markdown file.
LaTeX-Workshop
LaTeX Workshop is a popular LaTeX extension for Visual Studio Code, providing a comprehensive set of features for LaTeX editing, compiling, and previewing. In the following, I summarize some useful settings and tips for using LaTeX Workshop effectively.
Refer to LaTeX Workshop for more details.
Project Template
Use the extension Project Templates to create a new project from a template and save your own project templates. This is useful for creating a new project with a predefined structure and files.
My custom project template:
- Conference Presentation
-
Nord Document
Document with Nord Logo in the header.
Use:
-
Project: Create Project from Templatecommand to create a new project from a template.Go to the directory where you want to create the new project, then run the command.
-
Project: Save Project As Templatecommand to save your current project as a template. -
Project: Open Template Foldercommand to open the folder where templates are stored.You can change the template files directly in this folder. Your changes will be reflected in the next project you create from this template.
macOS template directory:
$HOME/Library/Application Support/Code/User/ProjectTemplates
Code Spell Checker
Words not in the dictionary files will have a squiggly underline.
Its configuration starts with cSpell in settings.json.
In text-based documents like .md and .qmd files, the spell checker checks all words. In code-based documents like .py and .R files, the spell checker only checks strings and comments.
Q: How to let cSpell ignore certain environments, such as code and math?
A: Add the following to your settings.json file:
// Configure spell checker to ignore certain patterns
"cSpell.ignoreRegExpList": [
  "/```[\\s\\S]*?```/g",  // Ignores fenced code blocks (```)
  "/`[^`\\r\\n]*`/g",     // Ignores inline code (`)
  "/@\\w+/g",             // Ignores @ mentions (like @username)
  "/\\$\\$[\\s\\S]*?\\$\\$/g", // Block LaTeX math ($$...$$)
  "/\\$[^$\\r\\n]*\\$/g"  // Inline LaTeX math ($...$)
]
- The key is that the inline code config comes before the LaTeX patterns. This way, cSpell will first ignore anything in backticks, so
$HOME(environment variable) inside backticks is not seen as LaTeX math.
Customization
The spell checker configuration can be controlled via VS Code preferences or cspell.json configuration file. ↩
Order of precedence:
- Workspace Folder
cspell.json - Workspace Folder
.vscode/cspell.json - VS Code Preferences
cSpellsection.
Words added to the dictionary are placed in the cspell.json file in the workspace folder. Note, the settings in cspell.json will override the equivalent cSpell settings in VS Code’s settings.json.
Example cspell.json file
// cSpell Settings
{
    // Version of the setting file. Always 0.2
    "version": "0.2",

    // language locale - current active spelling language
    // "en", "en-US" and "en-GB" are currently supported by default.
    "language": "en-GB",

    // words - list of words to be always considered correct
    "words": ["mkdirp", "tsmerge", "githubusercontent", "streetsidesoftware", "vsmarketplacebadge", "visualstudio"],

    // flagWords - list of words to be always considered incorrect
    // This is useful for offensive words and common spelling errors.
    // For example "hte" should be "the"
    "flagWords": ["hte"]
}
VS Code settings (settings.json)
//-------- Code Spell Checker Configuration --------
// The Language locale to use when spell checking.
// "en", "en-US" and "en-GB" are currently supported by default.
"cSpell.language": "en",
Note that when you specify language, the element names are different in cspell.json and settings.json.
languageincspell.jsoncSpell.languageinsettings.json
The one in cspell.json has higher priority if you specified at both files.
Comments (26-01): The specification in cspell.json seems not to work as expected. The spell checker still uses the language specified in settings.json even if you have specified a different language in cspell.json.
Foreign language support
Here is an example of how to enable Norwegian Bokmål spell checking in VS Code using the Code Spell Checker extension:
-
Install Norwegian Bokmål – Norwegian Bokmål dictionary extension for VS Code.
-
Adding
nbto thecSpell.languagesetting, will enable the Norwegian Bokmål dictionary.Add the following to your
settings.jsonfile to enable both English and Norwegian Bokmål spell checking:"cSpell.language": "en,nb",
British English
Install the extension Code Spell Checker - English (British)
Then, add the following to your workspace settings.json file:
"cSpell.language": "en-GB",
This would enable British English spell checking.
Verify if the language is set correctly by go to Command Palette (⇧⌘P) → Spell: Show Spell Checker Configuration Info, a side panel will open showing the current configuration.
If it does not show en-GB, make sure you have used the correct workspace settings.json file. Sometimes you may have nested project folders, VS Code only recognizes the root folder’s workspace settings.
Enable CSpell ONLY for certain file types
Q: Code Spell Checker does not check files that are in gitignore. How to fix?
A: Set "cSpell.useGitignore": false in settings.json.
Q: How to only enable spell checking for certain file types?
A: Add the following to your settings.json file:
"cSpell.enabledFileTypes": {
  "*": true,         // Enable for all file types
  "bibtex": false    // Disable for bibtex files
},
File type * means all file types.
The above configuration enables spell checking for all file types except for bibtex files.
Alternatively, you can prefix a file type with ! to disable it, as shown below:
"cSpell.enabledFileTypes": {
  *,
  !bibtex
},
A caveat is that * covers too comprehensively, but script files such as .py, .r, etc. should be excluded.
✅ Hence, it is suggested to enable spell checking individually for certain file types;
"cSpell.enabledFileTypes": {
  "rmd": true,
  "markdown": true,
  "plaintext": true,
  "text": true,
  "quarto": true,
  "qmd": true,
  "json": true,
  "bibtex": false           // Disable for bibtex files
},
If any file shows CSpell check squiggles undesirably, you can disable it by adding the file type to the list with value false.
ref: CSpell Enabled File Types
IntelliSense
IntelliSense is a general term for various code editing features including: code completion, parameter info, quick info, and member lists. IntelliSense features are sometimes called by other names such as “code completion”, “content assist”, and “code hinting.”
The inferred symbols are presented first, followed by the global identifiers (indicated by the abc word icon).
The editor supports tab completion, which inserts the best matching completion when pressing Tab.
Settings
// Controls if quick suggestions should show up while typing
"editor.quickSuggestions": {
    "other": true,
    "comments": false,
    "strings": false
},
Types of completions
| Icon | Name | Symbol type |
|---|---|---|
| Methods and Functions | method, function, constructor |
|
| Variables | variable |
|
| Structures | struct |
|
| Fields | field |
|
| Type parameters | typeParameter |
|
| Constants | constant |
|
| Classes | class |
|
| Interfaces | interface |
|
| Events | event |
|
| Operators | operator |
|
| Modules | module |
|
| Properties and Attributes | property |
|
| Enumerations | enum |
|
| Enumeration members | enumMember |
|
| References | reference |
|
| Keywords | keyword |
|
| Files | file |
|
| Folders | folder |
|
| Colors | color |
|
| Unit | unit |
|
| Snippet prefixes | snippet |
|
| Words | text |
ref:
Terminal Autocomplete
Enable autocompletion
Q: How to enable code autocomplettion in the terminal?
A: Set "terminal.integrated.suggest.enabled": true in settings.json. It supports suggestions for files, folders, commands, command arguments and options in the terminal.
// Enable command autocompletion, path, command help in Terminal
"terminal.integrated.suggest.enabled": true,
"terminal.integrated.shellIntegration.enabled": true,
"terminal.integrated.shellIntegration.enabled": true,: the shell integration script should automatically activate on supported shells launched from VS Code. This is done by injecting arguments and/or environment variables when the shell session launches.
Remap keybindings for triggering suggestions
Manually trigger the code suggestions: defaults to ⌃Space. But it conflicts with other keyboard shortcuts at the OS level, such as default Input Method Editor (IME).
If so, you can rebind the workbench.action.terminal.triggerSuggest command with a custom keybinding (go to the Command Palette (⇧⌘P), and type “Preferences: Open Keyboard Shortcuts”).
// keybindings.json
{
  "key": "tab",
  "command": "workbench.action.terminal.triggerSuggest",
  "when": "config.terminal.integrated.suggest.enabled && terminalFocus && terminalProcessSupported && !terminalSuggestWidgetVisible"
}
 This sets the Terminal inline autocomplete trigger to Tab.
Use arrow keys to navigate through suggestions, and press Enter to accept.
This sets the Terminal inline autocomplete trigger to Tab.
Use arrow keys to navigate through suggestions, and press Enter to accept.
You have to make sure that you delete the original keybinding for
"workbench.action.terminal.triggerSuggest"inkeybindings.jsonto avoid conflict.My experience is that if both exist, when I presee ⌃Space (intended to change input method), the input method struggles to switch, sometimes it works, sometimes it does NOT. I had to switch to another app and then switch back to VS Code to make it work again.
Suggest as you type
The default behavior in VS Code is that you need to manually trigger the code suggestions by pressing Ctrl + Space or Tab (if you have modified the keybindings as above).
If you want to enable automatic suggestions as you type, you can add the following to setting.json:
// show automatically depending on the content of the command line
"terminal.integrated.suggest.quickSuggestions": true
Read HERE for more settings about IntelliSense support in the terminal.
Alternative autocomplete extensions in the terminal:
🔥 Zsh autocomplete is more powerful than IntelliSense.
Install the following extensions:
The candidate suggestions show either as inline ghost text or in a suggestion widget below the command line.
- Ghost text: Hit → to accept the inline suggestion.
- Suggestion widget: Use arrow keys (↑/↓/←/→) to navigate through the suggestion widget and hit Enter to accept the suggestion.
In R terminal (Radian), use ↑/↓ to navigate through the autocomplete suggestions, use → to select the suggestion.
Terminal Appearance
The look of Visual Studio Code’s terminal can be customized extensively.
Settings to customize terminal appearance start with terminal.integrated..
Color customizations can be done via workbench.colorCustomizations setting.
Here is a useful theme generator for VS Code Terminal. It modifies your "workbench.colorCustomizations" in settings.json.
For example, the following code customizes the background and text color of the terminal:
"workbench.colorCustomizations" : {
  "terminal.background":"#181818",
  "terminal.foreground":"#D8D8D8",
}
GitHub Copilot
GitHub Copilot is the AI assistant in VS Code that helps you write code faster and with less effort. It provides code suggestions, autocompletes lines or entire functions, and even generates code based on comments or function names.
Commonly used keyboard shortcuts:
- Open chat view:
^⌘I - Start inline chat:
^I(modified from⌘Ito avoid conflict with italic style)
Code Completion
- github.copilot.enable - enable or disable inline completions for all or specific languages.
- editor.inlineSuggest.fontFamily - configure the font for the inline completions.
- editor.inlineSuggest.showToolbar - enable or disable the toolbar that appears for inline completions.
- editor.inlineSuggest.syntaxHighlightingEnabled - enable or disable syntax highlighting for inline completions.
Q: How does inline suggestions work?
A: As you type, GitHub Copilot generates code suggestions in real-time, displaying them as ghost text directly in your editor. You can accept the suggestions by pressing Tab (accept all) or Cmd + RightArrow (accept next word), or you can ignore them and continue typing.
Q: How to partially accept suggestions?
A: You might not want to accept an entire suggestion from GitHub Copilot. You can use
-
⌘→to accept the next word of a suggestion, and -
⌘]to accept the next line.Does NOT work; conflict with system indent.
-
Re-mapped to
Alt+]to accept the next line.My current
keybindings.jsoncontains:// Accept Next Line from GitHub Copilot inline suggestion { "key": "alt+]", "command": "editor.action.inlineSuggest.acceptNextLine", "when": "editorTextFocus && inlineSuggestionVisible" }Now you can use ⌥+] to accept the next line from GitHub Copilot inline suggestion.
Or you can hover the ghost text, a dialog (see below) will apear, click … to Accpet Line.

Q: How to see alternative suggestions?
A: For any given input, Copilot might offer multiple, alternative suggestions. You can hover over the suggestion and click < or > to navigate to any of the other suggestions. Keyboard shortcut: Option + ] to cycle through suggestions.
Q: How to make inline suggestions (ghost text) automatically disappear after a delay if you don’t accept them?
A: No native support for this feature yet.
Q: ESC which is both used for closing inline suggestions and for entering command mode in Vim, how to avoid conflict?
A: You can change the keybinding for inline suggestions.
{
  "key": "ctrl+u",
  "command": "editor.action.inlineSuggest.hide",
  "when": "editorTextFocus && inlineSuggestionVisible && vim.mode == 'Insert'"
}
This will allow you to use Ctrl + U to close inline suggestions while still using Esc for command mode in Vim.
But, you can just keep on typing to dismiss the inline suggestion. It’s not really necessary to close it manually.
Next Edit Suggestion
Copilot next edit suggestions (Copilot NES) is a feature that provides suggestions for the next edit you might want to make in your code.
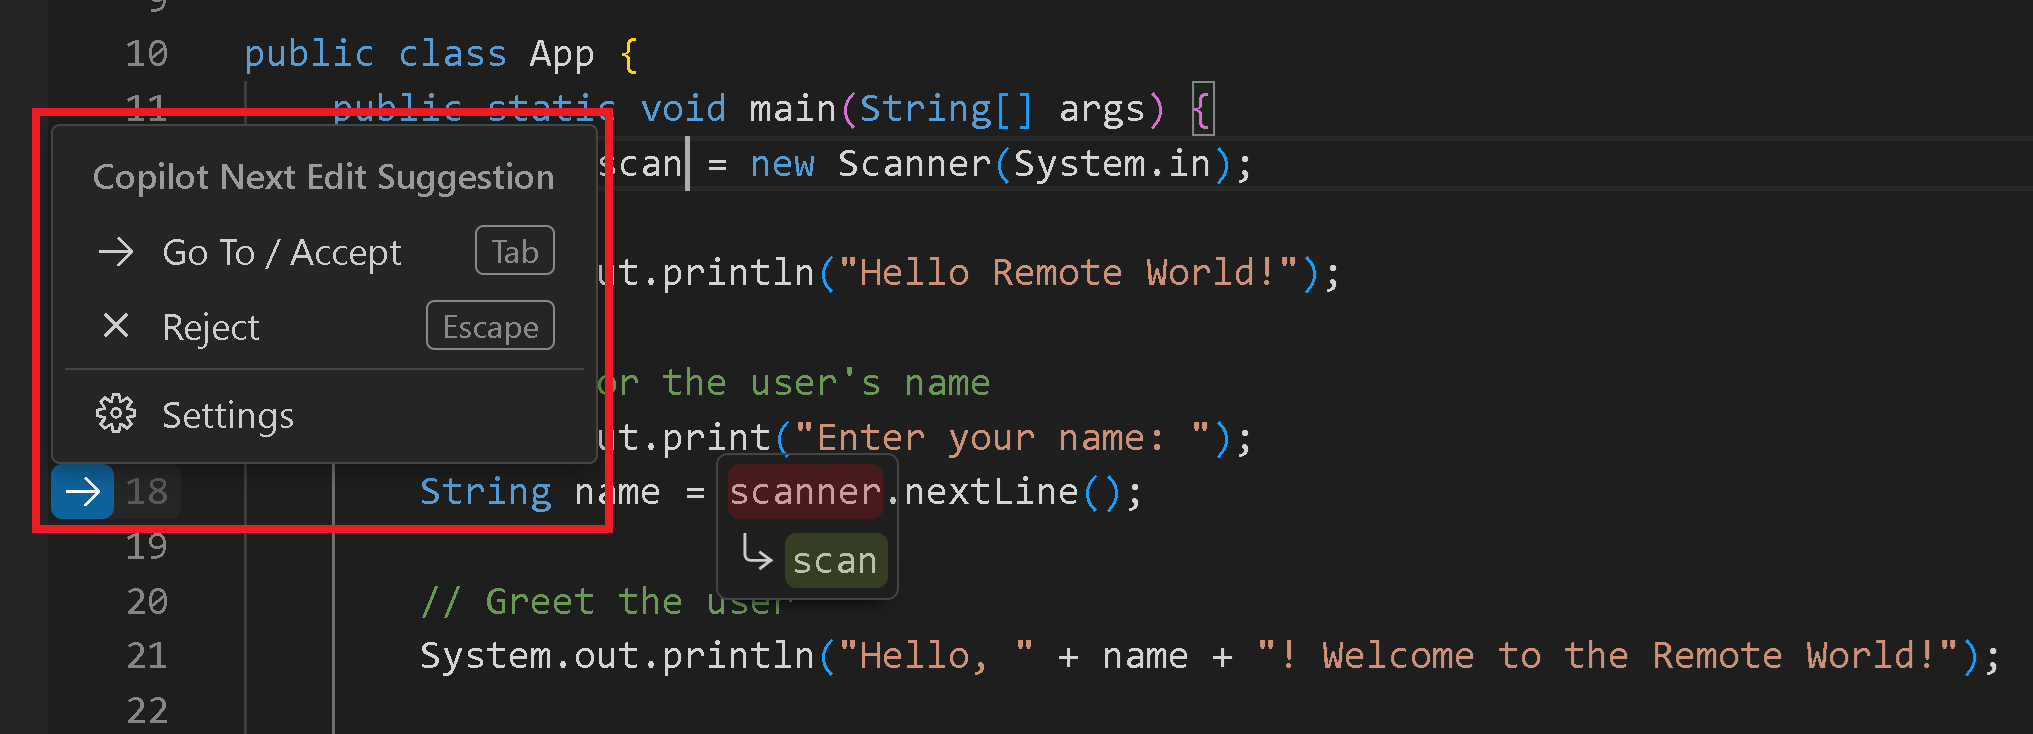
- Navigate to the Next suggested code changes with the
Tabkey.- You can then accept a suggestion with the
Tabkey again.
- You can then accept a suggestion with the
- An arrow in the gutter indicates if there is an edit suggestion available.
You can hover over the arrow to explore the edit suggestion menu, which includes keyboard shortcuts and settings configuration:
Q: How to reduce districtions by edit suggestions?
A: To disable showing the code changes in the editor, enable the editor.inlineSuggest.edits.showCollapsed setting in the Settings editor.
Prvent Enter from Submitting
Q: In chat window, set Enter to line break and Shift + Enter to submit.
A: Add the following settings to keybindings.json (Command Palette, type “Preferences: Open Keyboard Shortcuts”):
{
    "key": "shift+enter",
    "command": "workbench.action.chat.submit",
    "when": "inChatInput"
},
{
    "key": "enter",
    "command": "-workbench.action.chat.submit",
    "when": "inChatInput"
},
{
    "key": "enter",
    "command": "editor.action.insertLineAfter",
    "when": "inChatInput"
}
- before workbench.action.chat.submit means to remove the original keybinding for Enter.
The leading – means unbinding.
To summarize the Enter behavior:
- Enter now creates a new line in GitHub Copilot Chat
- Shift+Enter submits your message
VPN Settings
When you are behind a VPN, you might encounter issues with GitHub Copilot. To fix this, you can configure the proxy settings in VS Code.
Add the following to your workspace settings.json file:
/* VPN Settings */
// Set up a proxy server for Visual Studio Code to use
//  when making HTTP requests.
//  This is for GitHub Copilot to work behind a proxy.
//  Otherwise, it will fail to connect to the Copilot service.

"http.proxy": "http://127.0.0.1:7890",
"http.proxyStrictSSL": false,
"http.proxySupport": "on",
Somehow, it just does not work if the settings are added to the user settings.json file. You have to add it to the workspace settings.json file. 🤔
Replace http.proxy with your actual proxy server address and port.
AI Modes
Explain different modes of Github Copilot:
- Agent Mode 🤖
- Complex, multi-step tasks that require planning and coordination
- Tasks that span multiple files or require understanding project structure
- When you need systematic problem-solving with multiple tool invocations
- Research and analysis tasks that require gathering information from various sources
- Edit Mode ✏️
- Direct code modifications and quick fixes
- When you know exactly what needs to be changed
- Focused, single-purpose edits
- Implementing specific functionality or bug fixes
- Ask Mode 💬
- Learning and understanding concepts
- No code modifications
- Educational and consultative
Choose AI Correct Model
| Model type | Models |
|---|---|
| Fast coding | GPT-4o Claude Sonnet 3.5 Claude Sonnet 3.7 Gemini 2.0 Flash |
| Reasoning/planning | Claude Sonnet 3.7 Thinking o1 o3-mini |
There come limits with your subscription plan. So it’s important to optimize model selection to balance performance and cost. Auto selects the best model to ensure that you get the optimal performance and reduce the likelihood of rate limits.
When using auto model selection, VS Code uses a variable, model multiplier, e.g., 1x or 0x after model names based on the automatically selected model. If you are a paid user, auto applies a 10% request discount. For example, if auto selects Sonnet 4, it will be counted as 0.9x of a premium request; if auto selects GPT-5-mini, this counts as 0x because the model is included for paid users. You can see which model and model multiplier are used by hovering over the chat response.
If you are a paid user and run out of premium requests, auto will always choose a 0x model (for example, GPT-5 mini), so you can continue using auto without interruption.
Miscellaneous
Q: How to delete chat histories?
A: When you have a long chat, Copilot takes time to load the conversation history and might get slow. Deleting the history helps Copilot to have quick reactions. In the chat window, click the icon, it will show history chats in the command palette. You can delete any chats from there.
Chat histories are stored in /Users/menghan/Library/Application Support/Code/User/workspaceStorage/[long-serial-number...]/chatSessions
Update: Jan 2026 (version 1.108), you can now right click the chat session in the sidebar to delete it directly.
GitLens
Inline Blame
Inline blame will show a ghost text at the end of the current line indicating who make the last change and the current status of the line.
Q: How to disable inline blame?
A: Open Settings and type GitLens: Current Line, uncheck the Enabled box.
ref: Turn off git blame timeline
The following shows a GitLens Gutter Blame.
Gutter/File Blame displays blame information in the gutter (the area to the left of your code), providing a way to see who last modified a line, when, and in which commit.
Type GitLens: Toggle File Blame in the Command Palette (⇧⌘P) to enable/disable it.
Q: How to remove GitLens’ toolbar in the open editor panel?
A: Set the following in the settings.json file:
"gitlens.menus": {
    "editorGroup": {
        "blame": false,
        "compare": false
    }
},
Restore to Previous Revision
Sidebar > GitLens Inspect > File History, all previous revisions of the file will be listed.
Find the version you want to restore to. You can open them to view or compare with the current version.
Right click the version you want to restore to, you have two options:
-
“Restore Changes (Checkout)” is equivalent to performing a
git checkout <commit-id> <file-path>orgit restore --source=<commit-id> <file-path>command. It specifically targets a file and restores its content to the state it was in at a particular commit. This is useful when you want to revert a single file to an earlier version without affecting other files or your current branch. -
“Restore Previous Changes” leverages VS Code’s internal file history tracking, which can be useful for recovering lost work or reverting uncommitted changes. This is distinct from Git’s version control and operates on the local file system’s history.
Ref:
SQL Server (MSSQL)
FactSet: Connect to Azure SQL with Microsoft Entra authentication and SqlClient
FactSet uses Microsoft Entra ID as the authentication type. Microsoft Entra ID is previously known as Azure Active Directory (Azure AD)
Microsoft Entra authentication uses identities in Microsoft Entra ID to access data sources such as Azure SQL Database.
Active Directory Interactive authentication supports multifactor authentication technology to connect to Azure SQL data sources. If you provide this authentication mode in the connection string, an Azure authentication screen appears and asks the user to enter valid credentials. You can’t specify the password in the connection string.
Issue: cannot run SQL notebook as in Azure Data Studio
Q: How to pad line with dashes until 80 characters long. A: No quick fix. Can use vim to do this.
- Select the lines you want to pad.
-
Press
:to enter the command-line mode and type.:'<,'>normal 80A-<Esc>81|dwCommand breakdown:
:'<,'>: Selects the current visual selection.normal: Enters normal mode for the selected lines.80A-: Appends at the end of the line a dash (-) 80 times<Esc>: Exits insert mode.81|dw: Moves the cursor to the column 81 (81|) and deletes the rest of the line (dw, delete until the beginning of next word; dashes count as one word).
Note that
:normis a shorthand for:normal, which allows you to run normal mode commands on the selected lines. - Press
Enterto execute the command.
ref:
Jupyter Notebook
Q: How to enable word auto wrap in cell output?
A: Add the following to settings.json:
"notebook.output.wordWrap": true
Q: How to stop a Kernel?
A: When I click “X” of a notebook, it only closes the notebook but does not stop the kernel. To stop the kernel, you can use the Jupyter PowerToys extension. Click the trash bin icon to stop the kernel.
Refs:
- R Notes: Jupyter Notebook for more tips on using Jupyter Notebook in VS Code.
- Python Jupyter Notebook: Jupyter notebooks vs. Python scripts
FAQ
Q: How to share scripts among multiple projects in one solution? For instance, mathjax config file?
A: I put them in a common folder, e.g., /Users/menghan/Library/CloudStorage/OneDrive-Norduniversitet/_shared-resources, and then use relative file path to reference them in different projects.
filters:
  - ../../_shared-resources/filters/color-text.lua
  - ../../_shared-resources/filters/unlisted-sections.lua
  - ../../_shared-resources/filters/nested-ordered-list.lua
format:
  pdf:
    include-in-header: ../../_shared-resources/latex/preamble.tex
    fontsize: 12pt
Q: The terminal shows a yellow warning as follows, how to disable it?
The following extensions want to relaunch the terminal to contribute to its environment:
Python Debugger: Enables use of no-config debugging, debugpy
, in the terminal.
A: This warning appears because the Python Debugger extension wants to modify the terminal environment. Open settings.json, add the following line to disable it:
"python.terminal.activateEnvironment": false
Q: How to disable cursor from blinking?
A: Set the following in settings.json:
"editor.cursorBlinking": "solid",
"editor.cursorBlinking" controls the cursor animation style. Possible values are:
blink: The cursor blinks. Default behavior.smooth: The cursor fades in and out smoothly.phase: The cursor fades in and out in phases.expand: The cursor expands and contracts.solid: The cursor does not blink.
Q: How to disable VS Code auto update?
A: Open settings.json, add the following line to disable auto update:
"update.mode": "none",
-
default: Enable automatic update checks. Code will check for updates automatically and periodically.This can be annoying as VS Code updates frequently and if a new version is released, the gear icon will show a blue dot indicating that an update is available…
-
manual: Disable automatic background update checks. Updates will be available if you manually check for updates.You can check for updates by going to the menu bar
Code>Check for Updates... none: Disable all update checks.start: Check for updates only on startup. Disable automatic background update checks.
Q: When I type ⇧⌥A to insert “Å”, it inserts block comment instead. How to fix?
A: Disable the keybinding for block comment:
{
  "key": "shift+alt+a",
  "command": "-editor.action.blockComment",
  "when": "editorTextFocus && !editorReadonly"
}
Q: I set auto rendering in my my Quarto file, but it is rendered too frequently. How to make it render only when I save the file?
A: In settings.json, set the following:
"files.autoSave": "onFocusChange"
"quarto.renderOnSave": true,
Options for files.autoSave:
| Value | Behavior |
|---|---|
"off" |
Never auto-saves (manual Cmd+S only) |
"onFocusChange" |
Saves when you click away from the editor |
"onWindowChange" |
Saves when you switch away from the VS Code window |
"afterDelay" |
Saves after a set delay (e.g. 1000ms) |
Q: Can’t see last character of highlighted search result. ↩
A: Set "editor.findMatchBackground": "#00000000",. This will make the background of the search match transparent, allowing you to see the last character clearly.
Q: How to disable the new “modal window” when you open preferences?
A: Set the following in settings.json:
"workbench.editor.useModal": "off"