New Mac Setup
OS Settings
-
Trackpad
-
Tab to Click
System Preferences > Trackpad > Point & Click tab > check “Tap to click”
-
Three Finger Drag
-
-
Magic Mouse
Issue: Tracking speed too slow even at max setting.
Fix: usedefaults read -g com.apple.mouse.scalingto check current speed; should be 3 default. You can specify to a higher value, e.g., 5, by using the following cmd:defaults write -g com.apple.mouse.scaling 5Then log out and log back in to take effect.
-
Scroll bar: show when scrolling
System Preferences > General > check “Show scroll bars: When scrolling”
I like this setting because the Finder will look less cluttered. Otherwise, there will be obnoxious grey columns of scroll bars in the Finder windows.
-
Finder
-
Use column view as default
Open Finder > View > Show View Options > select “Always open in column view”.
-
-
Disable auto startup when opening the lid ↩
Apple silicon Macs automatically start up when you open the lid or connect them to power, but you can disable this behavior
# Orevent startup when opening the lid OR connecting to power.
sudo nvram BootPreference=%00

# Prevent startup only when opening the lid
sudo nvram BootPreference=%01

# Prevent startup only when connecting to power
sudo nvram BootPreference=%02

# To restore the default behavior and re-enable automatic startup
sudo nvram -d BootPreference
Programming Tools
-
Install Homebrew: tool to install software on mac
-
Git: version control
brew install git -
Visual Studio Code: powerful editor
-
Xcode Command Line Tools
Some OS comes with Xcode pre-installed, check if you have it:
xcode-select -pIf you see a path like
/Library/Developer/CommandLineTools, you have it installed.If you don’t have it, you can install it with:
xcode-select --install -
Terminal syntax highlighting for Zsh shell. 打造赏心悦目的终端界面 😎
Oh My Zsh: a popular framework for managing Zsh configuration. It comes with a lot of plugins and themes to customize your terminal.
Refer to Oh My Zsh for installation and configuration.
-
Warp Terminal: a modern terminal app for Mac. It is more flexible and user-friendly than the default Terminal app. Support AI features.
-
treefor generating directory tree in terminal. Install with Homebrew:brew install treeGo to the directory you want to generate the tree for, and run:
# Limit the depth of the tree to 2 levels
tree -L 2

# Show all files, including hidden ones
tree -a

# Show folder only
tree -d

# Ignore certain files or directories, e.g., .git and node_modules
tree -I '.git|node_modules'
SuperCharge provides a right-click menu to copy the directory tree.
OS Productivity Tools
-
iBar: Rescue your cluttered menu bar
As of Tahoe 26, macOS provides native support to hide menu bar icons.
-
Alfred: productivity app to replace Spotlight and more
-
Rectangle: Window management
-
CapsLock: Keyboard shortcut
-
AltTab: App switching
It support selecting windows of the same app. Each window has its own preview thumbnail.
-
CleanShot X
: $30 one-time purchase; 30% discount for students with valid .edu email.
It has higher resolution and more features than the default macOS screenshot tool.
Download the free version from Xclient
-
Record shortcuts for screen recording:
- Capture Area: ⌃⌘A
- Capture Window: ⌃⌘W
If the keyboard shortcuts suddenly stop working, restart CleanShot.
Note: These shortcuts conflict with WeChat’s shortcuts. Just remove all conflicting shortcuts in WeChat settings to avoid the conflict.
-
Hide Wallpaper when capture Window
Preferences > Wallpaper > Window screenshots > Choose “Transparent”
You can adjusting “Padding” to reduce the extra space around the window. I like to set it a bit smaller than the default.
You can remove all paddings by sliding to the leftmost position and uncheck “Include window shadow” as follows:
A sideeffect of this is that the screenshot will be cropped without radius and the boarders are removed as well. It looks less pretty when you are used to the default macOS style.
-
Open Annotate tool directly after taking screenshot:
Preferences > General > After capture > check “Open Annotate tool”
-
Overlay Thumbnail
I like to disable this feature because it is distracting.
This way, after taking a screenshot, the annotation window will open directly without showing the thumbnail overlay. You can add annotations, save, or ⌘W to close the window if you want to discard the screenshot.
-
Change border radius for screenshot
MacOS uses a round corner design for windows, but the screenshot by default will have right angle corners. You can change the border radius to make it look more consistent with the macOS style.
Select the Background tool
 > Use the slider for “Corners” to adjust the border radius.
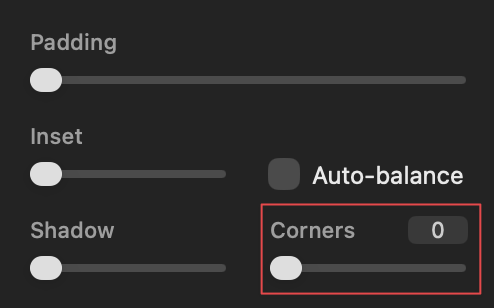
Here is a nice tutorial on CleanShot main features.
-
Office Software
-
Follow instruction HERE to install LaTeX tools.
Bibtex reference manager:
-
Mendeley: easy to start with but lacks flexibility. No dark mode.
OK for basic use.
-
Zotero: powerful and flexible; need some time to learn the features; recommended for seasoned LaTeX users. ↩
- can import directly from Mendeley; will keep your original library collections. 👍
- support dark mode;
-
Safari extension: automatically installed with the app but you need to enable it in Safari settings;
It is supported by Zotero Connector, which can also be installed in Chrome and Firefox.
-
JabRef: cannot open it after installation. ❌
-
-
Just install the Microsoft 365 Office suite. It includes Word, Excel, PowerPoint, OneNote, Outlook, and more. So you don’t need to install them separately.
Miscellaneous
-
f.lux: turn screen warmer at night 暖黄色屏幕护眼
-
BetterDisplay
: Free version is sufficient for most users; buy the Pro version to unlock advanced features. [穷鬼 app 🤪]
Flexible HiDPI scaling; useful for 2K external monitors that do not support Retina resolution.
Turn on HiDPI mode by clicking the menu bar icon > Click “High Resolution (HiDPI)”.
💡 It helps to a certain degree; remember, it is only a marginal improvement over non-Retina monitors. To get the best display quality, invest in a 4K monitor if you have 💰.
In short, 有用但不大。还行吧,比没有强。🤣
- VLC video player
- AppCleaner: uninstall apps completely, including config files
-
Itsycal: calendar in menu bar; good integration with Mac native Calendar app
-
Background Music: per-app volume control.
The mic icon in the menu bar will be highlighted, which I think is disturbing.
FAQ
Q: I installed zsh-syntax-highlighting via Homebrew, but Oh My Zsh cannot find it. What should I do?
A: If you installed zsh-syntax-highlighting via Homebrew, you might see an error like this when you start your terminal:
# Install via Homebrew
brew install zsh-syntax-highlighting

[oh-my-zsh] plugin 'zsh-syntax-highlighting' not found
Note that if you use Homebrew to install it, the plugin will be installed in the Homebrew directory, and Oh My Zsh won’t be able to find it automatically.
Homebrew usually installs packages in /usr/local/opt/ (Intel Macs) or /opt/homebrew/opt/ (Apple Silicon Macs). You can find the exact path by running:
brew --prefix zsh-syntax-highlighting
Oh My Zsh only looks for plugins in its own plugin directories:
~/.oh-my-zsh/plugins/
~/.oh-my-zsh/custom/plugins/
To fix this, two options:
-
If you decide to install with Homebrew, you need extra configuration by addting the plugin path to your
~/.zshrcfile. ↩# Add this line to your ~/.zshrc file source $(brew --prefix)/share/zsh-syntax-highlighting/zsh-syntax-highlighting.zsh手动管理太麻烦了。
-
“Pure” Oh My Zsh approach ✅
Install
zsh-syntax-highlightingby cloning the GitHub repository directly into the Oh My Zsh plugin directory, as described above.
Ref