3.11 Rmd GitHub Pages
The rmarkdown package had provided a simple site generator that did not rely on a third-party site generator like Hugo. If you feel Hugo is too complex for you, and you only want to build a few Rmd documents into a website, this built-in site generator may be a good choice.
Stage-commit-push many files
Use the Terminal
git add .to “stage” all the files that I want to commit as that’s quicker than clicking on all the files often that I want to commit.Go to RStudio
Commit Pending changesicon (the white docs icon with a tick in a Git pane) to write the commit as I findgit commit -m "Write your message here"a bit too long!Use the Push and Pull buttons in RStudio as that’s easier than typing
git pushorgit pullin the terminal.
Project structure
Note that the minimum requirement for any R Markdown website is that it has an index.Rmd file and a _site.yml file.
_site.ymlprovides the global YAML header for the siteindex.Rmdprovides the content for the home page of your website.
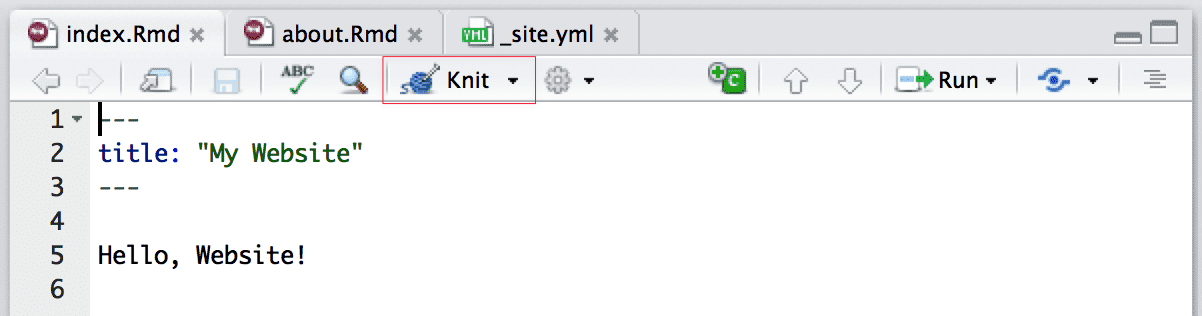
Figure 3.11: Minimal example of a R Markdown website.
If you run rmarkdown::render_site() (which is the function triggered by the “Knit” button) from within the directory containing the website, the following will occur:
All of the
*.Rmdand*.mdfiles in the root website directory will be rendered into HTML. Note, however, that Markdown files beginning with_are not rendered (this is a convention to designate files that are to be included by top level Rmd documents as child documents).index.Rmdcontrols the content on your main page.
The generated HTML files and any supporting files (e.g., CSS and JavaScript) are copied into an output directory (
_siteby default, on Github Pages the output folder isdocs).The HTML files within the output directory are now ready to deploy as a standalone static website.
_site.yml config
_site.yml is a site configuration file. It provides the global YAML header for the site.
It contains various common elements you want to apply to all pages (e.g., output options, CSS styles, header and footer elements, etc.).
_site.yml is equivalent to the combination of _output.yml and _bookdown.yml in bookdown.
A _site.yml example:
name: "my-website"
output_dir: "docs"
include: ["import.R"]
exclude: ["docs.txt", "*.csv"]
output:
  html_document:
    theme: cosmo
    highlight: textmate
    include:
      after_body: footer.html
css: styles.cssnameprovides a suggested URL path for your website when it is published (by default this is just the name of the directory containing the site).output_dirfield indicates which directory to copy site content into."_site"is the default if none is specified.It can be
"."to keep all content within the root website directory alongside the source code.
The
includeandexcludefields enable you to override the default behavior vis-à-vis what files are copied into the output directory.By default, all files within the website directory are copied into the output directory (e.g.
_site) except for the following:- Files beginning with
"."(hidden files). - Files beginning with
"_" - Files known to contain R source code (e.g.
".R",".s",".Rmd"), R data (e.g.".RData",".rds"), or configuration data (e.g."rsconnect","packrat","renv")).
The
includeandexcludefields of_site.ymlcan be used to override this default behavior (wildcards can be used to specify groups of files to be included or excluded). Note that theincludeandexcludefields target only top-level files and directories (i.e. a directory is either included or not, you can’t exclude a subset of files within a directory).Note also that
includeandexcludeare not used to determine which Rmd files are rendered (all of them in the root directory save for those named with the_prefix will be rendered).- Files beginning with
outputdefines shared output options for all R Markdown documents within a site.Note that individual documents can also include their own output options, which will be merged with the common options at render time.
include:

   after-body: footer.html
An example of
footer.thml:style.cssis a CSS stylesheet.
index.Rmd
index.Rmd provides the content for the home page of your website.
A parsimonious example of index.Rmd which only includes the website title. This is useful if your home page only includes simple text.
A full example of index.Rmd. You may use this when you want to write complex content in your home page.
---
title: "R Notes"
author: "Menghan Yuan"
date: "2025-06-17"
site: rmarkdown::default_site
documentclass: book
bibliography: [book.bib, packages.bib]
biblio-style: apalike
link-citations: yes
description: "This is a minimal example of using
  the rmarkdown to write a book."
---
rmarkdown::default_site() is the default site generation function. It is also possible to define a custom site generator that has alternate behaviors, e.g., bookdown::bookdown_site.
Note that index.Rmd in the rmarkdown build-in site generator is different than that of bookdown.
In bookdown sites, you can specify global YAML that will apply to all pages in the website, but in the rmarkdown built-in site generator, each page has its own YAML.
rmakrdown |
bookdown |
|
|---|---|---|
| Site generator function | rmarkdown::default_site() |
bookdown::bookdown_site |
index.Rmd |
home page | First Chapter and YAML that will apply to all pages |
| Rmd files | More independent; contains YAML of their own; |
Start with first-level heading (e.g., # Introduction); do NOT have any YAML; |
References:
R scripts
If you have R code that you would like to share across multiple R Markdown documents within your site, you can create an R script (e.g., utils.R) and source it within your Rmd files. For example:
Shared Rmd snippets
You may have common fragments of R Markdown that you want to share across pages within your site. To share Rmd fragments, you should name them with a leading underscore (_), and then include them within their parent Rmd document using the child chunk option. For example:
about.Rmd:_chunk-opt.Rmd:<!-- Chunk option settings --> ```{r chunk-opt, include=FALSE} # set default chunk options opts_chunk$set(echo = TRUE, message=FALSE, fig.align="center", fig.pos = "H") opts <- options(knitr.kable.NA = "") ``` <!-- Other shared Rmd snippets --> ...The leading underscore (
_) is an indicator to the site generation engine that the Rmd is a partial document to be included in other documents, so it is not compiled as a standalone document during site rendering.
Workflow
Workflow: Edit your site, build it, then push and commit to GitHub to publish your changes online.
To render all of the pages in the website, you use the Build pane, which calls rmarkdown::render_site() to build and then preview the entire site.
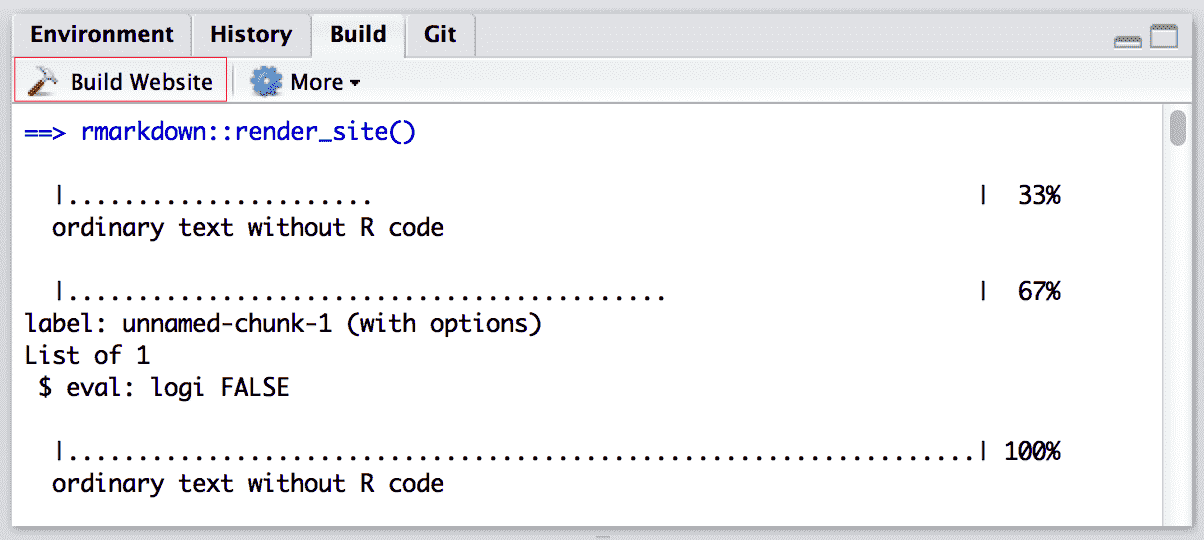
Figure 3.1: Build an entire website in RStudio.
As you work on the individual pages of your website, you can render them just as you do with conventional standalone R Markdown documents. This is useful when you want to preview a specific page without rendering the whole site, which can be time-consuming.
Two options to render individual pages:
Using the
Knitbutton just as you do with conventional standalone R Markdown documents.
Figure 3.2: Knit a single page of a website.
- Note that the
Knitbutton will callrmarkdown::render_site(input = "0100-RStudio.Rmd", output_format = "all"). - It will generate the html output in the
docs/directory as specified in_site.yml. - Knitting an individual page will only render and preview that page, not the other pages in the website.
- Note that the
Or using the command line
rmarkdown::render("0100-RStudio.Rmd").- It will generate the html output
RStudio.htmlin the current working directory. You can see it in the Output pane >Filestab. Click the file and chooseView in Web Browser.
- It will generate the html output
# render the entire site
rmarkdown::render_site()

# render a single file only
rmarkdown::render_site("about.Rmd")
To clean up all of the files generated via render_site(), you can call the clean_site() function, which will remove all files generated by rendering your site’s Markdown documents, including knitr’s *_cache directories. You can specify the preview = TRUE option to just list the files to be removed rather than actually removing them:
# list which files will be removed
rmarkdown::clean_site(preview = TRUE)

# actually remove the files
rmarkdown::clean_site()
References:
It is possible to control the behavior of the Knit button by providing the knit field within the YAML frontmatter of your document.
The field takes a function with the main argument input (the path to the input Rmd document) and other arguments that are currently ignored. You can either write the source code of the function directly in the knit field, or put the function elsewhere (e.g., in an R package) and call the function in the knit field.
---
knit: |
  (function(input, ...) {
    rmarkdown::render(
      input,
      output_file = paste0(
        xfun::sans_ext(input), '-', Sys.Date(), '.html'
      ),
      envir = globalenv()
    )
  })
---
Further readings:
If you want to have the pdf output, you add pdf_document to your document’s YAML after html_document. This way, your Rmd will supports multiple output format.
- When you click the
Knitbutton of runrmarkdown::render("0100-RStudio.Rmd"), it will use the first output format. You need to specify the output format you want in the second argument, callrmarkdown::render("0100-RStudio.Rmd", 'pdf_document') - More options can be passed by:
render("0207-Rmd-Table.Rmd",
bookdown::pdf_document2(
    latex_engine = "xelatex",
    keep_tex = TRUE,
    includes = includes(
       in_header = "latex/preamble.tex",
       before_body= "latex/before_body.tex"))
    )
# `output_options` is not compatible with output format function object
Note:
- Each time you run
rmarkdown::render_site(), thedocs/folder will be overwritten with updated HTML versions of your.Rmds. This means DON’T EVER EDIT FILES IN THEdocs/FOLDER! Nothing catastrophic will happen if you do, but you will overwrite and lose all your changes the next time you knit orrender_site(). - Don’t forget to update
index.Rmd(home page) and_site.yml(cross references filesinclude: ["w1.rmd", "w2.rmd"])- This will copy files into
docsso that you can put a downloadable link to them.
- This will copy files into
CSS Style
---
output:
  html_document:
    theme: cosmo
   # css: style.css # link to external CSS
---

<style type = "text/css">
h2 {
  color: red; /* internal CSS */
}
</style>

## R Markdown
When you want to change the style of certain element but don’t know where to start, open the html in Chrome, and go to View > Developer > Inspect Element to identify the corresponding elements.
Refer to your posts using relative links
If you have a Markdown file in your repository at docs/project1.html, and you want to link from that file to docs/another-page.md, you can do so with the following markup:
When you view the source file on GitHub.com, the relative link will continue to work, but now, when you publish that file using GitHub Pages, the link will be silently translated to docs/another-page.html to match the target page’s published URL.
Link to another file
TOC on home page:
- source code: https://github.com/lmullen/rmd-notebook/blob/master/index.Rmd
- webpage: https://lmullen.github.io/rmd-notebook/
# replacing with the following options
# {r TOC, echo=FALSE, results='asis'}
rmd <- Sys.glob("*.[Rr]md")
rmd <- rmd[!rmd %in% c("index.Rmd", "about.Rmd")]
html <- sub(".Rmd", ".html", rmd)
lines <- lapply(rmd, readLines)
yaml <- lapply(lines, rmarkdown:::parse_yaml_front_matter)
cat("<ul>")
for (i in seq_along(rmd)) {
  cat(paste0("<li><a href='", html[i], "'>", yaml[[i]]$title, "</a><br/>",
             "<code>", rmd[i], "</code>", "</li>"))
}
cat("</ul>")
Project website:
rmarkdown’s site generator, R Markdown: The Definitive Guide, https://bookdown.org/yihui/rmarkdown/rmarkdown-site.html
Structure: https://www.storybench.org/convert-google-doc-rmarkdown-publish-github-pages/
Multi-page website: https://phuston.github.io/patrickandfrantonarethebestninjas/howto
Blogdown: https://github.com/liuyanguu/Blogdown?tab=readme-ov-file
Bookdown Notes for One Course:
https://github.com/bcallaway11/econ_4750_notes
https://bcallaway11.github.io/econ_4750_notes/law-of-iterated-expectations.html#